Plump Pumpkin Doll
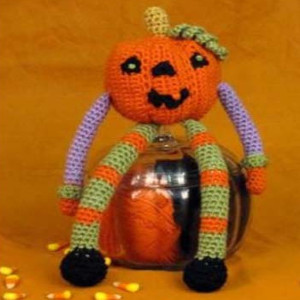
Imagine this Plump Pumpkin Doll sitting on your mantel, surrounded by candy corn. Wouldn't he look cute? Learn how to crochet a doll that you can use to decorate this Halloween. This punky little pumpkin is a free Halloween crochet pattern, so don't pass him up! With long candy-colored legs and a little leaf beret, he's hard to resist. This is one Halloween decoration that won't scare little kids. In fact, they'll want to hug this friendly jack o'lantern.

Crochet HookG/6 or 4 mm hook
Yarn Weight(4) Medium Weight/Worsted Weight and Aran (16-20 stitches to 4 inches)
MATERIALS:
-
Everyday Soft Worsted Solids by Premier Yarns: ED100-22 Bittersweet (A) – 1 ball, ED100-20 Orchid (B) – 1 ball, ED100-14 Caramel (C) – 1 ball, ED100-15 Sagebrush (D) – 1 ball, ED100-12 Black (E) – 1 ball
-
G/6 or 4 mm hook
SIZE:
Approximately 14.5” tall.
GAUGE:
4 sc and 4 rnds = 1” in sc. Use any size hook necessary to obtain the specified gauge.
PUMPKIN:
Beg at side with A, ch 19.
Row 1: Sc in second ch from hook and each ch across; turn – 18 sc.
Rows 2-5: Ch 1, sc in each sc across; turn.
Row 6: Ch 1, sc2tog across; turn–9 sc.
Row 7: Ch 1, sc in each sc across; turn.
Row 8: Ch 1, 2 sc in each sc across; turn–18 sc.
Rows 9-13: Ch 1, sc in each sc across; turn.
Rows 14-53: Rep Rows 6-13.
Row 54: Rep Row 6.
Row 55: Rep Row 7.
Row 56: Rep Row 8; do not fasten off, turn to work across sides of rows.
Top of Pumpkin—
Row 1: Sc in side of each row across; turn–56 sc.
Row 2: Ch 1, sc2tog across; turn–28 sc.
Row 3: Ch 1, sc2tog across –14 sc; fasten off, leaving an 18” end.
Thread end through yarn needle and weave through rem 14 sts of Row 3; pull to draw close opening. Use this endto also close up any holes from decreasing.
Bottom of Pumpkin—
Row 1: Working along remaining side edges, join A with a sl st in end of first row, ch 1, sc in same row as joining and in end of each row across– 56 sc.
Rows 2 and 3: Rep Rows 2 and 3 of Top of Pumpkin, leaving a 24” end. Use this end to close opening in same manner and to sew back seam, stuffing before closing completely to form pumpkin head.
STEM:
With B, ch 2.
Rnd 1: 6 sc in second ch from hook; do not join rnd, place a marker in last st and move marker up with each rnd.
Rnd 2: 2 sc in each sc around – 12 sc.
Rnd 3: Working in back lps only for this rnd, sc in each sc around.
Rnds 4-7: Sc in each sc around; fasten off, leaving a 12” end. Stuff Stem and use end to sew to top of Pumpkin.
EYE (Make 2):
With E, ch 4.
Row 1: Sl st in second ch from hook and each rem ch across; turn.
Row 2: Ch 1, d raw up lp in each sl st across, yo and pull through all 4 lps on hook; Fasten off, leaving a 12” end. Use end to sew Eye in place. Use D to embroider a French knot in center of each eye.
NOSE:
With E, ch 4.
Row 1: Sc in second ch from hook, 3 sc in next sc, sc in last sc; fasten off, leaving a 12” end. Use end to sew Nose in place.
MOUTH:
With E, ch 6.
Row 1: Sc in second ch from hook, 2 hdc in each of next 3 ch, sc in last ch; fssten off, leaving a 12” end. Sew Mouth in place in desired position on Pumpkin. Use A to e mbroider two teeth in satin stitch, using photo as a guide.
STEM CURLS:
With D, [ch 15, work 2 sc in second ch from hook and each ch across] twice; fasten off. Sew curls in place by stem.
ARM (Make 2):
With A, ch 2.
Rnd 1: 7 sc in second ch from hook – 7 sc.
Rnd 2-6: Sc in each sc around, changing to B in last sc of Rnd 6.
Rnds 7-25: Sc in each sc around, stuffing lightly as work progresses; fasten off at end of Rnd 25. Sew Arm in place on each side of Head.
CUFF (Make 2):
With D, ch 9.
Row 1: Sc in second ch from hook and in each ch across; turn.
Rows 2-4: Ch 1, sc in each sc across; turn. Fasten off at end of Row 4 and sew Cuff in place on each Arm.
LEG (Make 2):
With E, ch 2.
Rnd 1: 6 sc in second ch from hook –6 sc.
Rnd 2: 2 sc in each sc around – 12 sc.
Rnd 3: * Sc in next sc, 2 sc in next sc; rep from * a round–18 sc.
Rnd 4: Sc in each back lp of each sc around.
Rnd 5: Sc in each sc around.
Rnd 6: Sc2tog around –9 sc.
Rnd 7: Sc in each sc around, changing to D in last sc.
Rnds 8-13: Sc in each sc around, changing to A in last sc of Rnd 13 and stuffing lightly as work progresses.
Rnds 14-16: Sc in each sc around, changing to D in last st of Rnd 16.
Rnds 17-40:Rep Rnds 8-16 twice, then rep Rnds 8-13 once more. Fasten off and sew each Leg in place on bottom of Pumpkin.
Read NextStriped Duffle Bag
Your Recently Viewed Projects
Thanks for your comment. Don't forget to share!
JaneEK
Oct 10, 2017
I looked on the Premier site for this project but couldnt find it. It is an easy project since its just mostly a ball and tubes. It doesnt look especially hard to assemble as the project photo is clear enough to see most of the details. Id almost be inclined to just embroider the features instead of working them in crochet and then sewing them on. And wouldnt this make a cute lovey for a Halloween baby?
Report Inappropriate Comment
Are you sure you would like to report this comment? It will be flagged for our moderators to take action.
Thank you for taking the time to improve the content on our site.