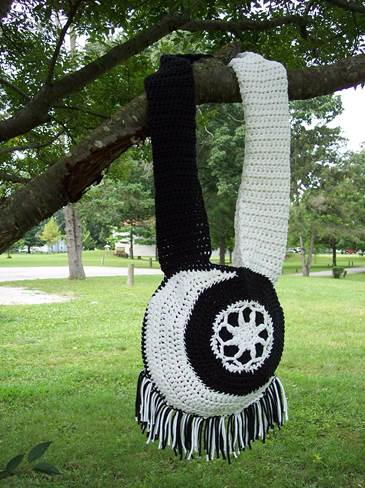
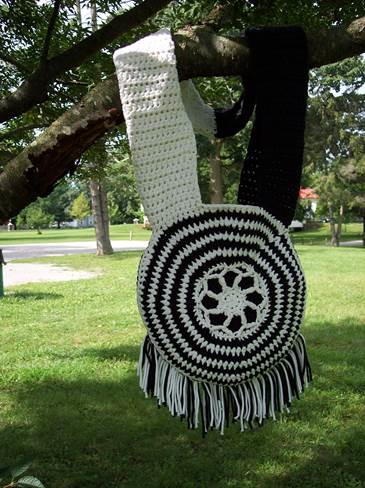
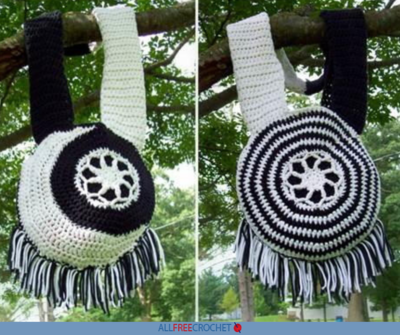
Moon and Sun Crochet Boho Bag Pattern (Free)
This crochet crossbody bag pattern is laid back yet stylish, which is the best of both worlds.
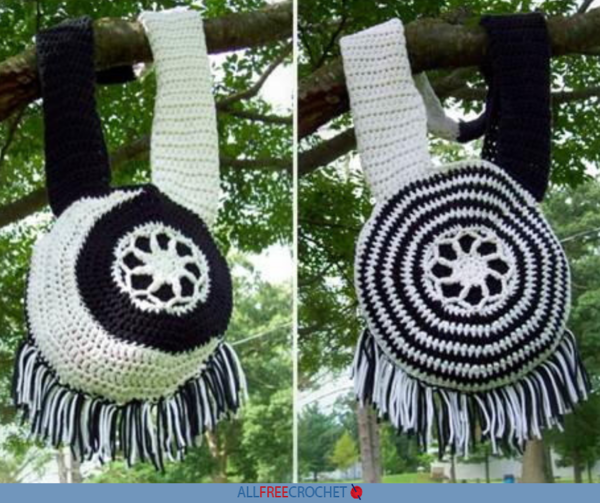
For all the boho lovers out there, this one's for you! The Moon and Sun Crochet Boho Bag Pattern is a free crochet bag pattern that is worked in parts: the front part featuring the mandala sun and moon, the back of the bag, and thick, wide straps.
This crochet boho bag pattern is an easy project that uses a soft, chunky yarn to achieve its sturdiness and softness. Easy to work up and machine washable, this boho beauty will hold all of your essentials as you take advantage of the cooler fall and winter weather this season. Choose any two colors to make a bag that matches your own personal style.
Hang it over your shoulder or use it as a crossbody bag pattern for the best hands-free and hassle-free carryall. The bohemian style of the two sides is perfect for anyone who loves stylish and artistic designs. Because this is an easy pattern, nearly any crocheter can make this awesome crochet bag.

Crochet HookK/10.5 or 6.5 mm hook
Yarn Weight(5) Bulky/Chunky (12-15 stitches for 4 inches)
Materials List
- 6.5 MM crochet hook
- Yarn needle
- Two colors of Bernat Fashion Maker Yarn - Bulky 5- 2 skeins of black and 2 skeins of white. (a total of 504 yards)
Free Boho Bag Pattern
Mandala Sun/Center of Moon/Front of Bag Pattern:
Click on any image to enlarge.
-
Round 1: Using the White, make a Magic Circle. CH 1. 8 HDC into Magic Circle. Pull your ring tight. Join to first HDC. (8 HDC)
-
Round 2: CH 1. *SC into next stitch. CH 4. Skip 1 CH. Slip stitch into next 3 CH. SC into same stitch.
(This puts 2 SC into each HDC from round 1, with the CH and slip stitch between stitches.) Repeat from * 7 more times. Join to first SC. (16 SC)
Finish off. Attach black yarn to the back loop of a SC to the left of CH and slip stitch. -
Round 3: CH 1. 2 HDC into first stitch. 1 HDC into next stitch. Keep the white CH/Slip stitch pushed to the front of your project. *2 HDC into next stitch. 1 HDC into next stitch. Repeat from * 6 more times. Join to first HDC. (24 HDC)
-
Round 4: CH 1. 2 HDC into the first stitch. HDC 1 time into each of the next 2 stitches. *2 SC into the next stitch. 1 SC into each of the next 2 stitches. Repeat from * 6 more times. Join to first HDC. (32 HDC)
-
Round 5: CH 1. HDC into the first stitch. SC into the skipped CH at the end of the CH/slip stitch from round 2. * HDC into each of the next 4 stitches. SC into the skipped CH at the end of the CH/slip stitch from round 2. Repeat from * 6 more times. HDC into last 3 stitches. Join to your first SC. ( 32 HDC, 8 SC )
Finish off. Attach white yarn into one of the SC. -
Round 6: CH 1. SC into same stitch. 1 SC into each of the next 2 stitches. FPDC around the previous CH/Slip from Round 2. FPDC around the next CH/Slip stitch from round 2. * 1 SC into each of the next 5 stitches (do not skip any stitches). FPDC around the previous CH/Slip from Round 2. FPDC around the next CH/Slip stitch from round 2. Repeat from * 6 more times. SC into the last 2 stitches. Join to first SC. (56 stitches)
Finish off. Attach black yarn into the back loop of any stitch. -
Round 7: CH 1. 1 HDC into the back loop of each stitch around. Join to first HDC. (56 HDC)
-
Round 8: CH 1. 2 HDC into the first stitch. 1 HDC into each of the next 6 stitches. *2 HDC into the next stitch. 1 HDC into each of the next 6 stitches. Repeat from * 6 more times. Join to first HDC. (64 HDC)
-
Round 9: CH 1. 2 HDC into the first stitch. 1 HDC into each of the next 7 stitches. *2 HDC into the next stitch. 1 HDC into each of the next 7 stitches. Repeat from * 6 more times. Join to first HDC. (72 HDC)
-
Round 10: CH 1. 2 HDC into the first stitch. 1 HDC into each of the next 8 stitches. *2 HDC into the next stitch. 1 HDC into each of the next 8 stitches. Repeat from * 6 more times. Join to first HDC. (80 HDC)
Finish off and set aside.
Moon Pattern:
-
Row 1: CH 47. Turn. Skip 1 CH. SC into next 8 CH. 2 HDC into the next CH. *DC into the next 6 CH. 2 DC into the next CH. Repeat from * 3 more times. 2 HDC into the next CH. SC into the last 8 CH. (52 stitches)
-
Row 2: Turn. Slip stitch into first 3 stitches. SC into next 8 stitches. HDC into next stitch. *DC into next 6 stitches. 2 DC into next stitch. Repeat from * 3 more times. HDC into next stitch. SC into next 8 stitches. Slip stitch into next stitch. (54 stitches)
-
Row 3: Turn. Skip first stitch. Slip stitch into next 2 stitches. SC into the next stitch. HDC into next stitch. *2 DC into the next stitch. 1 DC into next 9 stitches. Repeat from * 3 more times. HDC into the next stitch. SC into the next 2 stitches. Slip stitch into the next stitch. (52 Stitches)
-
Row 4: Turn. Skip first stitch. Slip stitch into each of the next 3 stitches. SC into each of the next 2 stitches. 2 HDC into next stitch. *DC into each of the next 5 stitches. 2 DC into next stitch. Repeat from * 3 more times. DC into each of the next 5 stitches. 2 HDC into next stitch. SC into next 2 stitches. Slip stitch into next stitch. (51 stitches)
-
Row 5: Turn. Skip first stitch. Slip stitch into next 6 stitches. SC into each of the next 2 stitches. HDC into next stitch. 2 DC into next stitch. *DC into next 4 stitches. 2 DC into next stitch. Repeat from * 4 more times. HDC into next stitch. SC into next 2 stitches. Slip stitch into next stitch. (40 stitches)
-
Finish off. Attach your two pieces using a yarn needle and the whip stitch.
With Black yarn, Attach yarn to the outer edge. HDC into each stitch around the entire edge after your pieces are joined. I have a total of 108 stitches.
The Dizzy Sun/Back of Bag Pattern:
(I rotated between black and white after round 6. I did not cut the yarn. I would just drop it, and put a stitch marker on it. Switch colors between rounds.)
-
Round 1: Using the White, make a Magic Circle. CH 1. 8 HDC into Magic Circle. Pull your ring tight. Join to first HDC. (8 HDC)
-
Round 2: CH 1. *SC into next stitch. CH 4. Skip 1 CH. Slip stitch into next 3 CH. SC into same stitch.
(This puts 2 SC into each HDC from round 1, with the CH and slip stitch between stitches.) Repeat from * 7 more times. Join to first SC. (16 SC)
Finish off. Attach black yarn to the back loop of a SC to the left of CH and slip stitch. -
Round 3: CH 1. 2 HDC into first stitch. 1 HDC into next stitch. Keep the white CH/Slip stitch pushed to the front of your project. *2 HDC into next stitch. 1 HDC into next stitch. Repeat from * 6 more times. Join to first HDC. (24 HDC)
-
Round 4: CH 1. 2 HDC into the first stitch. HDC 1 time into each of the next 2 stitches. *2 SC into the next stitch. 1 SC into each of the next 2 stitches. Repeat from * 6 more times. Join to first HDC. (32 HDC)
-
Round 5: CH 1. HDC into the first stitch. SC into the skipped CH at the end of the CH/slip stitch from round 2. * HDC into each of the next 4 stitches. SC into the skipped CH at the end of the CH/slip stitch from round 2. Repeat from * 6 more times. HDC into last 3 stitches. Join to your first SC. ( 32 HDC, 8 SC )
Finish off. Attach white yarn into one of the SC. -
Round 6: CH 1. SC into same stitch. 1 SC into each of the next 2 stitches. FPDC around the previous CH/Slip from Round 2. FPDC around the next CH/Slip stitch from round 2. * 1 SC into each of the next 5 stitches (do not skip any stitches). FPDC around the previous CH/Slip from Round 2. FPDC around the next CH/Slip stitch from round 2. Repeat from * 6 more times. SC into the last 2 stitches. Join to first SC. (56 stitches)
This is where I started rotating my colors at the beginning of each round. Using a stitch marker and without finishing off. -
Round 7: CH 1. 1 HDC into the back loop of each stitch. Join to first HDC.
-
Round 8: CH 1. 2 HDC into the first HDC. 1 HDC into each of the next 6 HDC. *2 HDC into the next HDC. 1 HDC into each of the next 6 HDC. Repeat from * 6 more times. Join to first HDC. (64 HDC)
-
Round 9: CH 1. 2 HDC into the first HDC. 1 HDC into each of the next 7 HDC. *2 HDC into the next HDC. 1 HDC into each of the next 7 HDC. Repeat from * 6 more times. Join to first HDC. (72 HDC)
-
Round 10: CH 1. 2 HDC into the first HDC. 1 HDC into each of the next 8 HDC. *2 HDC into the next HDC. 1 HDC into each of the next 8 HDC. Repeat from * 6 more times. Join to first HDC. (80 HDC)
-
Round 11: CH 1. 2 HDC into the first HDC. 1 HDC into each of the next 9 HDC. *2 HDC into the next HDC. 1 HDC into each of the next 9 HDC. Repeat from * 6 more times. Join to first HDC. (88 HDC)
-
Round 12: CH 1. 2 HDC into the first HDC. 1 HDC into each of the next 10 HDC. *2 HDC into the next HDC. 1 HDC into each of the next 10 HDC. Repeat from * 6 more times. Join to first HDC. (96 HDC)
-
Round 13: CH 1. 1 HDC into each stitch around. Join to first HDC. (finish off if you are rotating colors)
-
Round 14: CH 1. 2 HDC into the first HDC. 1 HDC into each of the next 7 HDC. *2 HDC into the next HDC. 1 HDC into each of the next 7 HDC. Repeat from * 10 more times. Join to first HDC. (108 HDC)
-
Finish off leaving a tail of about 5 feet. You will use this yarn end and your yarn needle to whip stitch the two sides of your bag together. Leaving the pretty sides of each piece facing out. You will want to watch the placement of your moon, to make sure it's where you want it on your bag. You will leave an opening at the top of 30 stitches on both sides.
Bag Strap Pattern:
The strap will be starting off and ending as a flat piece. The flat ends will be the part we attach to both left and right sides of your bag opening. We will make the rest of the bag strap in rounds, tubular shaped, for comfort while carrying.
You can change colors anytime on the strap. Leave it solid, or mix it up for fun!
I started with black yarn.
-
Row 1: CH 23. Skip 1 CH. 1 HDC into each of the next 22 CH.
-
Row 2-12: CH 1. Turn. 1 HDC into each of the 22 HDC.
-
Row 13-46: CH 1.Turn. 1 HDC into each of the 22 HDC. Join to first HDC. I switched to white yarn.
-
Row 47-80: CH 1.Turn. 1 HDC into each of the 22 HDC. Join to first HDC.
-
Row 81- 82: CH 1. Turn. 1 HDC into each of the 22 HDC. DO NOT JOIN.
-
Finish off leaving a tail for attaching to your bag.
Attach both ends of the straps to the sides of the open on your bag.
Weave in all your ends.
Bottom Bag Fringe Directions:
Cut 72 strands that are 7 inches long.
Attach these across the bottom of your bag. You will be attaching two at a time.
To attach, you will fold 2 strands in half, put your hook through a stitch on the bottom of your bag. Hook onto the folded strands, pull the center of the folded strands through the stitch. Pull the ends of your strands through the loop you just made. Tug tightly and repeat across.
Abbreviations
- Ch
- Chain
- Sl st
- Slip stitch
- Sc
- Single crochet
- Hdc
- Half double crochet
- Dc
- Double crochet
- FPDC
- Front post double crochet
Which side of this crochet bag is your favorite?
Let us know in the comments!
Read NextSingle Skein Market Bag
Your Recently Viewed Projects
Thanks for your comment. Don't forget to share!
JaneEK
Mar 22, 2018
I really like this clever little bag, but Im not too sure about the black and white color choice. That would make much more sense for a Ying Yang motif than Sun and Moon. The instructions are nicely written but this post really, really suffers from a lack of photos. Each section is complex enough that it needs its own set of photos to guide the crafter.
Report Inappropriate Comment
Are you sure you would like to report this comment? It will be flagged for our moderators to take action.
Thank you for taking the time to improve the content on our site.