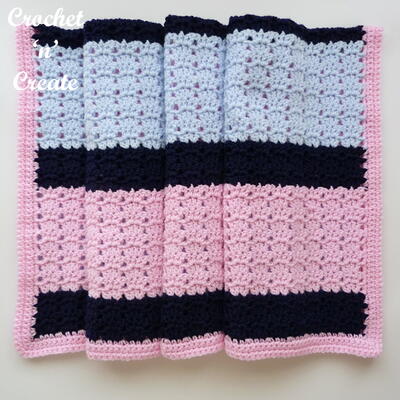
Cuddly Herringbone Crochet Blanket Pattern

Add some color to your home with this stunning Cuddly Herringbone Crochet Blanket Pattern. This cool-colored crochet afghan pattern is easy to make and features a vibrant diagonal line-design that will add excitement to any room! You can easily use the final project as a bed blanket or drape it over the back of a seat or couch. You can even make it as a gift item for someone who loves the color blue! Find out how easy this free crochet blanket pattern is to make and you'll have a fabulous piece of home decor in no time!
Notes1. Blanket is worked in 6 Strips worked from corner to corner. Strips are joined tog in Finishing.
2. To join new color, work to last loops on hook of previous color. Yoh with new color, draw through rem loops and proceed with new color.
3. Carry color not in use loosely up side of work.
4. While working Strips, be sure MC and A strands are always 2 different colors. If you reach a point where the 2 colors are the same, cut one strand and rejoin at next color change to maintain alternating stripes. You can re-attach the cut piece of yarn back at the end of the ball to avoid waste.

Crochet HookH/8 or 5 mm hook
Crochet Gauge12 sc and 13 rows = 4" [10 cm].
Finished SizeApprox 54" x 60"
Materials List
- Bernat® Blanket Breezy™ (8.8 oz/250 g; 530 yds/485 m)
- Main Color (MC) High Seas (70009) - 3 balls
- Contrast A Surfs Up (70008) - 2 balls
- Size U.S. H/8 (5 mm) crochet hook or size needed to obtain gauge.
Instructions
Strip (make 6 alike)
-
1st row: (RS). 2 sc in 2nd ch from hook. Turn.
-
2nd row: Ch 1. 2 sc in each of next 2 sc. Join A. Turn. 4 sc.
-
3rd row: With A, ch 1. 2 sc in first sc. 1 sc in each sc to last sc. 2 sc in last sc. Turn. 6 sc.
-
4th row: Ch 1. 2 sc in first sc. 1 sc in each sc to last sc. 2 sc in last sc. Join MC. Turn. 8 sc.
-
5th row: With MC, ch 1. 2 sc in first sc. 1 sc in each sc to last sc. 2 sc in last sc. Turn. 10 sc.
-
6th row: Ch 1. 2 sc in first sc. 1 sc in each sc to last sc. 2 sc in last sc. Join A. Turn. 12 sc. Rep 3rd to 6th rows 3 times more. Turn. 36 sc.
Body Section
-
1st row: (RS). With A, ch 1. Sc2tog. 1 sc in each sc to last sc. 2 sc in last sc. Turn.
-
2nd row: Ch 1. 2 sc in first sc. 1 sc in each sc to last 2 sc. Sc2tog. Join MC. Turn.
-
3rd row: With MC, ch 1. Sc2tog. 1 sc in each sc to last sc. 2 sc in last sc. Turn.
-
4th row: Ch 1. 2 sc in first sc. 1 sc in each sc to last 2 sc. Sc2tog. Join A. Turn.
-
Rep 1st to 4th rows until longest side edge measures approx 54" [137 cm], ending on a 2nd row rep.
Dec Section
-
1st row: (RS). With MC, ch 1. Sc2tog. 1 sc in each sc to last 2 sc. Sc2tog. Turn. 34 sc.
-
2nd row: Ch 1. Sc2tog. 1 sc in each sc to last 2 sc. Sc2tog. Join A. Turn. 32 sc.
-
3rd row: With A, ch 1. Sc2tog. 1 sc in each sc to last 2 sc. Sc2tog. Turn. 30 sc.
-
4th row: Ch 1. Sc2tog. 1 sc in each sc to last 2 sc. Sc2tog. Join MC. Turn. 28 sc.
-
Rep 1st to 4th rows 3 times more. 4 sc.
-
Next row: With MC, ch 1. Sc2tog twice. Turn. 2 sc.
-
Next row: Ch 1. Sc2tog. Fasten off.
Finishing
-
Joining: With MC, sew Strips tog as seen in Assembly Diagram, enclosing yarn carried up side of work and noting RS and WS are alternated to form chevron pat.
-
Bottom Edging: With RS facing, join MC with sl st at bottom left corner of Blanket.
1st row: (RS). Ch 1. Work 1 row of sc evenly across. Turn.
2nd row: Ch 1. 1 sc in each sc to end of row. Turn. Rep 2nd row 8 times more. Fasten off. -
Top Edging: With RS facing, join MC with sl st to top right corner of Blanket.
Work as given for Bottom Edging. -
Fringe: Cut strands of MC 10" [25.5 cm] long. Taking 3 strands tog, fold in half and knot into fringe in every other st across Bottom and Top Edging. Trim fringe evenly.
Abbreviations
- Yoh
- Yarn over hook
- WS
- Wrong side
- Tog
- Together
- Sc2(3)tog
- Draw up a loop in each of next 2 (3) stitches. Yoh and draw through all loops on hook.
- Beg
- Beginning
- Cont
- Continue
- Dec
- Decrease
- Inc
- Increase
- Rem
- Remaining
- Rep
- Repeat
Your Recently Viewed Projects
Thanks for your comment. Don't forget to share!
neeniejan
Jun 10, 2019
There is no designation as to how many chains to make for foundation row...
Report Inappropriate Comment
Are you sure you would like to report this comment? It will be flagged for our moderators to take action.
Thank you for taking the time to improve the content on our site.