This project was submitted by one of our readers, just like you.
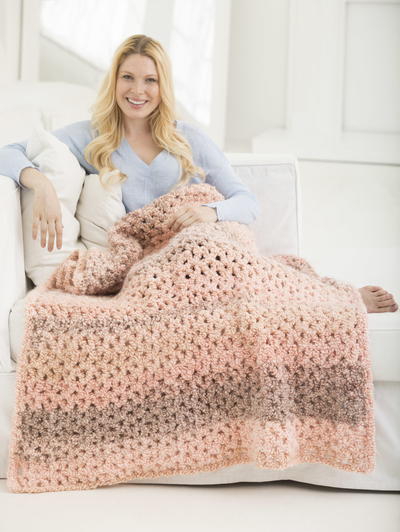
Crochet Fireside Throw Blanket

Crochet Fireside Throw Blanket
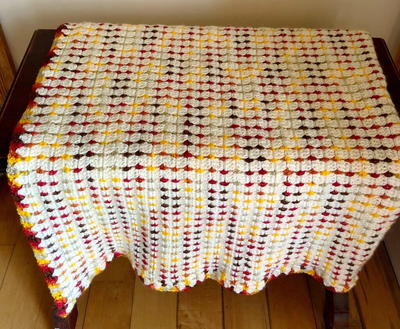
"This crochet fireside throw blanket will look so beautiful this fall. The colors remind me of an autumn sunset or a warm fire burning in the fireplace. I love to use crochet items that are useful to help bring the colors of the season into my home decor. Have you ever stood in the yarn store or in your yarn stash and let your yarn tell you what your next project will be? I do that often. Sometimes, I will have a project that I plan on doing; look through my yarn stash, and end up making something completely different. Seems crazy, right? At times, when digging through the yarn, a color combination will jump out at me and gives me inspiration. This blanket is made using the block stitch that has been slightly modified. In the past, when I have crocheted the block stitch, alternating the yarn colors every other row left a ton of yarn ends to be weaved in. Therefore, while I love the look of the block stitch, the sewing in of the yarn ends made me veer away from this beautiful stitch. Carry the Yarn up the Side of the Blanket! Yup, no more weaving in tons of yarn with each color change. It was not easy to figure out."
NotesCarry the Yarn up the Side of the Blanket!
Yup, no more weaving in tons of yarn with each color change.

Crochet HookH/8 or 5 mm hook
Yarn Weight(4) Medium Weight/Worsted Weight and Aran (16-20 stitches to 4 inches)
Crochet GaugeThis throw is approximately 34 inches wide X 44 inches long.
There are 126 rows of crochet with 2 rounds for the border.
To change the length of this pattern, increase or decrease the rows. When changing the width of the blanket, increase or decrease the beginning chain. The pattern is worked in multiples of 3 plus 1. That means that the initial row of chains needs to be divisible by 3, then add 1 more stitch. This blanket is 135 chains plus 1 for a total of 136 chains.
Finished SizeThis throw is approximately 34 inches wide X 44 inches long.
Materials List
- 3 Skeins of Yarnspirations Caron Simply Soft Sunset Autumn. There will be some left over. Total yarn needed 670 yards.
- 4 Skeins of Yarnspirations Caron Simply Soft Off White. There will be some left over. Total yarn needed 1,245 yards.
- If you used all one color of yarn for this crochet blanket, plan on 7 skeins of yarn approximately 1.915 yards.
- Size H 5.0 mm Crochet Hook
- Scissors
- Yarn Needle
Instructions
-
CH 136
-
Row 1: With the Sunset Autumn SC in the 2nd CH from the hook and in the next CH stitch. [CH 2, SK 2, SC in next ST] repeat between the [ and ] across the row. End with SC in the last ST.
-
Row 2: Change yarn color to the Off White***do not snip off the Sunset Autumn yarn***watch the video to see how I carry the yarn up the side. CH 3 which counts as a DC ST. [3 DC in each CH 2 SP] repeat between the [ and ] across the row. End with 1 DC in the last ST.
-
Row 3: Change yarn color – CH 1, SC in first ST and next ST, [CH 2, SC between the previous row 3 DC groupings] repeat between the [ and ] across the row. End with SC in the last ST just before the loop of the off white yarn. Change the yarn bringing the new color through the loop, tighten the loop and complete a SC in the last ST.
***Remember this is shown on the video tutorial*** -
Repeat rows 2 and 3 to desired length ending with the row 2 pattern.
Crocheting the Border
-
Round 1: Join off white yarn in a corner where you ended the blanket stitches, CH 3, 2 DC. continue to do the 3 DC in each CH 2 SP. In the first corner complete 2 sets of 3 DC then continue up the first side – complete 3 DC in each of the off white rows. For the second corner complete 2 sets of 3 DC, continue to do the 3 DC in each CH 2 SP. In the third corner complete 2 sets of 3 DC, continue up the last side completing 3 DC in each of the off white rows. In the fourth corner – which is the one you started in; end with 3 DC and a SL ST into the top ST of the first CH 3. Bring the yarn through the last loop to secure.
-
Cut the yarn leaving a long tail to be weaved in.
-
Finishing: Weave in all – very few- yarn ends and cut off excess yarn.

Read NextMarch Interlocking Square