This project was submitted by one of our readers, just like you.
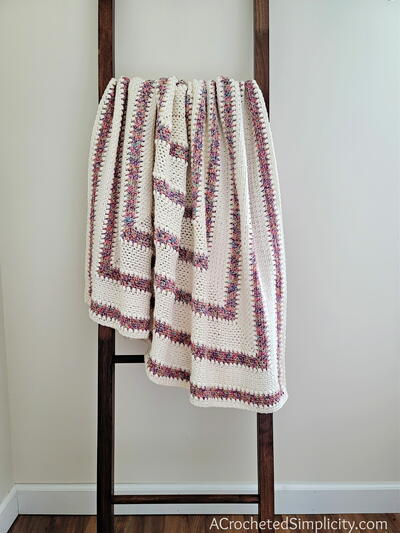
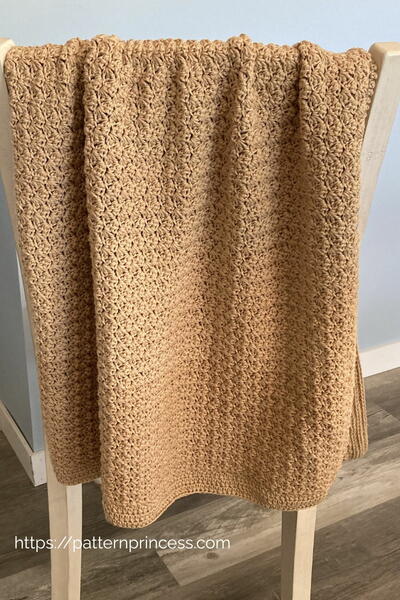
Cozy Man Cave Throw

Cozy Man Cave Throw
"This Cozy Man Cave Throw can be made in a few weekends. This crochet pattern includes the full directions and video tutorials. It seems like finding a feminine and lacy crochet pattern can be found in a moment. However, if you are like me, you may have noticed it is hard to find stylish patterns for the male in your life. Make this crochet throw to show him you care with a homemade afghan. Whether he is lucky enough to have a man cave or just that favorite chair, he can use the throw to relax. The feel of the edge is just luxurious and it really helped pull the entire design together."
NotesI know some people prefer and video, some like just the written directions, and other folks like to have a photo tutorial. It is my hope that I have included enough variety to help everyone learn how to make this beautiful crochet pattern.

Crochet HookH/8 or 5 mm hook
Yarn Weight(4) Medium Weight/Worsted Weight and Aran (16-20 stitches to 4 inches)
Crochet GaugeGauge is not critical to this pattern.
Finished Size28 inches wide by 42 inches long with the border. The border itself is approximately 1 inch wide. To make this throw larger or smaller, work the beginning row in multiples of 3 plus 1.
Materials List
- 4 Skeins Caron Simply Soft Tweeds Gray Heather about 850 yards
- 1 Skein Caron Simply Soft White about 250 yards
- Size H Crochet Hook
- Yarn Needle
- Scissors
Instructions
-
Starting with the Gray Heather Tweed yarn, Chain 128
-
Row 1: in the 4th CH from the hook, complete a HDC. SK 2 ST in the next ST [HDC, CH 1, HDC, SK 2 ST] repeat between the [ ] to the end. Ending with a HDC in the last ST.
-
Row 2: CH 2, [HDC, CH 1, HDC in the previous row CH 1 SP]. Repeat the Stitches between the [ ] in each previous row CH 1 SP to the end. Ending with a HDC in the last ST.
-
Repeat row 2: For my throw. Here is the color pattern that I used.
Rows 1-6 Gray Heather Tweed (6 rows)
Rows 7-8 White (2 rows)
Rows 9-10 Gray Heather Tweed (2 rows)
Rows 11-12 White (2 rows)
Rows 13-18 Gray Heather Tweed (6 rows)
Row 19 White (1 row)
Rows 20-24 Gray Heather Tweed (5 rows)
Rows 25-26 White (2 rows)
Rows 27-28 Gray Heather Tweed (2 rows)
Rows 29-30 White (2 rows)
Rows 31-36 Gray Heather Tweed (6 rows)
Row 37 White (1 row)
Rows 38-42 Gray Heather Tweed (5 rows)
Rows 43-44 White (2 rows)
Rows 45-46 Gray Heather Tweed (2 rows)
Rows 47-48 White (2 rows)
Rows 49-54 Gray Heather Tweed (6 rows)
Row 55 White (1 row)
Rows 56-60 Gray Heather Tweed (5 rows)
Rows 61-62 White (2 rows)
Rows 63-64 Gray Heather Tweed (2 rows)
Rows 65-66 White (2 rows)
Rows 67-72 Gray Heather Tweed (6 rows)
Row 73 White (1 row)
Rows 74-78 Gray Heather Tweed (5 rows)
Rows 79-80 White (2 rows)
Rows 81-82 Gray Heather Tweed (2 rows)
Rows 83-84 White (2 rows)
Rows 85-90 Gray Heather Tweed (6 rows)
Row 91 White (1 row)
Rows 92-96 Gray Heather Tweed (5 rows)
Rows 97-98 White (2 rows)
Rows 99-100 Gray Heather Tweed (2 rows)
Rows 101-102 White (2 rows)
Rows 103-108 Gray Heather Tweed (6 rows)
Border
Weave in ends prior to starting the border. Trim off any excess yarn. Once this is done, you are ready to add the border. Begin with the Gray Heather Tweed yarn.
-
Round 1: Starting in one of the corners and chain 3. DC around the entire blanket, working 3 DC into each corner ending with a SL ST into the top CH of the first chain 3.
-
Change to the White yarn.
Round 2: Start with a CH 3. Then go around the blanket again; however, this time, you will work the DC alternating between the front and back post. -
Change back to the Gray Heather Tweed yarn.
Round 3: Start with a CH 3. Then go around the blanket again; however, this time, you will work the DC alternating between the front and back post. See more detail below for the corners… -
Corners: When you get to the corners, continue to work 3 DC into the middle DC ST from the previous row. However, on the other two stitches from the previous row DCs in the corner – blend those into the FPDC and BPDC. See the photos of the corners to help show the detail.

Read NextSomething New Baby Blanket