Santa's Helpers Aprons
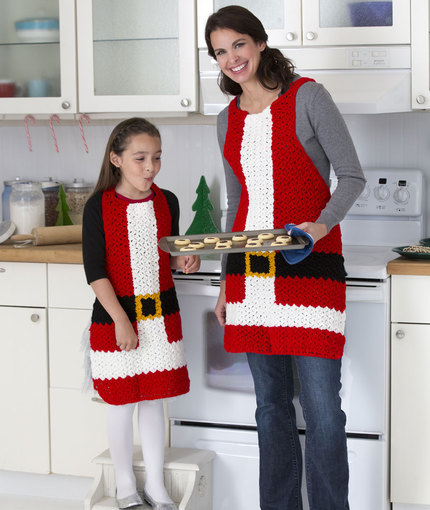
You'll get right to work in the kitchen with Santa's Helpers Aprons. This super fun Christmas crochet pattern is made in two sizes so that you can have an adult and child helper at the same time. These crochet aprons really will add some extra Christmas cheer to the kitchen, especially if you're working up Santa's favorite chocolate chip cookies. Set them out just in time for him to snatch them up and eat them when he comes down the chimney Christmas Eve.

Crochet HookI/9 or 5.5 mm hook
Yarn Weight(4) Medium Weight/Worsted Weight and Aran (16-20 stitches to 4 inches)
Crochet Gauge5 d-boxes = 4 (11 cm); 9 rows = 5 (13 cm) over pattern
Finished SizeDirections are for childrens size. Changes for adult size are in parentheses. Finished Width: 17 (24) [43 (61) cm], at widest. Finished Total Length: 25 (29) [65 (73.5) cm], not including ties.
Materials List
- RED HEART Super Saver: 2 skeins 319 Cherry Red A, 1 skein each 316 Soft White B, 312 Black C, and 321 Gold D
- Susan Bates Crochet Hook: 5.5mm [US I-9]
- Stitch Marker
- Yarn Needle
Notes
Special Stitches d-box (diagonal box) = (2 dc, ch 2, sc) in indicated stitch or space.
2-dc Cl (2 double crochet cluster) = Yarn over, insert hook in next stitch, yarn over and pull up loop, yarn over, draw through 2 loops, yarn over, insert hook in same stitch, yarn over and pull up loop, yarn over, draw through 2 loops, yarn over, draw through all 3 loops on hook.
Notes
1. Apron is worked from lower edge upwards. Color changes are used to create fur trim, belt, and buckle.
2. Before beginning, wind B into 2 separate balls, and C and D into 3 separate balls each.
3. To change color, work last stitch of old color to last yarn over. Yarn over with new color and draw through all loops on hook to complete stitch. Proceed with new color. Fasten off old color.
Apron
With larger hook and A, ch 55 (76).
Row 1: (Dc, ch 2, sc) in 4th ch from hook (beginning ch counts as first dc first d-box made), *skip next 2 ch, d-box in next ch; repeat from * across, turn18 (25) d-boxes.
Rows 2-5: Ch 3, (dc, ch 2, sc) in first ch-2 space (first d-box made), d-box in each remaining ch-2 space across, turn; change to B in last st of Row 5.
Rows 6-11 (10): With B, repeat last row 6 (5) times; change to A in last st of last row. Note: In following rows use a separate ball of yarn for each section of color.
Row 12 (11)-16 (16): With A, ch 3, (dc, ch 2, sc) in first ch-2 space, d-box in next 6 (9) ch-2 spaces; change to B, d-box in next 4 (5) ch-2 spaces; change to A, d-box in last 7 (10) ch-2 spaces, turn; change to C in last st of last row.
Row 17: With C, ch 3, (dc, ch 2, sc) in first ch-2 space, d-box in next 6 (9) ch-2 spaces; change to D, d-box in next 4 (5) ch-2 spaces; change to C, d-box in last 7 (10) ch-2 spaces, turn.
Rows 18-20: With C, ch 3, (dc, ch 2, sc) in first ch-2 space, d-box in next 6 (9) ch-2 spaces; change to D, d-box in next ch-2 space; change to C, d-box in next 2 (3) ch-2 spaces; change to D, d-box in next ch-2 space; change to C, d-box in last 7 (10) ch-2 spaces, turn.
Row 21: Repeat Row 17; change to A in last st.
Rows 22-29 (33): With A, ch 3, (dc, ch 2, sc) in first ch-2 space, d-box in next 6 (9) ch-2 spaces; change to B, d-box in next 4 (5) ch-2 spaces; change to A, d-box in last 7 (10) ch-2 spaces, turn. Place a stitch marker at beginning and end of last row, for placement of waist ties.
Shape Sides
Row 30 (34) (decrease): With A, slip st in each ch of first ch-2 space, slip st in next 2 dc, ch 3, (dc, ch 2, sc) in next ch-2 space, d-box in next 5 (8) ch-2 spaces, place a marker in last ch-2 space made; change to B, d-box in next 4 (5) ch-2 spaces, place a marker in last ch-2 space made; change to A, d-box in each ch-2 space across to last ch-2 space, 2-dc Cl in last ch-2 space, turn16 (23) d-boxes.
Note: The markers added in Row 30 (34) indicate where the color change should occur. Move markers up to last ch-space of each color section, as each row is completed. Use of stitch markers in this manner is optional. If you can read your stitches, you may choose not to use markers.
Row 31 (35)-36 (46): With A, ch 3, (dc, ch 2, sc) in first ch-2 space, d-box in each ch-2 space to first marker; change to B, d-box in each ch-2 space to next marker; change to A, d-box in each ch-2 space across to last ch-2 space, 2-dc Cl in last ch-2 space, turn10 (11) d-boxes.
Bib
Rows 37 (47)-46 (52): With A, ch 3, (dc, ch 2, sc) in first ch-2 space, d-box in next 2 ch-2 spaces; change to B, d-box in next 4 (5) ch-2 spaces; change to A, d-box in last 3 ch-2 spaces, turn.
Remove the color change markers.
First Neck Tie
Row 1: With A, ch 3 (counts as dc here and throughout), dc in first ch-2 space, dc in next dc, turn.
Row 2: Ch 3, dc in next 2 dc, turn. Repeat Row 2 until tie measures about 9 (23cm). Fasten off.
Second Neck Tie
Row 1: Draw up a loop of A in opposite top corner of apron, ch 3, dc in next dc, dc in next ch-2 space, turn.
Row 2: Ch 3, dc in next 2 dc, turn. Repeat Row 2 until tie measures about 9 (23cm).
Fasten off.
Waist Ties
Row 1: Draw up a loop of A in edge of apron where marked to work down side of apron, ch 3 (counts as dc here and throughout), work 2 dc evenly spaced in edge of apron, turn3 dc. Row 2: Ch 3, dc in next 2 dc, turn. Repeat Row 2 until tie measures about 15 (38 cm). Fasten off. Repeat on other side edge for 2nd tie.
Finishing
Edging Draw up a loop of A in edge of apron at beginning of an A-colored section, sc evenly spaced all the way around the outer edge of the apron, changing color to match each section; join with slip st in first sc. Fasten off. Weave in ends.
Read NextMerry Spa Set
Your Recently Viewed Projects
Thanks for your comment. Don't forget to share!
Zeemer
Nov 25, 2016
These Santa's Helpers Aprons are perfect for mother and daughter twinning. Mother and daughter tandem can wear these aprons on Cnristmas day as they cook and prepare food in the kitchen for family and friends who will drop by to visit and to join in the celebration. Why not? I can make these aprons for my daughter and granddaughter. Santa's helpers will surely be a hit on Christmas Day.
lbaque 0821106
Oct 13, 2016
pattern states in special stitches that d-box is 2dc 2ch sc. yet in pattern you start off with Dc 2ch sc and it says 1st d-box made. Then you are supposed to d-box, is it 1dc or 2dc for d-box? thank you for your help. With 2dc it doesn't seem to work out right.
Report Inappropriate Comment
Are you sure you would like to report this comment? It will be flagged for our moderators to take action.
Thank you for taking the time to improve the content on our site.