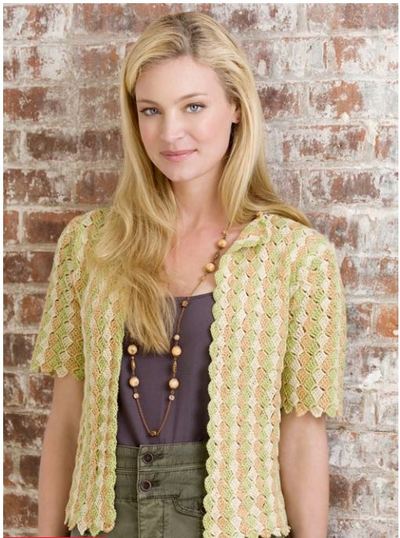
Short Puff Sleeve Jacket
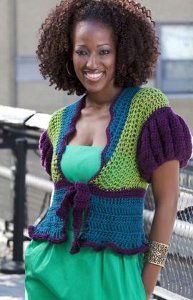
If you've never seen crochet jacket patterns for women, you must check out this Short Puff Sleeve Jacket from the Double Stitch twins. You can wear this jacket to complete your outfit on a nice summer day. The cluster stitch is used giving it a nice texture and feel.

Crochet HookI/9 or 5.5 mm hook
Yarn Weight(4) Medium Weight/Worsted Weight and Aran (16-20 stitches to 4 inches)
Directions are for size Small. Changes for sizes Medium, Large and Extra Large are in parentheses.
To fit bust: 34 (38, 42, 46)”
Finished Length: 19½ (19¾, 20, 21½)”
Note: Garment is not designed to meet at center front.
Materials:
- RED HEART® Soft:
- 2 (2, 3) balls 3729 Grape A
- 1 ball each of 9518 Teal B
- 4420 Guacamole C.
- Crochet Hook: 5.5mm [US I-9] or size needed for gauge.
- Stitch markers, yarn needle
GAUGE: 3 sts = 1”; 1¾ rows = 1” in dc. CHECK YOUR GAUGE. Use any size hook to obtain the gauge.
Special Abbreviations
Cluster = Yarn over, insert hook in next stitch, yarn over and pull up loop, yarn over, draw through 2 loops, [yarn over, insert hook in same stitch, yarn over and pull up loop, yarn over, draw through 2 loops] 4 times, yarn over, draw through all loops on hook. Sc2tog = [Draw up a loop in next st] twice, yarn over and draw through all 3 loops on hook.
Abbreviations: A, B, C = Color A, B, C; ch = chain; dc = double crochet; hdc = half double crochet; mm = millimeters; sc = single crochet; st(s) = stitch(es); tr = treble crochet; * or ** = repeat whatever follows the * or ** as indicated.
JACKET
Right Armhole
With A, ch 40 (42, 44, 46) slip st in first ch to form ring.
Round 1 (Armhole): Ch 3 (counts as dc), dc in each ch around, join with slip st to top of ch-3.
Upper Right Back
Row 1: Ch 3 (counts as dc), dc in next 19 (20, 21, 22) dcs, place marker in last st, turn—20 (21, 22, 23) dc.
Rows 2, 3, 5, 6, 7, 9, 10, 11: Ch 3 (counts as dc), dc in each dc across, turn.
Rows 4, 8 & 12: Ch 3 (counts as dc), *dc in next 2 dc, cluster in next dc, repeat from * to last 1 (2, 3, 1) sts, dc in last 1 (2, 3, 1) dc, turn.
Work 0 (1, 2, 3) more rows even in dc.
Next row: Ch 2 (counts as hdc), hdc in each dc across.
Fasten off.
Left Armhole and Upper Left Back
Make as for Right Armhole and Upper Right Back, but do not fasten off at the end of last row.
Join Upper Backs: Hold upper backs with right sides together. With A, sc in each dc of last rows of upper backs, working through both layers. Fasten off.
Sleeves
With right side facing, join A in any space between 2 dcs on Round 1 of armhole.
Round 1: Work all sts in this round in space between
Round-1 dcs. Ch 4 (counts as tr), 2 tr in same st, 3 tr in each dc around, join with slip st to top of ch-4—120 (126,
132, 138) tr.
Rounds 2-5: Ch 4 (counts as tr), tr in each tr around, join with slip st to top of ch-4.
Round 6: Ch 1, hdc in every other tr around, join with slip st to top of hdc—60 (63, 66, 69) hdc.
Round 7: Ch 2 (counts as hdc), hdc in next 0 (1, 2, 3) st(s), skip 1 hdc, *hdc in next hdc, skip 1 hdc; repeat from * to last 0 (0, 2, 4) sts, hdc in last 0 (0, 2, 4) sts, join—30 (32, 35, 38) hdc.
Round 8: Ch 1, sc in each hdc around, join with slip st to first sc. Fasten off.
Lower Back
With right side facing and B, join yarn to marker stitch at upper left back.
Row 1: Ch 3 (counts as dc), dc 51 (53, 55, 57) sts evenly across to second marked st, turn—52 (54, 56, 58) dc.
Row 2: Ch 3 (counts as dc), dc in each dc across, turn.
Row 3: Work as for Row 2, changing to C at end of row.
Cut B.
Rows 4-6: Ch 3 (counts as dc), dc in each dc across, turn.
Row 7: Ch 3 (counts as dc), dc in each dc across. Fasten off.
Right Front Bodice
With right side facing, join C to last stitch on row 6 of lower right back.
Row 1 (right side): Ch 3 (counts as dc), dc 11 sts evenly along edge of lower back to marked st; dc in remaining 20 (21, 22, 23) dc of right armhole, turn—32 (33, 34, 35) dc.
Remove marker.
Rows 2-6 (2-6, 2-8, 2-8): Ch 3 (counts as dc), dc in each dc across, turn.
Row 7 (7, 9, 9): Ch 3 (counts as dc), dc in each dc across, changing to B at end of row, turn. Cut C.
Row 8 (8, 10, 10) (wrong side): Ch 3 (counts as dc), dc in each dc to last 4 dc, turn—28 (29, 30, 31) dc.
Row 9 (9, 11, 11): Ch 3 (counts as dc), dc across.
Repeat last 2 rows once more—24 (25, 26, 27) dc.
Row 12 (12, 14, 14): Repeat Row 8 (8, 10, 10)—20 (21, 22, 23) dc.
Row 13 (13, 15, 15): Ch 1, sc in each dc across.
Join shoulders: Place markers 2 (2¼, 2½, 2½)” either side of center back seam for back neck. With right sides together, pin corner of right front bodice to marked st on right back. With A, slip st ends of rows together, easing in fullness on front shoulder.
Left Front Bodice
With wrong side facing, join C to first stitch on row 6 of lower back.
Row 1 (wrong side): Ch 3 (counts as dc), dc 11 sts evenly along edge of lower back to marked st; dc in remaining 20 (21, 22, 23) dc of left armhole, turn—32 (33, 34, 35) dc. remove marker.
Rows 2-6 (2-6, 2-8, 2-8): Ch 3 (counts as dc), dc in each dc across, turn.
Row 7 (7, 9, 9): Ch 3 (counts as dc), dc in each dc across, changing to B at end of row, turn. Cut C.
Row 8 (8, 10, 10) (right side): Ch 3 (counts as dc), dc in each dc to last 4 dc, turn—28 (29, 30, 31) dc.
Row 9 (9, 11, 11): Ch 3 (counts as dc), dc across.
Repeat last 2 rows once more—24 (25, 26, 27) dc.
Row 12 (12, 14, 14): Repeat Row 8 (8, 10, 10)—20 (21, 22, 23) dc.
Row 13 (13, 15, 15): Ch 1, sc in each dc across. Join left shoulder as for right shoulder.
Waistband
With right side facing, join A to lower corner of left front bodice.
Row 1: Ch 1, sc 14 (14, 16, 16) evenly across lower edge of right front bodice, sc 52 (54, 56, 58) across lower back, and sc 14 (14, 16, 16) evenly across left front bodice to corner, turn—80 (82, 88, 90) sc.
Rows 2-4: Ch 1, sc in each sc across, turn.
Row 5: Ch 1, sc in each sc across; do not turn at end of row. Cut A.
Peplum
Row 1: With right side facing, join B at beginning of row, ch 4 (counts as tr), tr in each sc across, turn—80 (82, 88,
90) tr.
Rows 2-5: Ch 4 (counts as tr), tr in each tr across, turn.
Row 6: Ch 4 (counts as tr), tr in each tr across, changing to A on last st, turn.
Row 7: With A, ch 2 (counts as hdc), 2 hdc in same st, hdc in each tr across; do not turn.
Edging
Continuing up with A and right side facing, [sc evenly up right front edge to corner, 1 sc in corner, sc evenly along ends of rows at front edge, ch 1 to turn corner] 3 times, sc in each sc to shoulder, sc evenly across back neck, [sc in each st to corner, ch 1 to turn corner, sc evenly along ends
of rows, 1 sc in corner] 3 times, sc evenly down right front edge to beginning of peplum Row 7.
Waistband Ties (make 2)
With right side facing, join A to front edge of waistband.
Row 1: Ch 3 (counts as dc), dc 4 sts evenly along edge of waistband, turn—5 dc.
Rows 2-21: Ch 3 (counts as dc), dc in each dc across, turn. Work additional rows if necessary to adjust fit. Fasten off at end of last row.

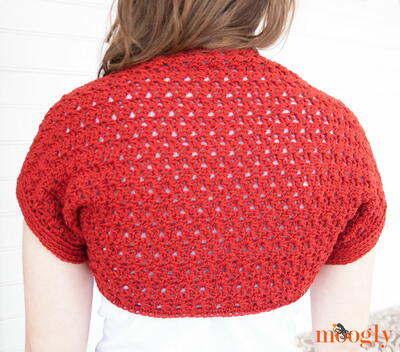
Read NextSimple Scarlet Crochet Shrug Pattern
Your Recently Viewed Projects
Thanks for your comment. Don't forget to share!
Edna 2671660
Apr 11, 2012
Nancy, if you hold down Ctrl and press the + button, that should enlarge everything on your monitor.
rngray5040 3707206
Dec 21, 2011
I love the pattern , but I wish you would have a place where you can enlarge the print. It's very hard for an old person to read such small print. Nancy
editorKS
Dec 22, 2011
Hi, Nancy. If you hold down your control key (Ctrl) and then press the + key (next to the backspace), you can enlarge the content on your screen. Conversely, you could also copy and paste the pattern into a Word document and increase the font size. Hope this helps! --Editors of AllFreeCrochet
Report Inappropriate Comment
Are you sure you would like to report this comment? It will be flagged for our moderators to take action.
Thank you for taking the time to improve the content on our site.