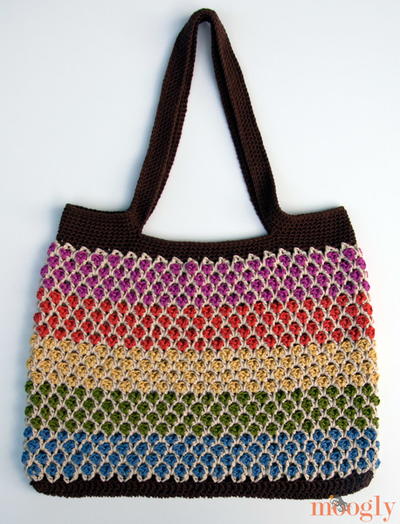
Hexagonal Summertime Tote
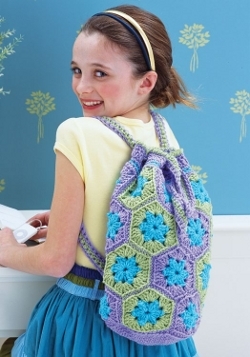
Crochet a stylish hexagonal summertime tote. This is an intermediate free crochet pattern that has motifs with a floral appearance. The various colors are perfect in contrast. Girls will love going to school this spring with this stylish and homemade tote. They'll be the coolest ones in class. Use Red Heart yarn to complete this crocheted bag. It's great not only for school, but also for running errands around town with mom.

Crochet HookJ/10 or 6 mm hook
Yarn Weight(4) Medium Weight/Worsted Weight and Aran (16-20 stitches to 4 inches)
Materials:
Yarn: RED HEART® “Kids”: 1 skein each 2358 Lt. Purple A and 2650 Pistachio B; 2 skeins 2680 Jade C.
Crochet hook: Size J/10 (6 mm)
Yarn needle
Stitch markers or safety pins
Size: 9” wide x 13” high (23 cm x 33 cm) excluding straps
Gauge: Hexagon = 4”/10cm diameter from point to point.
Special Abbreviations
rev sc (reverse single crochet) = Working from left to right, insert hook in next st to right of last st, yo and draw up a lp, yo and draw through both lps on hook.
DIRECTIONS:
Note: Tote has a lining. Throughout pattern, “Outer Bag” refers to the public side of the bag (which is constructed from hexagons and pentagons), and “Lining” refers to the sc lining.
Outer Bag:
Hexagon (make 12 total)
With C, ch 5; join with sl st in first ch to form a ring.
Round 1 (right side): Ch 2 (counts as dc), 2 dc in ring, [ch 2, 3 dc in ring] 5 times; ch 2 – 18 dc and 6 ch-2 sps. Join with sl st in 2nd ch of beginning ch-2. Fasten off. note: Use A for Round 2 of first 6 motifs, and B for Round 2 of remaining 6 motifs.
Round 2: With A or B and right side facing, join A or B with sl st in any ch-2 sp, ch 2 (counts as dc), (2 dc, ch 2, 3 dc) in same ch-2 sp as joining; *ch 1, (3 dc, ch 2, 3 dc) in next ch-2 sp; repeat from * 4 times more; ch 1 – 36 dc, 6 ch-2 sps and 6 ch-1 sps. Join. Fasten off.
Pentagon (make 12 total)
With C, ch 5: join with sl st in first ch to form a ring.
Round 1: Work same as Round 1 on hexagon. Note: Use A for Round 2 of first 6 motifs, and B for Round 2 of remaining 6 motifs.
Round 2: With right side facing, join A or B with sl st in any ch-2 sp, ch 2 (counts as dc), (2 dc, ch 2, 3 dc) in same ch-2 sp as joining; *ch 1, (3 dc, ch 2, 3 dc) in next ch-2 sp; repeat from * 3 times more; 3 dc in next ch-2 sp – 33 dc, 5 ch-2 sps and 4 ch-1 sps. Join. Fasten off.
Outer Base:
With A, ch 4; join with sl st in first ch to form a ring.
Round 1: Ch 1, 6 sc in ring – 6 sc. Join with sl st in first sc.
Round 2: Ch 1, 2 sc in first sc and in each sc around – 12 sc. Join.
Round 3: Ch 1, sc in same sc as joining, 2 sc in next sc; [sc in next sc, 2 sc in next sc] 5 times – 18 sc. Join.
Round 4: Ch 1, sc in same sc as joining and in next sc, 2 sc in next sc; [sc in next 2 sc, 2 sc in next sc] 5 times – 24 sc. Join.
Round 5: Ch 1, sc in same sc as joining and in next 2 sc, 2 sc in next sc; [sc in next 3 sc, 2 sc in next sc] 5 times – 30 sc. Join.
Round 6: Ch 1, sc in same sc as joining and in next 3 sc, 2 sc in next sc; [sc in next 4 sc, 2 sc in next sc] 5 times – 36 sc. Join.
Round 7: Ch 1, sc in same sc as joining and in next 4 sc, 2 sc in next sc; [sc in next 5 sc, 2 sc in next sc] 5 times – 42 sc. Join.
Round 8: Ch 1, sc in same sc as joining and in next 5 sc, 2 sc in next sc; [sc in next 6 sc, 2 sc in next sc] 5 times – 48 sc. Join.
Round 9: Ch 1, sc in same sc as joining and in next 6 sc, 2 sc in next sc; [sc in next 7 sc, 2 sc in next sc] 5 times – 54 sc. Join.
Round 10: Ch 1, sc in same sc as joining and in next 7 sc, 2 sc in next sc; [sc in next 8 sc, 2 sc in next sc] 5 times – 60 sc. Join.
Round 11: Ch 1, sc in same sc as joining and in next 8 sc, 2 sc in next sc; [sc in next 9 sc, 2 sc in next sc] 5 times – 66 sc. Join. Fasten off.
Outer Bag Assembly:
With right sides facing, place 6 pentagons next to each other in a line, alternating colors, with straight long edge at bottom. Whipstitch motifs tog through back lps with A. Whipstitch first motif to last motif so that a ring of 6 motifs is made (bottom row made). Repeat for 6 pentagons to form top row. Join 2 rows of hexagons in same manner for center of the tote. With right sides facing, whipstitch outer base and bottom edge of bottom row tog through back lps with A.
Motif Rings Assembly:
Taking care to line up points of one ring of hexagon motifs with valleys of bottom ring of pentagon motifs, whipstitch rings of motifs tog with right sides facing through back lps to create a flat bottom edge. Repeat with top ring of pentagon motifs and other ring of hexagon motifs to create a flat top edge. Join hexagon motif rings in center to form side of tote.
LINING
Base and Sides
With C, ch 4; join with sl st in first ch to form a ring.
Rounds 1–11: Work same as Rounds 1–11 of outer base. At end of Round 11, do not fasten off.
Round 12: Ch 1, sc in same sc as joining and in each sc around – 66 sc. Join.
Rounds 13–16: Repeat Round 12 four times more.
Round 17: Working in front lps only, repeat Round 12.
Rounds 18–26: Repeat Round 12 nine times more.
Round 27: Repeat Round 17.
Rounds 28–49: Repeat Round 12 twenty-two times more. At end of Round 49, fasten off.
Pen Pocket
With C, ch 16.
Row 1 (right side): Sc in 2nd ch from hook and in each rem ch across – 15 sc. Ch 1, turn.
Rows 2–4: Sc in each sc across. Ch 1, turn. At end of Row 4, do not ch 1. Fasten off, leaving an 18”/45.5cm tail for sewing.
Square Pocket
With C, ch 21.
Row 1 (right side): Sc in 2nd ch from hook and in each rem ch across – 20 sc. Ch 1, turn.
Rows 2–24: Sc in each sc across. Ch 1, turn. At end of Row 24, do not ch 1. Fasten off, leaving a 24”/61cm tail for sewing.
Pockets Assembly
Turn lining so wrong side is facing out. Line up bottom row of square pocket with some unused lps on Round 17 of lining. Line up one short edge of pen pocket with some unused lps on Round 27 of lining. Pin pockets in place with stitch markers. Using C, whipstitch bottom edge and 2 side edges of pockets to lining using unused lps on Rounds 17 and 27 of lining at bottom of pockets and sts running vertically up sides of lining from rounds with unused lps. Turn lining right side out with pockets on inside.
TOP EDGE OF BAG
Round 1: With right side of outer bag facing, join A with sc in any st on top edge of top ring of pentagon motifs, work 65 more sc evenly spaced around top edge (11 sc in top edge of each pentagon) – 66 sc. Join with sl st in first sc. Fasten off.
Place lining inside outer bag with top edge of lining flush with top edge of outer bag. Pin in place with stitch markers.
Round 2: Working through both thicknesses of outer bag and lining, join C with sc in any sc of Round 1 and any sc on last round of lining, sc in each sc around. Join. Fasten off.
Round 3: With right side facing, join A with sc in any sc, sc in next 9 sc, 2 sc in next sc; [sc in next 10 sc, 2 sc in next sc] 5 times – 72 sc. Join.
Round 4: Ch 2 (counts as dc), dc in next 6 sc, ch 2, sk next 2 sc; [dc in next 7 sc, ch 2, sk next 2 sc] 7 times – 56 dc and 8 ch-2 sps. Join with sl st in 2nd ch of beginning ch-2.
Round 5: Ch 1, sc in same ch as joining, sc in each dc and in each ch around – 72 sc. Join with sl st in first sc. Fasten off.
Round 6: With right side facing, join B with sc in any sc, working from left to right, work rev sc in each sc around – 72 rev sc. Join. Fasten off.
STRAP
With B, ch 201.
Row 1 (right side): Sc in back bar of 2nd ch from hook in back bar of each rem ch across – 200 sc. Fasten off.
Round 2: With right side facing, join A with sc in first sc, sc in each sc across, ch 1, pivot piece, sc in edge of last sc on Row 1, ch 1, pivot piece, working along opposite edge of foundation ch, sc in free lp of each ch across, ch 1, picot piece, sc in edge of first sc on Row 1, ch 1 – 402 sc. Join
with sl st in first sc. Fasten off.
Strap Assembly
Holding assembled bag upright, weave one end of strap in and out 4 consecutive ch-sps on Round 4 of top edge, starting and ending on right side, leaving approx 10”/25.5cm of opposite end of strap at beginning. Drop strap end down to bottom of bag. Insert strap end into a ch-sp on Round 1 at bottom straight long edge of bottom pentagon below 4th ch-sp where strap exited bag. Pushing strap between outer bag and lining, pull strap out another ch-sp on Round 1 at bottom straight long edge of next bottom pentagon approx 4”/10cm from where strap went in (below next available ch-sp on Round 4 of top edge). Bring strap end up to top of bag. Weave strap in and out next available ch-sp and following 3 consecutive ch-sps on Round 4 of top edge, starting and ending on right side. Tie two ends of strap tog in front. Adjust tension so that ends of strap are equal.
Finishing
Weave in all ends.
Check out Red Heart Yarns' company profile and other great patterns!
See this project and more in 30 Free Crochet Patterns for Bags + Free eBook.
Read NextGrab N Go Bag
Your Recently Viewed Projects
Thanks for your comment. Don't forget to share!
kayemmdee
Apr 09, 2013
I had a crocheted backpack in college in which I carried heavy books. I made it with double strand - one strand of yarn and one strand of Speed-Cro-Sheen (heavy crochet cotton) for strength and reinforcement. I did made it all in one piece (circular) because seams *will* be too weak for heavy books. I used that backpack for several years before it gave out.
CARLAJ01
Sep 01, 2011
Make this a "better" bag by lining it with cotton or canvas liner. Also reinforce the handles with cotton or canvas strips to retain their shape. Another suggestion is to make it in your child's school colors instead of trying to match all of their clothing. Be sure to use cotton yarns instead of acrylics or only use super soft yarns to cut down on irritation around the neck and face areas.
gtraicoff 7230405
Aug 31, 2011
This is a really cute tote. However, it is NOT a good school bag unless your child doesn't carry any heavy books. This is great for use as a purse/tote for other uses. Kids have to transport so much in their school backpacks that crocheted ones, no matter how sturdy, just aren't as good as commercial backpacks. Make this as a good fashion addition for weekends.
Report Inappropriate Comment
Are you sure you would like to report this comment? It will be flagged for our moderators to take action.
Thank you for taking the time to improve the content on our site.