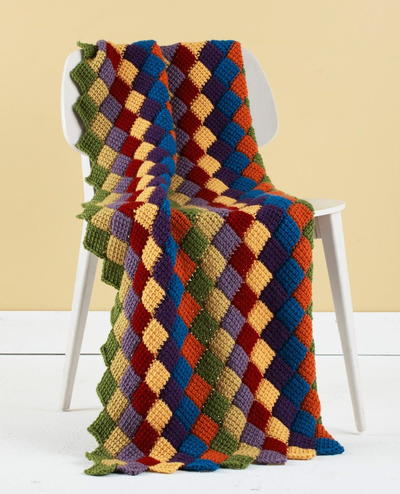
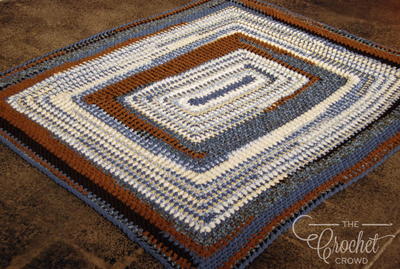
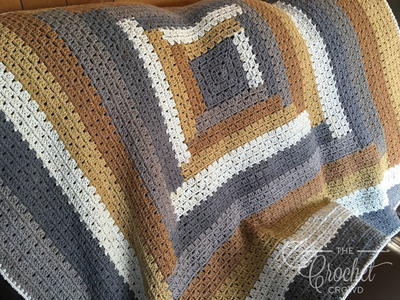
Tunisian Seascape Throw

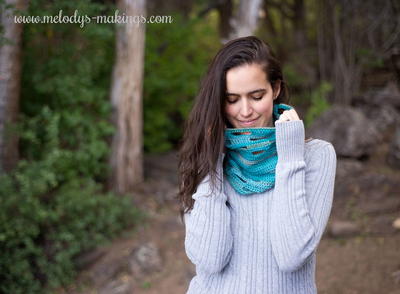
When you look at this Tunisian Seascape Throw, you might think of the underwater sea and fish scales; it's a beautiful Tunisian crochet pattern worked up in a schematic order. This crochet design might also look intimidating, but it is in fact an easy crochet pattern. The numbers refer to working order and the letters refer to type of square. Each square is connected at a mitered joint having the throw measure 48 inches x 61 inches. You'll love the finished product once you've worked through it. Wouldn't this throw be the perfect addition to your favorite sitting area? This colorful crochet Tunisian stitch pattern would also make a great gift idea for family and friends.
Don't miss out on the video below that will show you how easy it is to master the crochet tunisian stitch!
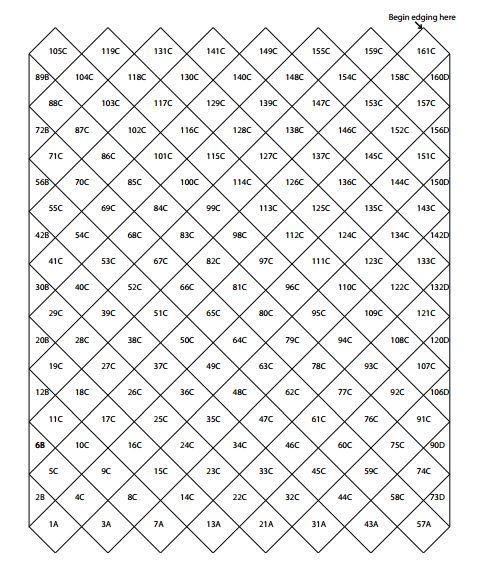
NotesNOTE: Follow the schematic in the Project Diagram section below. Numbers refer to working order and letters refer to type of square.

Crochet HookN/15 or 10 mm hook
Yarn Weight(4) Medium Weight/Worsted Weight and Aran (16-20 stitches to 4 inches)
Crochet GaugeSquare = 4¼” x 4¼”. CHECK YOUR GAUGE. Use any size hook to obtain the gauge.
Finished SizeThrow measures 48” x 61”.
Materials List
- RED HEART “Super Saver”: 7 Skeins 946 Peruvian Print
- Crochet hook: 10mm [US N-15] Crystalites® or Luxite® hook (requires hook without a wide thumb/finger grip)
- Stitch marker
- Yarn needle
Special Abbreviation
TSS (Tunisian Simple Stitch) = insert hook under next vertical bar, yo and draw through keeping loop on hook.
Square A
(Full Square beginning a diagonal row)
-
Row 1 (Right Side): Ch 21, pick up a loop in 2nd ch from hook and in each ch across – 21 sts.
-
Row 1 Return: Yo, draw through first loop, [yo, draw through 2 loops] 8 times, yo, draw through 4 loops – center cluster made, [yo, draw through 2 loops] 9 times – 1 loop on hook.
-
Row 2: Skip first vertical bar, [TSS] 8 times, insert hook under center vertical bar of cluster and draw up a loop – mark this loop, [TSS] 8 times, TSS working under both vertical bars of final st – 19 sts.
-
Row 2 Return: Yo, draw through first loop, * yo, draw through 2 loops *; repeat from * to * until 2 loops remain on hook before marked loop, yo, draw through 4 loops; repeat from * to * to end – 1 loop on hook.
-
Row 3: Skip first vertical bar, * TSS under next vertical bar *; repeat from * to * up to cluster; TSS under marked st – move marker to this new loop; repeat from * to *, working under both vertical bars of final st – 2 fewer sts than previous row pick-up.
-
Row 3 Return: Repeat Row 2 Return.
-
Rows 4-9: Repeat Row 3 noting there will be 2 fewer sts on hook at the end of pick up portion of each row.
-
Row 10: TSS under marked st, TSS under both vertical bars of final st – 3 sts.
-
Row 10 Return: Yo, draw through all 3 loops – 1 loop on hook. DO NOT FASTEN OFF.
Square B
(Half Square used to create a straight edge at the end of a diagonal row)
-
Row 1 (Right Side): Working in ends of rows, pick up loop in each row of current square – 11 sts.
-
Row 1 Return: Yo, draw through 2 loops – left cluster made, * yo, draw through 2 loops; repeat from * across – 1 loop on hook.
-
Row 2: Skip first vertical bar, TSS to cluster; TSS under both vertical bars of final st of cluster – 1 fewer st than previous row pick-up.
-
Row 2 Return: Repeat Row 1 Return.
-
Rows 3-9: Repeat Row 2 noting there will be 1 fewer st on hook at the end of pick up portion of each row.
-
Row 10: TSS under both vertical bars of final st – 2 sts.
-
Row 10 Return: Yo, draw through both loops. FASTEN OFF.
Square C
(Subsequent Full Square)
-
Row 1 (Right Side): Working in ends of rows, skip final row of current square, pick up a loop in space between current square and adjacent square, working in ends of rows of adjacent square, beginning at Row 1, pick up loop in end of each row – 21 sts.
-
Row 1 Return-Row 10 Return: Work as for Square A.
Square D
(Half Square used to create straight edge at the beginning of a diagonal row)
-
Row 1 (Right Side): Place slip knot on hook; beginning in Row 1 working in ends of rows, pick up loop in each row of adjacent square – 11 sts.
-
Row 1 Return: Yo, draw through first loop, * yo, draw through 2 loops; repeat from * until 3 loops remain on hook; yo, draw through 3 loops – right cluster made and 1 loop on hook.
-
Row 2: Skip cluster, * TSS under next vertical bar; repeat from * across, working under both vertical bars of final st – 1 fewer st than previous row pick-up.
-
Row 2 Return: Repeat Row 1 return.
-
Rows 3-9: Repeat Row 2 noting there will be 1 fewer st on hook at the end of pick up portion of each row.
-
Row 10: TSS under both vertical bars of final st – 2 sts.
-
Row 10 Return: Yo, draw through both loops – 1 loop on hook. DO NOT FASTEN OFF.
Finishing — Edging
-
Working in ends of rows, join yarn with sc in left edge of Row 10 of Square #161; sc in same place, * sc in each of next 8 rows, [draw up a loop in next row] twice, yo and draw through 3 loops, sc in next 8 rows, [2 sc in next row] twice; repeat from * 6 more times; sc in next 8 rows, 2 sc in next row; sc in next 90 rows, 2 sc in next st, sc in next 8 sts **, [2 sc in next st] twice; repeat from * to ** working in sts rather than rows on bottom edge; 2 sc in next row; join with a slip st in first sc.
-
Fasten off.
-
Weave in ends.
Project Diagram
-
Click below for project diagram, or click here for enalrged version.
Abbreviations
- ch
- chain
- mm
- millimeters
- sc
- single crochet
- st(s)
- stitch(es)
- yo
- yarn over
- * or **
- repeat whatever follows the * or ** as indicated
- [ ]
- work directions in brackets the number of times specified
Read Next"Long Live the Queen" Throw

Thanks for your comment. Don't forget to share!
JaneEK
Apr 30, 2018
I love working Tunisian projects because it has such an unusual look for a crocheted item. This remarkable throw is available as a free download from Red Heart here http//www.redheart.com/free-patterns/tunisian-mite == red-throw-0 This lovely throw looks like colorfully linked sea shells, and remind me of many a stroll along the beach. Im going to have to plan for some very special yarn for this one.
Morehouse17
Aug 31, 2017
This throw is stunning. The colors here are mezmerizing and beautiful to look at. Perhaps when I complete the throw I am working on right now, this may be the next one I attempt.
mrslindaparsons42 4416181
Aug 16, 2017
I wonder if anyone ever looks at these comments and answers questions about the pattern. I noticed all comments are so old. If someone does look at them, I need help with Square 4C as I can't understand the instructions to Square C and can't figure how to join my finished 3A Square which I did not finish off like Square A said to the 4C Square I've yet to make. Those instructions to Square C don't make a bit of sense.
lilianebou 1879
Jul 11, 2018
Maybe you will have more information if you go on the redheart.com site. The throw is called tunisian mitered throw. I hope this will help you.
Zeemer
Jul 23, 2017
This Tunisian Seascape Throw is true to its name as the design depicts the colors of the sea and the emotions that the sea awakens in all of us. This throw was carefully design to give an illusion of movement of waves and colors. Thanks for the pattern which is easy to understand and complete with diagram. Cheers!
Delphine Bryant
Apr 13, 2017
The skill level for this crochet project but the finished Tunisian Seascape Throw looks like it took the expertise of an experienced crocheter to accomplish this. After reading the directions, I am not too convinced that it is a project that should be labeled easy. Beautiful results.
Lynn K
Apr 02, 2017
With the leaves turning Fall colors here in South Africa my mind is turning towards throws and afghans. Initially I was a bit daunted by this design but having done a small sample of the pattern it really is Easy! It is beautiful too and now that I am in the process of thinking what colors to use I am becoming impatient to start making it already. In my family we all love snuggling under throws and afghans in our family room in winter and this lovely throw is going to be the perfect addition.
annick1960
Mar 24, 2017
It should have been called "fishscales" instead of "seascape" in my opinion.
Lehla81 1629736
Aug 13, 2016
I dont understand where to start/place Square C.
mrslindaparsons42 4416181
Aug 16, 2017
Did you ever find out how to do Square 4C in this afghan to get it joined to 3A? I am stuck and can't go farther until I find out and I can't understand the instructions for Square C. It sounds Greek to me. Any help would be appreciated.
mckinsey1192 38757 88
Jun 30, 2016
I can't believe how dumb I am today! But I can't even understand "Row 1 Return". I have my initial 21 stitches. Twenty-one being the operative. If I draw thru 1 = 20 left yo draw thru 2 loops x 8 (16) = 4 left. Soooo, how am I supposed to yo draw thru 2 loops x 9? I must not be reading it right or just really stupid. Please help.
mckinsey1192 38757 88
Jun 30, 2016
Never mind! I walked away then tried it again and it worked. Just a dumb moment. Hopefully, I won't be stupid while continuing. I agree with another post that this is very loose with such a large hook.
mojobaker 7733405
Mar 22, 2016
Here is a picture taken while blocking. For the folks saying it came out lopsided, you have to block it. If your stitching is even, it should turn out fine.
mojobaker 7733405
Mar 21, 2016
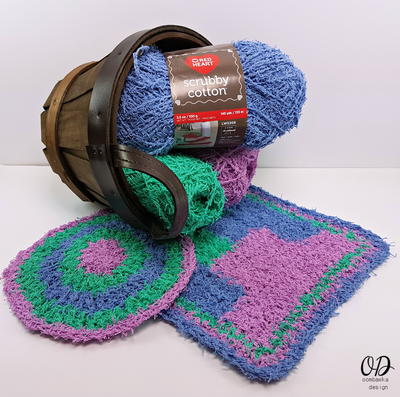
Made this in kitchen cotton. Yeah, I know, sounds weird, but one of my sons absolutely loves the feel of it and had been begging me to make a blanket for him with it. I had to add quite a few more rows because of having to use smaller hook, but it came out amazing.
cstein31 5941664
Aug 25, 2015
I do love this pattern, it says "easy", however I am confused about transition from square A to B. B is supposed to have 11 sts, mine only comes out to 9 sts. Any idea what I do wrong?
Jenny Thiel
Jun 24, 2015
Row 1 of Square C is confusing! Can anyone clarify exactly where to join to start Square C?
Cubalz
Mar 23, 2015
From the pictures, this afgan looks very solid but when working it with the recommended hook size, it actually seems very loose. I love the colors in the photo but since my living room is more of a Lodge theme with greens browns, I opted for the Red Heart Woodsy color which was VERY unattractive worked in this pattern. I returned 6 of the 7 skeins to the store and ripped out all the worked yarn and added it to my stash. Too bad...I LOVE the look of this pattern.
genzscott 8244077
Aug 18, 2014
Discouraging as I followed the directions and it turned out lovely, but very LOPSIDED. Am a sucker for punishment, trying to make another and make changes so it won't be misshapen. Will make a good car seat cover.
rosiem 3720335
Jun 28, 2013
This pattern has beautiful colors! I wonder if there is a list of colors, yardage, and a layout of each different numbered squares? It looks so FUN!
UndertakerBarb
Sep 12, 2013
rosiem3720335, if you click on the word "SCHEMATIC" under the materials, and then scroll down you will find a drawing with the pattern laid out.
iansandy13 3796028
Jun 27, 2013
I am visual in my learning...would love to see some pics on the steps for this stitch pls :)...thanks...
Report Inappropriate Comment
Are you sure you would like to report this comment? It will be flagged for our moderators to take action.
Thank you for taking the time to improve the content on our site.