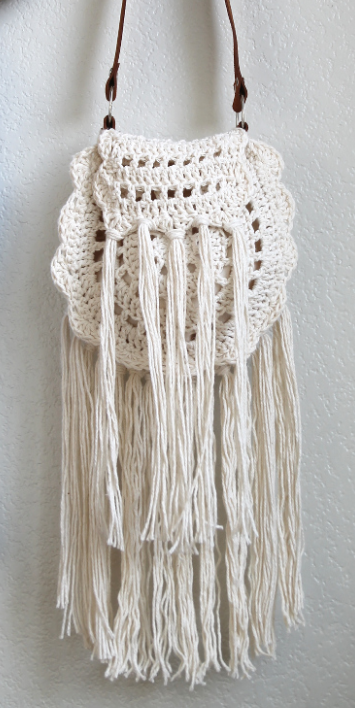
Flower Power Beach Bag
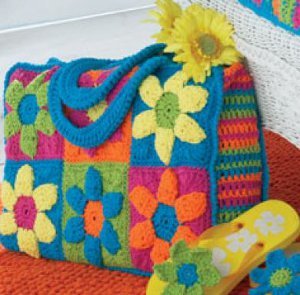
Hit the beach in style this summer with this Flower Power Beach Bag. The bright, bold colors of this bag are perfect for the sunny days of summer. This homemade bag measures approximately 18.5 inches wide by 12.5 inches tall when complete. It's just the right size to fit everything you need for a perfect day at the beach: sunglasses, flip flops, water bottle, sunblock, and a good book.

Crochet HookH/8 or 5 mm hook
Yarn Weight(4) Medium Weight/Worsted Weight and Aran (16-20 stitches to 4 inches)
MATERIALS
-
Bernat® Handicrafter Cotton (50 g/1.75 oz)
Main color (MC)
(13742 Hot Blue) 4 balls
Contrast A
(13712 Hot Green) 2 balls
Contrast B
(13628 Hot Orange) 2 balls
Contrast C
(13740 Hot Pink) 2 balls
Contrast D
(00089 BananaYellow) 2 balls - Size 5 mm (U.S. H/8) crochet hook or size needed to obtain gauge.
MEASUREMENTS
Approx 18½ ins [47 cm] wide x
12½ ins [32 cm] high.
GAUGE: 14 sc and 16 rows = 4 ins [10 cm].
INSTRUCTIONS
Motif
With color 1, ch 2.
1st rnd: 6 sc in 2nd ch from hook. Join with
sl st to first sc.
2nd rnd: Ch 3 (counts as dc). 2 dc in same sp
as last sl st. 3 dc in each sc around. Join with
sl st to top of ch 3. 18 dc. Fasten off.
Flower: First Petal: 1st row: Join color 2 with sl st to front loop only of any dc. *Ch 3 (counts as dc). 1 dc in same sp as last sl st. 1 dc in front loop only of next dc. 2 dc in front loop only of next dc. 5 dc for petal. Turn.
2nd row: Ch 3 (counts as dc). 1 dc in each dc of petal. Turn.
3rd row: Ch 3 (counts as dc). (Yoh and draw up a loop in next st. Yoh and draw through 2 loops on hook) 3 times. Yoh and draw through all loops on hook – dc3tog made. 1 dc in last dc. Fasten off leaving a long end.*
Second Petal: **Rejoin color 2 with sl st to front loop of next unworked sc of 2nd rnd. Rep from * to * once.**
Third to Sixth Petals: Rep from ** to ** 4 times more. 6 petals.
3rd rnd: Join color 3 with sl st to rem back loop of any dc of 2nd rnd. Ch 3. 1 dc in same sp. 2 dc in each rem back loop around. Join with sl st to top of ch 3. 36 dc.
4th rnd: Ch 3. 1 dc in same sp as last sl st. *1 dc in next dc. 2 dc in next dc. Rep from * to last 5 dc. 2 dc in each of next 4 dc. 1 dc in last dc. Join with sl st to top of ch 3. 56 dc.
5th rnd: Ch 1. 1 sc in same sp as last sl st. 1 sc in each of next 4 dc. *1 hdc in each of next 2 dc. 1 dc in each of next 2 dc. 5 tr in next dc for corner. 1 dc in each of next 2 dc. 1 hdc in each of next 2 dc.** 1 sc in each of next 5 dc. Rep from * twice more, then from * to ** once.
Join with sl st to first sc.
6th rnd: Ch 1. 1 sc in each st around, working 3 sc in corners. Join with sl st to first sc. Fasten off.
Using yarn ends from each petal, sew around outer edges of petals.
Motif I (make 2)
Work as for Motif using MC for color 1, A for color 2 and C for color 3.
Motif II (make 2)
Work as for Motif using D for color 1, C for color 2 and B for color 3.
Motif III (make 2)
Work as for Motif using A for color 1, D for color 2 and MC for color 3.
Motif IV (make 2)
Work as for Motif using C for color 1, D for color 2 and MC for color 3.
Motif V (make 2)
Work as for Motif using B for color 1, MC for color 2 and A for color 3.
Motif VI (make 2)
Work as for Motif using MC for color 1, B for color 2 and C for color 3.
Sew Motifs tog as shown in diagram for Front and Back.
Side and Bottom Section
Note: When changing colors, work to last 2 loops on hook of last st, then draw new color through rem 2 loops and proceed.
With MC, ch 11.
1st row: (RS). 1 dc in 4th ch from hook (counts as 2 dc). 1 dc in each ch across. 9 sts. Join A. Turn.
2nd row: With A, ch 1. 1 sc in each dc across. Join MC. Turn.
3rd row: With MC, ch 3 (counts as dc). 1 dc in each sc across. Join A. Turn.
4th row: As 2nd row. Join B. Turn.
5th row: With B, as 3rd row. Join C. Turn.
6th row: With C, as 2nd row. Join B. Turn.
7th row: As 5th row.
8th row: With C, as 2nd row. Join A. Turn.
9th row: With A, as 3rd row. Join MC. Turn.
10th row: With MC, as 2nd row. Join A. Turn.
11th row: With A, as 3rd row. Join MC. Turn.
12th row: With MC, as 2nd row. Join C. Turn.
13th row: With C, as 3rd row. Join B. Turn.
14th row: With B, as 2nd row. Join C. Turn.
15th row: With C, as 3rd row. Join B. Turn.
16th row: With B, as 2nd row. Join MC. Turn.
17th row: With MC, as 3rd row. Join A. Turn.
Rep 2nd to 17th rows until work from beg measures length to fit down one side of Back or Front, across bottom, then up rem side. Fasten off.
Pin Side and Bottom Section to Front and Back along 3 sides.
Edging: 1st rnd: Join MC with sl st in top left corner of Front or Back of Bag. Ch 1. 3 sc in same sp as sl st. Work sc evenly around, working 3 sc in corners and working through both thicknesses where Front and Side sections meet. Join with sl st to first sc.
2nd rnd: Ch 1. Working from left to right, instead of from right to left as usual, work 1 reverse sc in each sc around. Join with sl st to first sc. Fasten off.
Rep edging for Back of Bag.
Handles (make 2)
With MC, ch 50.
1st row: (RS). 1 dc in 4th ch from hook (counts as 2 dc). 1 dc in each ch across. 48 sts. Turn.
2nd and 3rd rows: Ch 3 (counts as dc). 1 dc in each dc across. Turn.
Fold Handle in half lengthwise and work 1 row of sc through 3rd row and rem loops of foundation ch. Fasten off.
Sew on handles as shown in picture.
Visit Bernat's company profile for more great patterns!
Read NextTwo Hour Tote
Your Recently Viewed Projects
Thanks for your comment. Don't forget to share!
Morehouse17
Apr 30, 2018
What a colorful beach bag. The motifs are probably the easiest to make of this project. Without pictures you may get stumped on assembly. I like that the only picture provided showed a flower added to a pair of inexpensive flip flops. Great idea.
Delphine Bryant
Apr 25, 2018
This shows in the title as a beach bag but do not feel like that is the only place that you can use this colorful bag. It looks roomy enough to also be a market or book bag. If you are really that fancy, it could just be a purse. I love the look of the flowers as they appear to be three dimensional.
clivemelanie 13943 31
Oct 05, 2017
This is a quick project to make up and could use less or more colours and still be lovely. I agree a lining would be helpful. To have less ends and use less wool, the side and bottom edging could be done with 2 rows of SC (DC UK) in each colour. I also went for 52 stitches in motif rather than 56. Worked for me
JaneEK
Aug 16, 2017
This project REALLY REALLY needs photos to go along with it. Since this pattern is from a commercial outlet, Im sure its been proofed and there are no glaring errors. However, in just reading through the first part of the pattern, it LOOKS like the petals are attached individually to the flower center. Its also confusing how the directions switch between rounds and rows without much warning. I love the flower, but the instructions need work.
lcarr
May 27, 2017
This is so cute! The squares take very little time to make, so this project is a fairly quick one. It is a good idea to add a lining if you dont want it to stretch out of shape, or have small items fall out through spaces between the stitches.
Report Inappropriate Comment
Are you sure you would like to report this comment? It will be flagged for our moderators to take action.
Thank you for taking the time to improve the content on our site.