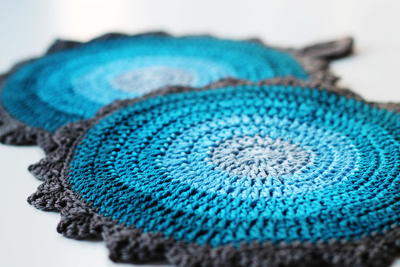
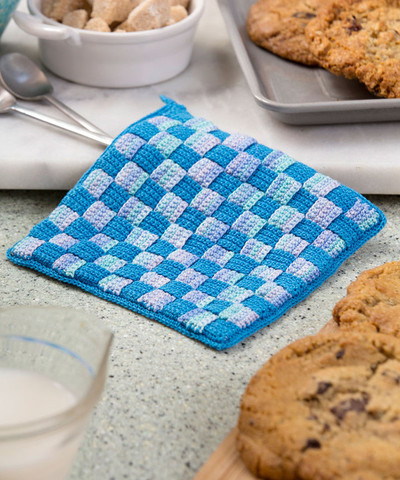
Milk & Cookies Crochet Hotpad

The Milk and Cookies Crochet Hotpad is just what every kitchen needs. Work up this free pattern from our friends at Red Heart using Aunt Lydia's Classic Crochet Thread. This particular crocheted hotpad is made by crocheting strips and then weaving them together, which creates a double thick design. This woven hotpad adds the perfect touch of charm to any kitchen. Make it for your own home, or pair this crochet pattern with a batch of homemade chocolate chip cookies for the perfect hostess gift.

Crochet Hook6 or 1.8 mm hook (steel), 7 or 1.65 mm hook (steel)
Yarn Weight(0) Lace (33-40 stitches to 4 inches). Includes crochet thread.
MATERIALS:
- AUNT LYDIA’S® Classic Crochet Thread, Size 10:
1 ball 805 Blue Hawaii A and 1 ball 995 Ocean B - Susan Bates® Steel Crochet Hooks:
1.5mm [US 7] and 1.6 mm [US 6] - Straight pins
- Stitch holders
- Tapestry needle
SIZE:
Hot pad measures 6” square (15 cm).
GAUGE:
25 sc = 3” (7.5 cm); 25 rows = 3” (7.5 cm) after blocking.
CHECK YOUR GAUGE. Use any size hook to obtain the gauge
NOTE:
Front and Back pieces may not match gauge exactly or be square prior to blocking.
INSTRUCTIONS:
HOTPAD
Front (Make 2)
Using size 7 (1.5 mm) hook, make one using A and one using B. Ch 51.
Row 1 (Right side): Sc in bottom loop of 2nd ch from hook and each ch across; turn—50 sc.
Rows 2-5: Ch 1, sc in each sc across. At end of Row 5, ch 51; turn.
Rows 6-50: Repeat Rows 1-5 nine times. At end of Row 50, do not ch 51. Do not fasten off A. Fasten off B.
Back
Using size 6 (1.6 mm) hook and A, ch 4, join with slip st to form ring.
Round 1 (Right side): Ch 3, * 2 sc in ring, ch 2; repeat from * twice, sc in ring, slip st in beginning ch-3 loop—8 sts, 4 corner loops.
Round 2: Ch 3, sc in ch-3 loop, * 2 sc, (sc, ch 2, sc) in next ch-2 loop; repeat from * twice, 2 sc, slip st in beginning ch-3 loop—16 sts, 4 corner loops.
Round 3: Ch 3, sc in ch-3 loop, * 4 sc, (sc, ch 2, sc) in next ch-2 loop; repeat from * twice, 4 sc, slip st in beginning ch-3 loop—24 sts, 4 corner loops.
Rounds 4-25: Ch 3, sc in ch-3 loop, * sc across to next ch-2 loop, (sc, ch 2, sc) in ch-2 loop; repeat from * twice, sc across to beginning ch-3 loop, slip st in ch-3 loop. Do not fasten off—200 sts, 4 corner loops.
ASSEMBLY
Joining Front Pieces
With right sides up, place edges connecting strips of A and B at right angles. Weave strips over and under to form the checkerboard pattern, and pin into position along outer
edges. (It may be helpful to use stitch holders or pin pieces to a pillow or cushion while weaving.) Holding both layers together, sc sides of strips to ends of other strips where they meet, working 5 sc per strip as follows:
Using size 7 (1.5 mm) hook with A from Front piece, ch 1. * Sc in first st, place stitch holder to mark corner, sc in same st; work 49 sc evenly across side to next corner, turn
work so next side is up; repeat from * three times; at end of last side, do not turn, slip st in beginning sc; fasten off—204 sc.
Joining Front and Back
Front and Back may not be the same size, but they will fit together after blocking. With wrong sides together and Front side up, match stitches around the edges of the two pieces. The marked stitches in the Front corners will line up with the Back corner loops. (It may be helpful to use additional stitch holders.) Work through both layers held together. Using size 7 (1.5 mm) hook with A from Back piece, ch 1, * insert hook in marked Front corner sc and Back corner loop, work 3 sc in corner, sc evenly across edge, turn work so next side is up; repeat from * three times; at end of last side, do not turn, slip st in beginning sc to join.
Hanging Loop (Optional)
Do not turn; ch 15, skip sc, slip st in next sc; turn. Slip st in each ch and sc at base of ch; turn. Ch 1, work 30 sc over loop; slip st in sc where loop ends. Fasten off and weave in all ends.
FINISHING
Block hot pad by soaking in boiling water.
Remove with a utensil and dip in cool water.
Roll hot pad in a towel to soak up extra water.
Lay flat on a padded surface and shape into a 6” (15 cm) square. Pin to surface and let dry.
ABBREVIATIONS
A,B = Color A, Color B
ch = chain
cm=centimeters
mm= millimeters
sc= single crochet
st(s)= stitch(es)
yo= yarn over
* or ** = repeat whatever follows the * or ** as indicated
Read Next30 Minute Potholder
Your Recently Viewed Projects
Thanks for your comment. Don't forget to share!
mmrb3618686
Jan 29, 2018
I have made dishcloths for my kitchen but was very surprised to see this pattern. I will be making this pattern this weekend. It is always needed to protect the kitchen counters from hot pots and pans.
Hippie Chick
Feb 27, 2017
Love the look of the milk and cookies woven crochet hot pad. I doesnt quite look like milk and cookies to me, more like a picnic blanket hot pad, but love the look of it. It looks very intricate with all the color blocks. The blue Hawaiian color is beautiful and love working with cotton yarn.
jobers77
Nov 18, 2016
A nice classic design. Since it's made from crochet cotton I think it would be pretty sturdy and able to stand up to some use. I like a potholder pattern that looks modern and classic at the same time, this one uses modern colors and a traditional design so it would look great in any kitchen.
Report Inappropriate Comment
Are you sure you would like to report this comment? It will be flagged for our moderators to take action.
Thank you for taking the time to improve the content on our site.