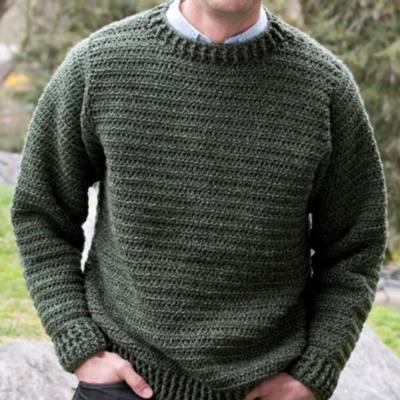
Simple Sweater for Him

Give him a gift he will love this year for Father's Day. The Simple Sweater for Him is an easy crochet pattern to complete with a stylish ribbed pattern. It's a classic crew neck sweater that can be worn almost anywhere. Be sure to make it in his favorite color. Red Heart Super Tweed yarn is used for this simple sweater pattern.

Crochet HookI/9 or 5.5 mm hook
Yarn Weight(4) Medium Weight/Worsted Weight and Aran (16-20 stitches to 4 inches)
SUPPLIES:
- RED HEART® Super Tweed®: 6 (7, 7, 8, 8) skeins 7625 Camo
- Susan Bates® Crochet Hook: 5.5 [US I-9] and 6 mm [US J-10]
- Yarn needle
- Chart
Size:
- Directions for sweater are for men’s size small. Changes for medium, large, X-large and XX-large are in parentheses.
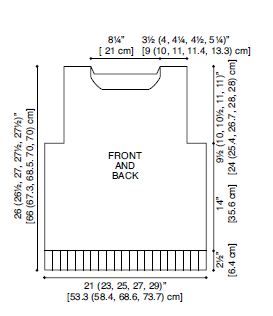
- Finished Measurements Chest: 42 (46, 50, 54, 58)”, [107 (117, 127, 137, 147) cm]
- Total length: 26 (26½, 27, 27½, 27½)”, [66 (67.3, 68.5. 70, 70) cm]
Gauge/Tension:
12 sts and 9 rows = 4” (10 cm) in hdc. CHECK YOUR GAUGE. Use any size hook to obtain the gauge.
Special Stitches:
hdc2tog = [Yarn over, insert hook in next st, yarn over, draw yarn through st] twice, yarn over, draw yarn through all loops on hook.
BPdc (Back post double crochet) = Yarn over, insert hook from back to front to back again around the post of next st, yarn over, draw yarn through st, [yarn over, draw yarn through 2 loops on hook] twice.
FPdc (Front post double crochet) = Yarn over, insert hook from front to back to front again around the post of next st, yarn over, draw yarn through st, [yarn over, draw yarn through 2 loops on hook] twice.
RIBBING PATTERN (rib patt)
Foundation Row (right side): Dc into fourth ch from hook and into each ch across, turn.
Row 1 (wrong side): Ch 2, skip first st, *FPdc into next st, BPdc into next st; repeat from * across to last 2 sts, ending with FPdc in next st, hdc into top of beginning ch-2, turn.
Row 2: Ch 2, skip first st, *BPdc in next st, FPdc in next st; repeat from * across to last 2 sts, ending with BPdc in next st, hdc into top of beginning ch-2, turn.
Repeat rows 1–2 for pattern.
BACK
Ribbing
With smaller hook, ch 65 (71, 77, 83, 88).
Foundation Row (right side): Dc into fourth ch from hook and into each ch across, turn—63 (69, 75, 81, 86) dc.
Work even in rib patt until ribbing measures 2½ [6.4 cm]” from beginning, ending with a wrong side row.
Body
Change to larger hook.
Row 1 (right side): Ch 2 (counts as hdc here and throughout), skip first st, hdc in each st across, turn—63 (69, 75, 81, 87) hdc.
Work even on 63 (69, 75, 81, 87) hdc until piece measures 16½” (42 cm) from beginning, ending with a wrong side row.
Shape Armholes
Slip st in first 9 (11, 13, 15, 16) sts, ch 2, skip first st, hdc in each st across across to last 8 (10, 12, 14, 15) sts rem, turn, leaving remaining sts unworked—47 (49, 51, 53, 57) hdc.
Work even in hdc until piece measures 25 (25½, 26, 26½, 26½)”, [63.5 (64.7, 66, 67, 67.3) cm] from beginning, ending with a wrong side row.
Right Shoulder Shaping
Row 1: Ch 2, skip first st, hdc in next 11 (12, 13, 14, 16) sts, turn, leaving remaining sts unworked—12 (13, 14, 15, 17) hdc.
Row 2: Ch 2, skip first st, hdc2tog in next 2 st, hdc in each st across—11 (12, 13, 14, 16) hdc.
Work even until armhole measures 26 (26½, 27, 27½, 27)”, [66 (67.3, 68.5. 70, 70) cm] from beginning. Fasten off.
Left Shoulder Shaping
Row 1: With right side facing, skip 23 sts to the left of right shoulder shaping, with larger hook, join yarn with a slip st in next st, ch 2, skip first st, hdc in each st across, turn—12 (13, 14, 15, 17) hdc.
Row 2: Ch 2, skip first st, hdc in each st across to last 2 sts, hdc2tog in last 2 sts—11 (12, 13, 14, 16) hdc. Fasten off.
Bottom Edging
Row 1: With right side facing and smaller hook, join yarn with a slip st in first ch of foundation row, slip st in each ch across. Fasten off.
FRONT
Work same as back until piece measures 22½ (23, 23½, 24, 24)”, [57 (58.4, 59.7, 61, 61) cm] from beginning, ending with a wrong side row, turn.
Left Shoulder Shaping
Row 1: Ch 2, skip first st, hdc in next 15 (16, 17, 18, 20) sts, turn, leaving remaining sts unworked—16 (17, 18, 19, 21) hdc.
Row 2: Slip st into first 3 sts, ch 2, skip first st, hdc in each st across, turn—14 (15, 16, 17, 19) hdc.
Row 3: Ch 2, skip first st, hdc in each st across to last 2 sts, turn, leaving remaining sts unworked—12 (13, 14, 15, 17) hdc.
Row 4: Ch 2, skip first st, hdc2tog in next 2 sts, hdc in each st across—11 (12, 13, 14, 16) hdc.
Work even in hdc until front measures same as back to shoulders. Fasten off.
Right Shoulder Shaping
Row 1: With right side facing, skip 15 sts to the left of right shoulder shaping, with larger hook, join yarn with slip st in next st, ch 2, skip first st, hdc in each st across, turn—16 (17, 18, 19, 21) hdc.
Row 2: Ch 2, skip first st, hdc in each st across to last 2 sts, turn, leaving remaining sts unworked—14 (15, 16, 17, 19) hdc.
Row 3: Slip st in first 3 sts, ch 2, skip first st, hdc in each st across, turn—12 (13, 14, 15, 17) hdc.
Row 4: Ch 2, skip first st, hdc in each st across to last 2 sts, hdc2tog in next 2 sts, turn—11 (12, 13, 14, 16) hdc.
Work even in hdc until front measures same as back to shoulders. Fasten off.
Bottom Edging
Work same as back bottom edging.
SLEEVE (make 2)
With smaller hook, ch 33.
Foundation Row (right side): Dc into fourth ch from hook and into each ch across, turn—31 dc.
Work even in rib patt until piece measures 2½” [6.4 cm] from beginning, ending with a wrong side row.
Change to larger hook.
Row 1 (right side): Ch 2, skip first st, hdc in each st across, turn.
Work in hdc, increasing 1 st at each end of next row and every other row 7 (11, 13, 18, 18) times; then every 4th row 6 (4, 3, 0, 0) times—57 (61, 63, 67, 67) hdc.
Work even on 57 (61, 63, 67, 67) hdc until sleeve measures 22½ (23½, 23½, 23½, 23½)”, [57 (59.7, 59.7, 59.7, 59.7) cm] from beginning. Fasten off.
Bottom Edging
Work same as back bottom edging.
FINISHING
Sew front to back across left shoulder.
NECKBAND
Row 1: With right side facing, using smaller hook, join yarn with a slip st to neck edge of right shoulder seam, ch 3 (counts as dc), work 65 dc evenly-spaced around neckline; join with slip st to top of beginning ch-3.
Work even in rib patt until neckband measures 1½” [3.8 cm] from beginning, ending with a wrong side row.
Next Row: Slip st in each st across. Fasten off.
Sew right shoulder seam, including side of neckband. Set in sleeves, using square-indented construction. Sew sleeve and side seams.
ABBREVIATIONS
ch = chain; dc = double crochet; hdc = half double crochet; mm = millimeters; sc = single crochet; st(s) = stitch(es); [ ] = work directions in brackets the number of times specified; ( ) = work directions in parentheses into specified st or sp; * or ** = repeat whatever follows the * or ** as indicated.
Check out Red Heart's company profile and other great patterns!
See this design and others in 17 Crochet Gifts for Dad!
Read NextSimple Sweater for Him
Your Recently Viewed Projects
Thanks for your comment. Don't forget to share!
YarnDaddy
Mar 09, 2022
I have heard of vanity sizing, but in what world is a 42 chest a "small"? Do I trust the measurements, or the size letter? Can someone who has worked this pattern let me know?
badmomparker 76331 85
Feb 01, 2021
This worked up reasonably well except for the neck (which turned out to be a mock-turtleneck. There were some instructions I had to guess at as well.
crochetcuties 4910 997
Aug 23, 2020
The sleeve directions are wring. When you get to 31 hdc's you need to increase by 2 not 1. 1 inc. at beg. of row and 1 at end of row.
carr5 9160805
Feb 03, 2019
On the Red Heart web page, they have this pattern under Father Pullover. There is a way to download the PDF. There is also a diagram of what the finished sleeve is supposed to look like after it's finished before it is sewn in. It's not great, but it is more helpful than this one.
Daughter of Light
Feb 28, 2018
What a handsome men's sweater pattern! We have three men in our family and they all wear a different size. Thankfully this pattern takes care of that! I may have found their Christmas presents for this year! I'm soooo glad that this pattern is designated "easy" because that way I'll be able to have three of them ready in time for gift giving!
Delphine Bryant
May 22, 2017
There are so few patterns for articles of clothing for men and I am beginning to understand why. The directions here are not very clear and there are so many of them. I think I will crochet a vest before I attempt a sweater.
ChaCha Rizzo
Jan 18, 2017
My husband was just asking me for a sweater - I think this crochet sweater pattern will be just right for him. Thank you.
mamaw5677 8833701
Dec 19, 2013
I am having problems w/ the sleeve. I must not be experienced enough to understand but if you start out with 31 stitches across and add 1 stitch every other row 11 times and 1 stitch every 4 rows 4 times, how do I end up with 61 hdc? I am using the size inside the (). What am I missing? I think I will be learning something today... =-) Thanks for your help...
gypsygyrl79 742360 3
Jan 26, 2014
Hi I had the same question and stared at the pattern for a good while before I realized the pattern says to increase 1 st at EACH END of the increase rows. Hope that helps someone!
bpagliaro 5017250
Nov 08, 2013
I'm just starting to put this sweater together but cannot find instructions for the "square-indented construction". Please help!
mamaw5677 8833701
Dec 19, 2013
I am not that far yet but did see that and was wondering the same thing... hope we all can figure it out... =-)
hjurkowski 1216122
Oct 03, 2013
I don't think you mentioned what size the smaller hook is?
ginnymanhart 10166 78
Feb 25, 2018
I was just reading comments because I wanted to know what other people think before I start. In the part where it tells you the supplies needed, it says crochet hook 5.5 (Us I-9) and 6m (US J-10), the first one listed is the smaller size crochet hook.
nagamani14vm 55723 28
May 27, 2013
I have a question in this pattern, How many chains we need to do to start with for ribbing pattern (rib patt)
groovythumper12 90 78585
Jul 24, 2013
BACK Ribbing With smaller hook, ch 65 (71, 77, 83, 88). Foundation Row (right side): Dc into fourth ch from hook and into each ch across, turn63 (69, 75, 81, 86) dc. Read more at http://www.allfreecrochet.com/Mens-Sweaters/Simple-Sweater-for-Him-from-Red-Heart#jl5vhshtwBMSjjEV.99
katsommers
May 19, 2013
This is a great sweater, but what I am really looking for is a simple vest pattern - something he can wear under his suitcoat and I'll be making it in cotton. Anyone have a pattern like that?
groovythumper12 90 78585
Jul 24, 2013
You do realize cotton will stretch with time and with washing and dryings, cotton does shrink and the colors will eventually fade.
Report Inappropriate Comment
Are you sure you would like to report this comment? It will be flagged for our moderators to take action.
Thank you for taking the time to improve the content on our site.


