Berry Beret and Wrist Warmers

Work up a "berry" colorful gift set for any little girl you know. This easy crochet pattern for kids will work in any number of colors, but when it comes to some little girls you just have to choose pink. Give the Berry Beret and Wrist Warmers to someone for a birthday gift or just as a treat. This crochet pattern set from Red Heart is a must-have winter accessory. All you need is one skein of yarn for the crochet hat, and one skein of yarn for the arm warmers.

Crochet HookK/10.5 or 6.5 mm hook
Yarn Weight(4) Medium Weight/Worsted Weight and Aran (16-20 stitches to 4 inches)
MATERISL:
- RED HEART® With Love™ 1 skein each:
- 1703 Candy Pink A
- 1807 Boysenberry B
- Crochet Hook: 6.5mm [US K-10½]
- Yarn needle
GAUGE: 16 sts & 14 rows = 4” CHECK YOUR GAUGE. Use any size hook to obtain the gauge.
ABBREVIATIONS: ch = chain; dc = double crochet; hdc = half double crochet; sc = single crochet; st(s) = stitch(es); [] = work directions given in brackets the number of times specified; * or ** = repeat whatever follows the * or ** as indicated.
SPECIAL ABBREVIATIONS
shell: (2 dc, ch 2, 2 dc) in same space.
sc2tog: [Insert hook in next st, yo, draw yarn through st] twice, yo, draw yarn through 3 loops on hook.
dc2tog: [Yo, insert hook in next st, yo, draw yarn through st, yo, draw through 2 loops on hook] twice, yo, draw through 3 loops on hook.
PATTERN NOTES:
When working rows in back loop only, if your last st is a little loose, try working the last st into both loops of st.
Instructions:
Directions are for girl’s size 2-4 (S). Changes for size 6-8 (L) are in parentheses.
Finished measurements: Hat: 16 (18)” in circumference.
Hat: 8.5 (10)” in diameter
Wristers: 2¾ (3¼ )” wide; 3 (3½ )” long.
HAT:
Band:
With A, leaving a 8” sewing length, ch 5 (7).
Row 1: Working in back bar of each ch, slip st in 2nd ch from hook, slip st in each ch across; turn—4 (6) slip sts.
Row 2: Working in back loops only, slip st in each st across, turn—4 (6) slip sts.
Repeat row 2 until 106 (114) rows have been worked or band measures 14 (15)” from beginning. Do not fasten off.
Rotate to begin working along sides of rows. Work now progresses in rounds
Crown:
Round 1 (right side): Ch 1, work 64 (80) sc evenly spaced across side edge of band; join with a slip st in first sc.
Round 2: Ch 3 (counts as dc here and throughout), skip first sc, dc in each sc around; join with a slip st in top of beginning ch-3—64 (80) dc. Fasten off A.
Round 3: With right side facing, join B with a slip st in top of beginning ch-3, ch 1, sc in same st, *ch 2, skip 1 dc, sc in next dc; repeat from * around to last dc, ch 2, skip last dc; join with a slip st in first sc—32 (40) ch-2 spaces.
Round 4: Slip st in next ch-2 space, ch 1, sc in same ch-2 space, *shell in next ch-2 space**, sc in next ch-2 space; repeat from * around, ending last repeat at **; join with a slip st in first sc—16 (20) shells. Fasten off B.
Round 5: With right side facing, join A with a slip st in ch-2 space of any shell, ch 1, sc in same space as joining, ch 5, (sc, ch 5) in each ch-2 space around; join with a slip st in first sc—16 (20) ch-5 spaces.
Round 6: Slip st in next ch-5 space, ch 1, 5 sc in each ch-5 space around; join with a slip st in first sc—80 (100) sc.
Round 7: Ch 3, skip first sc, dc in each sc around; join with a slip st in top of beginning ch-3—80 (100) dc.
Size L Only: Round 8: Ch 3, skip first dc, dc in each of next 2 dc, dc2tog over next 2 sts, *dc in each of next 3 dc, dc2tog over next 2 sts; repeat from * around; join with a slip st in top of beginning ch-3—80 dc.
Both Sizes:
Round 8 (9): Ch 1, sc in first st, sc in next 7 sts, sc2tog over next 2 sts, *sc in next 8 sts, sc2tog over next 2 sts; repeat from * around; join with a slip st in first sc—72 sts.
Round 9 (10): Ch 1, sc in first st, sc in next 6 sts, sc2tog over next 2 sts, *sc in next 7 sts, sc2tog over next 2 sts; repeat from * around; join with a slip st in first sc—64 sts.
Round 10 (11): Ch 1, sc in first st, sc in next 5 sts, sc2tog over next 2 sts, *sc in next 6 sts, sc2tog over next 2 sts; repeat from * around; join with a slip st in first sc—56 sts.
Round 11 (12): Ch 1, sc in first st, sc in next 4 sts, sc2tog over next 2 sts, *sc in next 5 sts, sc2tog over next 2 sts; repeat from * around; join with a slip st in first sc—48 sts.
Round 12 (13): Ch 1, sc in first st, sc in next 3 sts, sc2tog over next 2 sts, *sc in next 4 sts, sc2tog over next 2 sts; repeat from * around; join with a slip st in first sc—40 sts.
Round 13 (14): Ch 1, sc in first st, sc in next 2 sts, sc2tog over next 2 sts, *sc in next 3 sts, sc2tog over next 2 sts; repeat from * around; join with a slip st in first sc—32 sts.
Round 14 (15): Ch 1, sc in first st, sc in next st, sc2tog over next 2 sts, *sc in next 2 sts, sc2tog over next 2 sts; repeat from * around; join with a slip st in first sc—24 sts.
Round 15 (16): Ch 1, sc in first sc, sc2tog over next 2 sts, *sc in next sc, sc2tog over next 2 sts; repeat from * around; join with a slip st in first sc—18 sts.
Round 16 (17): Ch 1, *sc2tog over next 2 sts; repeat from * around; join with a slip st in first sc—9 sts.
Round 17 (18): Ch 1, sc in first sc, *sc2tog over next 2 sts; repeat from * around; join with a slip st in first sc—5 sts. Fasten off leaving a sewing length. With yarn needle, weave sewing length through tops of sts in last round, gather top and secure.
FINISHING: With yarn needle and sewing length, sew brim seam. Weave in ends.
WRISTERS (make 2):
Wrist Band:
With A, leaving a 8” sewing length, ch 7 (9).
Row 1 Working in back bar of each ch, slip st in 2nd ch from hook, slip st in each ch across; turn—6 (8) slip sts.
Row 2: Working in back loops only, slip st in each st across, turn—6 (8) slip sts. Repeat row 2 until 38 (42) rows have been worked or band measures 5 (5½)” from beginning. Do not fasten off. Rotate to begin working along side edge of wrist band. Work now progresses in rounds.
Round 1 (right side): Ch 1, work 16 (20) sc evenly spaced across side edge of band; join with a slip st in back loop only of first sc.
Round 2: Ch 3 (counts as dc here and throughout), working in back loops only, skip first sc, dc in each sc around; join with a slip st in top of beginning ch-3—16 (20) dc.
Round 3: Ch 1, sc in first st, *ch 2, skip next dc, sc in next dc; repeat from * around to last dc, ch 2, skip last dc; join with a slip st in first sc—8 (10) ch-2 spaces.
Round 4: Slip st in next ch-2 space, ch 1, sc in first ch-2 space, *shell in next ch-2 space**, sc in next ch-2 space; repeat from * around ending last repeat at **; join with a slip st in first sc—4 (5) shells. Fasten off A.
Round 5: With right side facing, join B to remaining front loop of any sc in Round 1, ch 1, sc in same st as joining, *ch 2, skip next sc, sc in next sc; repeat from * around to last sc, ch 2, skip last sc; join with a slip st in first sc—8 (10) ch-2 spaces.
Round 6: Repeat round 4. Fasten off B.
FINISHING: With yarn needle and sewing length, sew wrist band seam. Weave in ends.
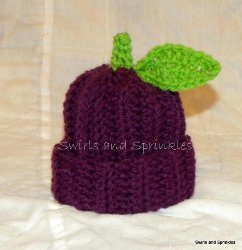
Read NextPurple Plum Hat
Your Recently Viewed Projects

Thanks for your comment. Don't forget to share!
andrealuxton 00859 53
Dec 04, 2016
I have, let me see, five nieces and have been quite stumped as to what on earth to get them for Christmas. This pattern is a life-saver. It is beautiful and so suited to the girlie girl in us! I will have to deviate from the strict berry theme as I plan to make one set for each niece in her favourite colour. And voila! Christmas sorted.
andrealuxton 00859 53
Dec 04, 2016
I really love the look of the final product! I have, let me see, five nieces, and I think they will go nuts over this ensemble. I'm going to make up a set for each one of them. I will have to deviate from the berry theme however so that they can all get theirs in their favourite colours. I love making winter gifts in summer and here in the southern hemisphere we are now in full- blown summer!
turtint 5946444
Mar 18, 2014
This is a little confusing, especially for me who is just learning how to read patterns as well as learning terminology. Ugghhh I give up
Crafter 18002
Jul 25, 2013
THIS MIGHT BE A GOOD PATTERN BUT WHY WHEN IT IS DOWNLOADED DOES IT ALL RUN TOGETHER IN ONE PARAGRAPH
Report Inappropriate Comment
Are you sure you would like to report this comment? It will be flagged for our moderators to take action.
Thank you for taking the time to improve the content on our site.