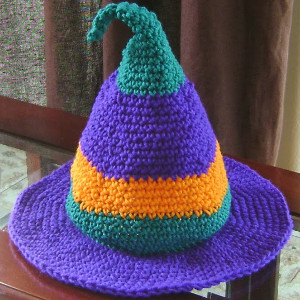
Safe and Secure Pumpkin Hat

This Safe and Secure Pumpkin Hat will be a blessing for your child's homemade Halloween costume. The yarn used to make this crochet hat is reflective, meaning your kid can walk the streets in it and still be seen by cars and people with flashlights. This way, if they run off from you while trick-or-treating, get lost, or are just in a darker park of the neighborhood, you can still make sure they are safe on Halloween night. You want this holiday to be a lot of fun, but now you can keep it safe too with this fun Halloween crochet pattern.

Crochet HookJ/10 or 6 mm hook
Yarn Weight(5) Bulky/Chunky (12-15 stitches for 4 inches)
Crochet Gauge11 sts = 4 (10cm); 7 rows = 4 (10cm) in double crochet and Front post double crochet pattern.
Finished SizeHat measures about 20 (51 cm) circumference and will stretch to fit a range of sizes.
Materials List
- RED HEART Reflective: 1 ball each 8699 Olive A, and 8251 Neon Orange B
- Susan Bates Crochet Hook: 6mm [US J-10]
- Yarn needle
Notes
Special Stitches Fpdc (Front post double crochet) = Yarn over, insert hook from front side of work to back and to front again around post of indicated stitch; yarn over and pull up a loop (3 loops on hook), [yarn over and draw through 2 loops on hook] twice (1 loop remains on hook). Fphdc (Front post half double crochet) = Yarn over, insert hook from front side of work to back and to front again around post of indicated stitch; yarn over and pull up a loop (3 loops on hook), yarn over and draw through all 3 loops (1 loop remains on hook). Notes 1. Hat is easy to make once you get started and become comfortable making the post stitches (Fpdc and Fphdc). 2. Hat is worked in joined rounds beginning with the Stem at the top of the Hat. 3. Stem is worked with A and remainder of Hat is worked with B. 4. Post stitches (Fpdc and Fphdc) are worked to create the grooves in the Stem and Pumpkin.
Stem
With A, leaving a 10 (25.5 cm) tail, ch 4; join with slip st in first ch to form a ring. Round 1 (right side): Ch 2 (counts as first hdc here and throughout), (hdc, 5 dc, hdc) in ring; join with slip st in top of beginning ch8 sts. Rounds 26: Ch 2, Fphdc around next st, Fpdc around each of next 5 sts, Fphdc around last st; join with slip st in top of beginning ch. Round 7: Ch 3 (counts as first dc here and throughout), Fpdc around the beginning ch-2 of previous round, [dc in next st, Fpdc around same st] 7 times; join with slip st in top of beginning ch16 sts. Fasten off A.
Pumpkin
Round 1 (right side): Leaving a long tail to weave in later, draw up a loop of B in same st as joining slip st of previous round, ch 3, Fpdc around first Fpdc, [dc in next dc, dc in top of next Fpdc, Fpdc around same Fpdc] 7 times, dc in same st as joining slip st of previous round; join with slip st in top of beginning ch24 sts. Round 2: Ch 3, Fpdc around first Fpdc, [dc in next 2 dc, dc in top of next Fpdc, Fpdc around same Fpdc] 7 times, dc in next dc, dc in same st as joining slip st of previous round; join with slip st in top of beginning ch32 sts. Round 3: Ch 3, Fpdc around first Fpdc, [dc in next 3 dc, dc in top of next Fpdc, Fpdc around same Fpdc] 7 times, dc in next 2 dc, dc in same st as joining slip st of previous round; join with slip st in top of beginning ch40 sts. Round 4: Ch 3, Fpdc around first Fpdc, [dc in next 4 dc, dc in top of next Fpdc, Fpdc around same Fpdc] 7 times, dc in next 3 dc, dc in same st as joining slip st of previous round; join with slip st in top of beginning ch48 sts. Round 5: Ch 3, Fpdc around first Fpdc, [dc in next 5 dc, dc in top of next Fpdc, Fpdc around same Fpdc] 7 times, dc in next 4 dc, dc in same st as joining slip st of previous round; join with slip st in top of beginning ch56 sts. Rounds 6-8: Ch 3, Fpdc around first Fpdc, [dc in next 6 dc, Fpdc around next Fpdc] 7 times, dc in next 5 dc; join with slip st in top of beginning ch56 sts. Round 9: Ch 2, Fphdc around first Fpdc, [hdc in next dc, dc in next 4 dc, hdc in next dc, Fpdc around next Fpdc] 7 times, hdc in next dc, dc in next 4 dc; join with slip st in top of beginning ch. Round 10: Ch 2, Fphdc around first Fphdc, [hdc in next hdc, dc in next 4 dc, hdc in next hdc, Fphdc around next Fphdc] 7 times, hdc in next hdc, dc in next 4 dc; join with slip st in top of beginning ch. Fasten off. VINES (make 2) With A, ch 12. Row 1: Work 3 hdc in 3rd ch from hook (2 skipped chains count as first hdc), 3 hdc in each remaining ch across40 hdc. Fasten off, leaving a long tail for sewing Vine to Hat. Designer Tip: If you want your Vines to twist even tighter, work 4 hdc in each ch instead of 3 hdc.
Finishing
Thread yarn tail at beginning of the Stem into yarn needle. Sew the tail down through all the beginning chains of the Stem. Pull tail slightly to increase curve of Stem and weave in tail on inside of Hat. Use tails of Vines to sew Vines onto Hat at base of Stem. Weave in all remaining ends.
Read NextCoolest Pirate Afghan Ever