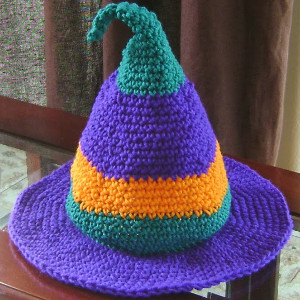
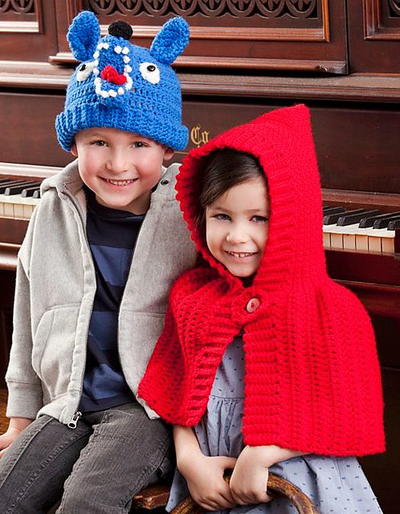
Red Riding Hood and The Wolf Costumes

Work up some fairytale characters with this Red Riding Hood and The Wolf Costumes patterns. These simple crochet Halloween patterns are the perfect instant costumes. They get the idea of these classic characters across, but there aren't a lot of complicated bits and pieces to create. Make a crochet shawl for Red Riding Hood and an easy crochet hat for the wolf, and you're done! For Halloween, you could raid your closets for other clothes that would expand the costumes, like grey shirt and pants for the wolf, and a cute dress for Red. The best part is the kids can use these for dress-up all year long!

Crochet HookH/8 or 5 mm hook
Yarn Weight(4) Medium Weight/Worsted Weight and Aran (16-20 stitches to 4 inches)
MATERIALS:
WOLF HAT
- Red Heart Super Saver: 1 Skein each 886 Blue A, 316 Soft White B, 312 Black C, and 319 Cherry Red D.
- Crochet Hook: 5mm [US H-8].
- Split-ring stitch marker; yarn needle; small amount of stuffing; two 12mm brown buttons for eyes.
RED RIDING HOOD CAPE
- Red Heart Super Saver: 2 Skeins 319 Cherry Red.
- Crochet Hook: 8mm [US 5-H].
- Yarn needle; 1 1” diameter red button.
SIZE:
WOLF HAT
Hat is 18” circumference.
RED RIDING HOOD CAPE
Hood is 32” around front edge.
GAUGE:
WOLF HAT
14 sc = 4”; 14 rows = 4”. CHECK YOUR GAUGE. Use any size hook to obtain the gauge.
RED RIDING HOOD CAPE
12 sc = 4”; 16 rows = 4”. CHECK YOUR GAUGE. Use any size hook to obtain the gauge.
SPECIAL ABBREVIATION:
Sc2tog = [draw up a loop in next st] twice, yo and draw through all 3 loops on hook.
NOTES:
When worked in rounds, do not join; mark the beginning of the round and move the marker up as work progresses.
Ribbing
With a , ch 11.
Row 1: Sc in 2nd ch from hook and in each ch across; turn – 10 sts.
Row 2: Ch 1, working in back loops ONLY, sc in each st across; turn.
Rows 3-64: Repeat Row 2. Do not turn at end of Row 64.
WOLF HAT
Row 1:, Turn to work along row ends of Ribbing, ch 1, sc in each row end; turn – 64 sts.
Row 2: Ch 2, dc in each st across; turn.
Row 3: Ch 1, sc in each st across; turn.
Rows 4-5: Repeat Rows 2-3.
Row 6: Repeat Row 2.
Row 7: Ch 1, * sc in next 14 sts, sc2tog; repeat from * across; turn – 60 sts.
Row 8: Repeat Row 2.
Row 9: Ch 1, * sc in next 8 sts, sc2tog; repeat from * across; turn – 54 sts.
Row 10: Repeat Row 2.
Row 11: Ch 1, * sc in next 7 sts, sc2tog; repeat from * across; turn – 48 sts.
Row 12: Ch 1, * sc in next 6 sts, sc2tog; repeat from * across; turn – 42 sts.
Row 13: Ch 1, * sc in next 5 sts, sc2tog; repeat from * across; turn – 36 sts.
Row 14: Ch 1, * sc in next 4 sts, sc2tog; repeat from * across; turn – 30 sts.
Row 15: Ch 1, * sc in next 3 sts, sc2tog; repeat from * across; turn – 24 sts
Row 16: Ch 1, * sc in next 2 sts, sc2tog; repeat from * across; turn – 18 sts.
Row 17: Ch 1, * sc in next st, sc2tog; repeat from * across; turn – 12 sts.
Row 18: Ch 1, * sc2tog; repeat from * across – 6 sts. Fasten off, leaving a long tail for sewing.
Ear (Make 2)
With a, ch 2.
Row 1: 6 sc in 2nd ch from hook; turn – 6 sts.
Row 2: Ch 1, * sc in next st, 2 sc in next st; repeat from * across; turn – 9 sts.
Row 3: ,Ch 1, sc in each st across; turn.
Row 4: Ch 1, * sc in next 2 sts, 2 sc in next st; repeat from* across; turn – 12 sts.
Row 5: Repeat Row 3.
Row 6: Ch 1, * sc in next 3 sts, 2 sc in next st; repeat from* across; turn – 15 sts.
Row 7: Repeat Row 3.
Row 8: Ch 1, * sc in next 4 sts, 2 sc in next st; repeat from* across; turn – 18 sts.
Row 9: Repeat Row 3.
Row 10: Ch 1, * sc in next 5 sts, 2 sc in next st; repeat from * across; turn – 21 sts.
Row 11: Repeat Row 3. Fasten off, leaving a long tail for sewing.
Snout Top
With a , ch 2.
Row 1: 6 sc in 2nd ch from hook; turn – 6 sts.
Row 2: Ch 1, 2 sc in each st across; turn – 12 sts.
Row 3: Ch 1, * sc in next 3 sts, 2 sc in next st; repeat from* across; turn – 15 sts.
Rows 4-8: Ch 1, sc in each st across; turn.
Row 9: Ch 1, sc in next 5 sts, [2 sc in next st] 5 times; sc in next 5 sts; turn – 20 sts.
Row 10: Ch 1, sc in each st across. Fasten off, leaving a long tail for sewing.
Snout Bottom
Work same as Snout Top through Row 2.
Rows 3-8: Ch 1, sc in each st across. Fasten off, leaving a long tail for sewing.
Nose
With C, ch 2.
Round 1: 6 sc in 2nd ch from hook – 6 sts.
Round 2: 2 sc in each st around – 12 sts.
Rounds 3-4: Sc in each st around. Fasten off.
Eyes (Make 2)
With B, work same as for Nose through Round 2. Fasten off.
Tongue
With D , ch 6.
Row 1: Sc in 2nd ch from hook and in next 3 ch, 3 sc in last ch, turn to work in opposite side of beginning ch, sc in next 4 sts; turn – 11 sts.
Row 2: Ch 1, sc in next 4 sts, [2 sc in next st] 3 times; sc in next 4 sts – 14 sts.
Finishing
Using tail, sew sides of Hat together. Fold ear in half and sew bottom together. Sew in place on top of Hat. Repeat for other ear. With C , embroider 10 teeth around Snout Top. Stuff Snout lightly and sew in place on Hat. Repeat for Snout Bottom. Sew tongue in place. Sew Eyes in place above Snout. Sew buttons over Eyes. Weave in ends.
RED RIDING HOOD CAPE
Ribbing
Ch 8.
Row 1: Sc in 2nd ch from hook and in each st across; turn – 7 sts.
Row 2: Ch 1, sc in BACK LOOP ONLY of each st across; turn.
Rows 3-126: Repeat Row 2.
Cape
Row 1: Turn to work along side of Ribbing, ch 1, sc in each row end; turn – 126 sts.
Row 2: Ch 3 (counts as 1st dc), dc in next 27 sts, sc in next 70 sts, dc in last 28 sts; turn.
Rows 3-7: Repeat Row 2.
Short Row a-Row 8: Ch 3, dc in next 25 sts, hdc in next st, sc in next st, slip st in next st; TURN – 29 sts.
Short Row B-Row 9: Skip slip st, sc in next st, hdc in next st, dc in last 26 sts; turn – 28 sts.
Row 10: Ch 3, dc in next 25 sts, hdc in next st, sc in next st, sc in same st as slip st from Row 8, sc in next 69 sts, dc in last 28 sts; turn – 126 sts.
Rows 11-12: Repeat Rows 8-9.
Row 13: Repeat Row 10.
Rows 14-19: Repeat Rows 8-13.
Rows 20-21: Repeat Row 2.
Rows 22-27: Repeat Rows 8-13.
Rows 28-30: Repeat Row 2.
Rows 31-36: Repeat Rows 8-13.
Rows 37-40: Repeat Row 2. Fasten off at end of Row 40.
Buttonhole
Ch 7; join with a slip st into a ring.
Round 1: Ch 1, 12 sc in ring; join – 12 sts.
Round 2: Ch 1, hdc in same st as join, * 2 hdc in next st, ch 1, slip st in next st, ch 1, hdc in next st; repeat from * around to last 2 sts; 2 hdc in next st, ch 1, slip st in next st; join. Fasten off.
Finishing
Sew back seam. Sew Buttonhole in place on one side of ,neck. Sew button in place on the other side. Weave in ends.
Abbreviations:
A, B, C = Color A, Color B, Color C, etc; ch = chain; dc = double crochet; mm = millimeters; sc = single crochet; st(s) = stitch (es); yo = yarn over; [ ] = work directions in brackets the number of times specified; * or ** = repeat whatever follows the * or ** as indicated.
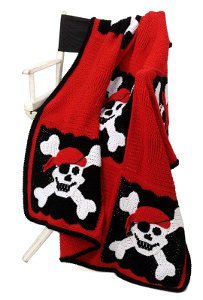
Read NextCoolest Pirate Afghan Ever
Your Recently Viewed Projects
Thanks for your comment. Don't forget to share!
honeybear72504 833 9848
Oct 20, 2014
I made the red riding hood cape for halloween for my 2yr old daughter and it turned out completely adoreable! the pattern was really easy to follow. i only had a slight problem keeping count of the rows when i had to use the short rows but the end result was even and i am happy i tried it
Report Inappropriate Comment
Are you sure you would like to report this comment? It will be flagged for our moderators to take action.
Thank you for taking the time to improve the content on our site.