Hanging Halloween Spiderweb Wreath
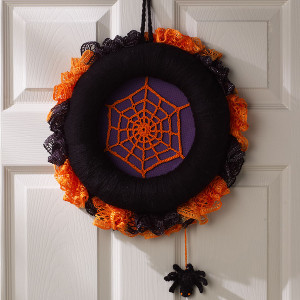
Decorate either side of your door with this Hanging Halloween Spiderweb Wreath crochet pattern. Both the web and the spider are easy to crochet so that you can have the most stylish Halloween decoration ideas on the block. Whether you're just getting ready for trick-or-treaters or you're decorating for a party, this easy Halloween craft is a great way to add a little spook without too much scare. Use both worsted and super bulky weight yarn to achieve the look of this Halloween wreath crochet pattern.

Crochet HookC/2 or 2.75 mm hook, F/5 or 3.75 mm hook, J/10 or 6 mm hook
Yarn Weight(4) Medium Weight/Worsted Weight and Aran (16-20 stitches to 4 inches)
MATERIALS:
- Red Heart Super Saver: A: Black (1 skein)
- Red Heart Boutique Sashay Team Spirit: B: Orange/Black (1 ball)
- Aunt Lydia's Classic Crochet Thread: C: Pumpkin (Size 10, 1 ball)
- Susan Bates Crochet Hooks (C/2, 2.75 mm; F/5, 3.75 mm; J/10, 6 mm)
- 12" (30 cm) straw wreath
- Phoomph fabric bonding sheets
- 2 Stiff sheets in any color
- 11" (28 cm) diameter circle of purple cotton fabric
- Glue Gun
- Yarn Needle
GAUGE:
Gauge is not important for this project.
PATTERN NOTES:
Sc2tog: single crochet next two stitches together
WREATH
Ruffle
Row 1: Using 6mm hook and B, leaving 5” (13 cm) length, working in every other yarn loop, ch 148, turn.
Row 2: Slip st in 2nd ch from hook and in each remaining ch across. Fasten off.
Wreath Preparation
Using A, wrap wreath tightly and evenly.
Secure ends on back of Wreath.
Web
With 2.75mm hook and 2 strands C held together, ch 4, join with slip st in first ch to form ring.
Round 1: Ch 3 (counts as first dc), work 11 dc in ring, join with slip st in top of beginning ch-3—12 dc.
Round 2: Ch 5, dc in next dc, ch 2, *dc in next dc, ch 2, repeat from * around, join with slip st in 3rd ch of beginning ch-5.
Round 3: Ch 6, dc in next dc, ch 3, *dc in next dc, ch 3, repeat from * around, join with slip st in 3rd ch of beginning ch-6.
Round 4: Ch 9, tr in next dc, ch 5, *tr in next dc, ch 5, repeat from * around, join with slip st in 4th ch of beginning ch-9.

Round 5: Ch 11, tr in next tr, ch 7, *tr in next tr, ch 7, repeat from * around, join with slip st in 4th ch of beginning ch-7.
Round 6: *Ch 20, slip st in 2nd ch from hook and each remaining ch, slip st in next 7 chs in previous round, slip st in next tr, repeat from * around, join with slip st in first slip st.
Fasten off.
SPIDER
Body
With A and 3.75mm hook, ch 2.
Round 1: 6 sc in 2nd ch from hook—6 sc.
Round 2: 2 sc in each sc around—12 sc.
Round 3: Working in front loops only, sc in next 2 sc, *[ch 5, slip st in 2nd ch from hook and next 3 chs, slip st in last sc made], sc in next sc,* repeat between * 4 times, sc in next 2 sc, repeat between * 4 times.
Round 4: Working in back loops of round 2, [sc2tog in next 2 sc] around—6 sc. Fasten off.
Head
With A, ch 2.
Round 1: 6 sc in 2nd ch from hook—6 sc.
Round 2: [Sc in next 2 sc, 2 sc in next sc] around—8 sc.
Round 3: Sc in each sc around. Leaving long end, fasten off. Using long end, gather sts and sew Head to Body as shown in photo. With C Embroider eyes using french knots.
See illustration.

Wreath Center
Cut one 9” (22 cm) diameter circle from each sheet of Phoomph. Place fabric right side down on a hard surface. Remove paper from one side of one circle of Phoomph. Center Phoomph circle exposed side down over fabric and apply pressure to adhere Phoomph to fabric. Remove paper from opposite side of Phoomph circle. Fold remaining material around Phoomph circle and apply pressure to adhere. Place Web on hard surface and center covered circle over Web. Pull long ends of Web to back of circle and apply pressure to adhere to unused area of Phoomph. Remove paper from one side of remaining circle of Phoomph.With exposed side down, center over fabric-covered circle and apply pressure to adhere circles together. Do not remove the paper from the remaining side.
Wreath Assembly
Place circles at back of Wreath and adhere to Wreath using glue gun.
Placing slip st side of ruffle against Wreath, glue ruffle around back of Wreath close to edge of Phoomph.
Finishing
Hanging Web
With 2.75mm hook and 2 strands of C held together, ch 38. Fasten off. Join ch to spider and secure to back of Wreath.
Wreath Hanging Loop
With 3.75mm hook and A, ch 20, join with slip st in first ch, slip st in each remaining ch around. Leaving long end, fasten off.
Using long end, sew Hanging Loop securely to top of Wreath.
Read NextCoolest Pirate Afghan Ever
Your Recently Viewed Projects
Thanks for your comment. Don't forget to share!
mulberrygalprinces s
Sep 07, 2017
I am sorry but after reading thru the directions I have to agree with a previous poster. This is just not explainitory enough. It needs better instructions, or graphics or even a video. It is a cute idea and I would love to have it but I just can't get it.
JaneEK
Apr 20, 2017
This project REALLY needs some photos to show how this is assembled. That one little graphic on how to form a French Knot just doesnt cut it. The directions for the ruffle are completely baffling. I dont even find out until the very end that the ruffle will be GLUED to the wreath instead of stitched. I like the look of this project, but the directions do not do it justice.
Report Inappropriate Comment
Are you sure you would like to report this comment? It will be flagged for our moderators to take action.
Thank you for taking the time to improve the content on our site.