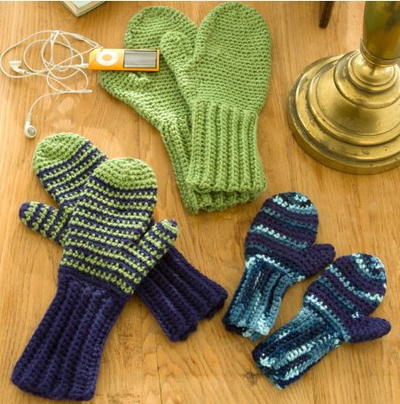
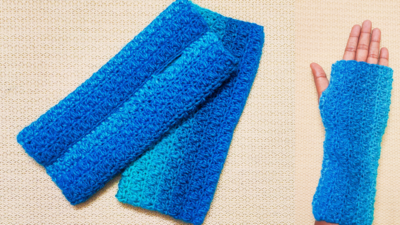
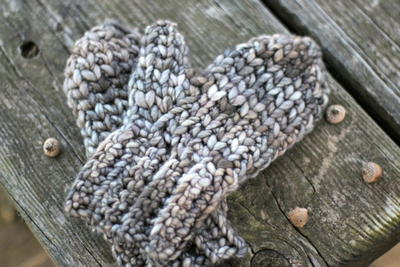
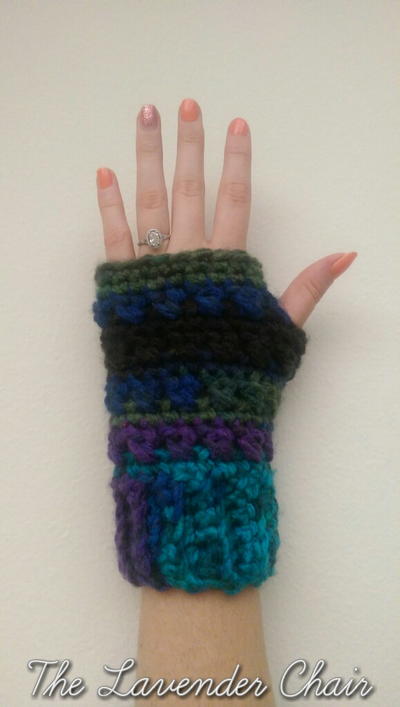
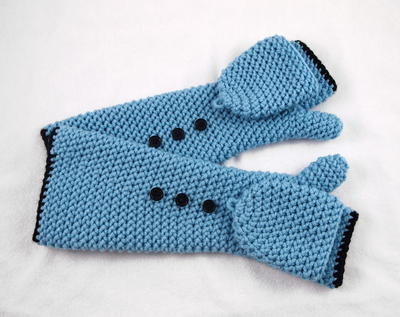
Cosmic Convertible Crochet Fingerless Gloves

Get ready for the fall and winter chill with the Cosmic Convertible Crochet Fingerless Gloves. This free crochet pattern features a pair of long fingerless gloves that extend past your wrist for ultimate warmth and comfort. And, as a bonus feature, they feature a little flap that folds over and can cover your exposed fingers, making these both fingerless gloves and a pair of mittens. Use any single shade of worsted weight yarn to work these up - they're an intermediate pattern because of the shaping for the thumb holes, so just be sure to pay attention as you're following this pattern. You'll be able to work this up quickly and easily make a pair for anyone on your list!
NotesNOTES:
•Gloves are worked from the fingers down; make the foundation chain loosely to allow for stretching
•Instructions are the same for the right and left hand; just mind where you place the mitten tops
•The body of the glove is worked in a spiral – use a stitch marker to keep track of rounds
•The mitten tops and thumbs are worked in joined rounds, the starting chain does not count as a stitch, make the first HBhdc in the same stitch as the starting chain, join in the first HBhdc of the round
•The instructions given are for medium-length gloves; however you can make them in any length you prefer.
•Height is measured from finger opening to arm cuff.

Crochet HookH/8 or 5 mm hook
Yarn Weight(4) Medium Weight/Worsted Weight and Aran (16-20 stitches to 4 inches)
Crochet Gauge14 stitches and 11 rows = 4” (10 cm)
Finished SizeToddler to Large Adult
Materials List
- Worsted weight acrylic yarn such as Red Heart With Love
- 5.0 mm (H-8) crochet hook or size needed to obtain the gauge
- stitch marker and yarn needle for weaving in ends
- ½” buttons (min. 2 – additional buttons for decoration are optional)
- Stitch marker
Pattern
-
Toddler (1 - 3 yrs) • Palm circumference = 4.5" - 5.5" • Finished size = 4.5" around palm, 6" in length
Round 1: Ch 17, HBhdc in 2nd ch from hook and in each chain across, bring ends together and join in first HBhdc (16)
Round 2: Ch 1, sc in first stitch, HBhdc in each remaining stitch around, do not join (16)
Round 3: HBhdc in first 7 stitches, ch 5, skip 3, HBhdc in 4th stitch and each remaining stitch around (13 hdc, 5 chains)
Round 4: HBhdc around in each stitch and chain stitch (18)
Round 5: HBhdc decrease, HBhdc around (17)
Round 6: HBhdc in each stitch around (17)
Round 7: Make 2 HBhdc in first stitch, HBhdc around (18)
Round 8: HBhdc in each stitch around (18)
Round 9: Make 2 HBhdc in first stitch, HBhdc around (19)
Round 10: HBhdc in each stitch around (19)
Round 11: Make 2 HBhdc in first stitch, HBhdc around (20)
Round 12: HBhdc in each stitch around (20)
Round 13: Make 2 HBhdc in first stitch, HBhdc around (21)
Round 14: HBhdc in each stitch around (21)
Round 15: HBhdc in each stitch around (21) - Taper off the cuff stitches by working the following: Sc 3, sl st 3, FO
Finish off the arm cuff and finger opening with a Round of SC in a Contrasting Color.
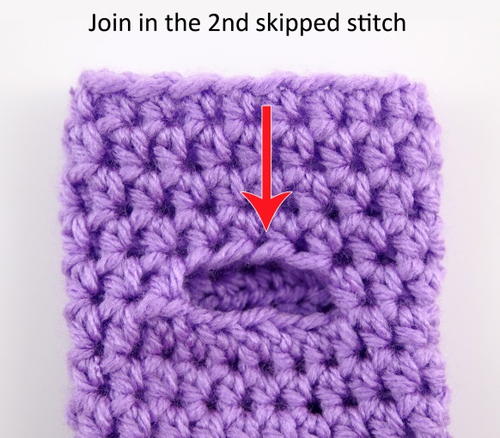
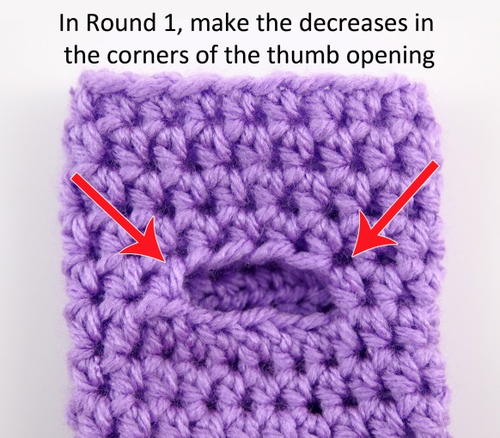
Thumb - If leaving the thumb uncovered, skip these instructions and work a round of SC in a contrasting color.
Pull up a loop in the second stitch that was skipped when making the thumb opening. The first round will have stitches placed evenly around, but with decreases made in the "corners" of the thumb - see images at end of file.
Round 1: Ch 1, HBhdc in first 2 stitches, HBhdc decrease, HBhdc in next 7 stitches, HBhdc decrease, HBhdc 1, join in first HBhdc (12)
Round 2: *HBhdc decrease, HBhdc in next 4 stitches* repeat once, join (10)
Round 3: *HBhdc decrease, HBhdc in next 3 stitches* repeat once, join (8)
Round 4: HBhdc in each stitch around, join (8)
Round 5: Repeat Round 4 - if you need to increase thumb length add another round of HBhdc
Round 6: *Sc2tog* 4 times, join and fasten off. With a yarn needle, weave the tail through the front loop of each stitch around and pull gently to close the opening.
Mitten Top - Leave a lengthy tail for making the button loop
Round 1: Ch 2, make 8 HBhdc in 2nd chain from hook, join in first HBhdc (8)
Round 2: Ch 1, make 2 HBhdc in each stitch around, join (16)
Round 3: Ch 1, make 2 HBhdc in first stitch, HBhdc in each remaining stitch around, join (17)
Round 4 - 9: Ch 1, HBhdc in each stitch around, join (17)
Fasten off, leaving a lengthy tail for sewing.
For placement of the mitten top, buttons and how to make the button loop, see the photos at the end of the file. -
Small Child (3 - 6 yrs) • Palm circumference = 5.25" - 6.25" • Finished size = 5.25" around palm, 7" in length
Round 1: Ch 20, HBhdc in 2nd ch from hook and in each chain across, bring ends together and join in first HBhdc (19)
Round 2: Ch 1, sc in first stitch, HBhdc in each remaining stitch around, do not join (19)
Round 3: HBhdc in each stitch around (19)
Round 4: HBhdc in first 9 stitches, ch 6, skip 3, HBhdc in 4th stitch and each remaining stitch around (16 hdc, 6 chains)
Round 5: HBhdc around in each stitch and chain stitch (22)
Round 6: HBhdc decrease, HBhdc around (21)
Round 7: HBhdc decrease, HBhdc around (20)
Round 8 - 9: HBhdc in each stitch around (20)
Round 10: Make 2 HBhdc in first stitch, HBhdc around (21)
Round 11: HBhdc in each stitch around (21)
Round 12: Make 2 HBhdc in first stitch, HBhdc around (22)
Round 13: HBhdc in each stitch around (22)
Round 14: Make 2 HBhdc in first stitch, HBhdc around (23)
Round 15: HBhdc in each stitch around (23)
Round 16: Make 2 HBhdc in first stitch, HBhdc around (24)
Round 17: HBhdc in each stitch around (24)
Round 18: HBhdc in each stitch around (24) - Taper off the cuff stitches by working the following: Sc 3, sl st 3, FO
Finish off the arm cuff and finger opening with a Round of SC in a Contrasting Color.
Thumb - If leaving the thumb uncovered, skip these instructions and work a round of SC in a contrasting color.
Pull up a loop in the second stitch that was skipped when making the thumb opening. The first round will have stitches placed evenly around, but with decreases made in the "corners" of the thumb - see images at end of file.
Round 1: Ch 1, HBhdc in first 2 stitches, HBhdc decrease, HBhdc in next 8 stitches, HBhdc decrease, HBhdc 1, join in first HBhdc (13)
Round 2: *HBhdc decrease, HBhdc in next 4 stitches* repeat once, HBhdc in last stitch, join (11)
Round 3: *HBhdc decrease, HBhdc in next 3 stitches* repeat once, HBhdc in last stitch, join (9)
Round 4: HBhdc in each stitch around, join (9)
Round 5: Repeat Round 4 - if you need to increase thumb length add another round of HBhdc
Round 6: *Sc2tog* 4 times, sc in last stitch, join and fasten off. With a yarn needle, weave the tail through the front loop of each stitch around and pull gently to close the opening.
Mitten Top - Leave a lengthy tail for making the button loop
Round 1: Ch 2, make 8 HBhdc in 2nd chain from hook, join in first HBhdc (8)
Round 2: Ch 1, make 2 HBhdc in each stitch around, join (16)
Round 3: Ch 1, *make 2 HBhdc in first stitch, HBhdc in next 3 stitches* repeat around, join (20)
Round 4 - 10: Ch 1, HBhdc in each stitch around, join (20)
Fasten off, leaving a lengthy tail for sewing.
For placement of the mitten top, buttons and how to make the button loop, see the photos at the end of the file. -
Large Child (6 - 10 yrs) • Palm circumference = 6" - 7" • Finished size = 6" around palm, 9" in length
Round 1: Ch 22, HBhdc in 2nd ch from hook and in each chain across, bring ends together and join in first HBhdc (21)
Round 2: Ch 1, sc in first stitch, HBhdc in each remaining stitch around, do not join (21)
Round 3 - 4: HBhdc in each stitch around (21)
Round 5: HBhdc in first 10 stitches, ch 7, skip 3, HBhdc in 4th stitch and each remaining stitch around (17 hdc, 7 chains)
Round 6: HBhdc around in each stitch and chain stitch (24)
Round 7: HBhdc in each stitch around (24)
Round 8: HBhdc decrease, HBhdc around (23)
Round 9: HBhdc decrease, HBhdc around (22)
Round 10 - 11: HBhdc in each stitch around (22)
Round 12: Make 2 HBhdc in first stitch, HBhdc around (23)
Round 13: HBhdc in each stitch around (23)
Round 14: Make 2 HBhdc in first stitch, HBhdc around (24)
Round 15: HBhdc in each stitch around (24)
Round 16: Make 2 HBhdc in first stitch, HBhdc around (25)
Round 17: HBhdc in each stitch around (25)
Round 18: Make 2 HBhdc in first stitch, HBhdc around (26)
Round 19: HBhdc in each stitch around (26)
Round 20: Make 2 HBhdc in first stitch, HBhdc around (27)
Round 21: HBhdc in each stitch around (27)
Round 22: Make 2 HBhdc in first stitch, HBhdc around (28)
Round 23: HBhdc in each stitch around (28) - Taper off the cuff stitches by working the following: Sc 3, sl st 3, FO
Finish off the arm cuff and finger opening with a Round of SC in a Contrasting Color.
Thumb - If leaving the thumb uncovered, skip these instructions and work a round of SC in a contrasting color.
Pull up a loop in the second stitch that was skipped when making the thumb opening. The first round will have stitches placed evenly around, but with decreases made in the "corners" of the thumb - see images at end of file.
Round 1: Ch 1, HBhdc in first 2 stitches, HBhdc decrease, HBhdc in next 9 stitches, HBhdc decrease, HBhdc 1, join in first HBhdc (14)
Round 2: *HBhdc decrease, HBhdc in next 5 stitches* repeat once, join (12)
Round 3: *HBhdc decrease, HBhdc in next 4 stitches* repeat once, join (10)
Round 4: HBhdc in each stitch around, join (10)
Round 5 - 6: Repeat Round 4 - if you need to increase thumb length add another round of HBhdc
Round 7: *Sc2tog* 5 times, join and fasten off. With a yarn needle, weave the tail through the front loop of each stitch around and pull gently to close the opening.
Mitten Top - Leave a lengthy tail for making the button loop
Round 1: Ch 2, make 8 HBhdc in 2nd chain from hook, join in first HBhdc (8)
Round 2: Ch 1, make 2 HBhdc in each stitch around, join (16)
Round 3: Ch 1, HBhdc in first 4 stitches, *make 2 HBhdc in next stitch, HBhdc in next stitch* repeat from *around, join (22)
Round 4 - 11: Ch 1, HBhdc in each stitch around, join (22)
Fasten off, leaving a lengthy tail for sewing.
For placement of the mitten top, buttons and how to make the button loop, see the photos at the end of the file. -
Teen / Adult • Palm circumference = 6.75" - 7.75" • Finished size = 6.75" around palm, 11" in length
Round 1: Ch 25, HBhdc in 2nd ch from hook and in each chain across, bring ends together and join in first HBhdc (24)
Round 2: Ch 1, sc in first stitch, HBhdc in each remaining stitch around, do not join (24)
Round 3 - 5: HBhdc in each stitch around (24)
Round 6: HBhdc in first 12 stitches, ch 8, skip 3, HBhdc in 4th stitch and each remaining stitch around (21 hdc, 8 chains)
Round 7: HBhdc around in each stitch and chain stitch (29)
Round 8: HBhdc in each stitch around (29)
Round 9: HBhdc decrease, HBhdc around (28)
Round 10: HBhdc decrease, HBhdc around (27)
Round 11: HBhdc decrease, HBhdc around (26)
Round 12: HBhdc decrease, HBhdc around (25)
Round 13 - 15: HBhdc in each stitch around (25)
Round 16: Make 2 HBhdc in first stitch, HBhdc around (26)
Round 17: HBhdc in each stitch around (26)
Round 18: Make 2 HBhdc in first stitch, HBhdc around (27)
Round 19: HBhdc in each stitch around (27)
Round 20: Make 2 HBhdc in first stitch, HBhdc around (28)
Round 21: HBhdc in each stitch around (28)
Round 22: Make 2 HBhdc in first stitch, HBhdc around (29)
Round 23: HBhdc in each stitch around (29)
Round 24: Make 2 HBhdc in first stitch, HBhdc around (30)
Round 25: HBhdc in each stitch around (30)
Round 26: Make 2 HBhdc in first stitch, HBhdc around (31)
Round 27: HBhdc in each stitch around (31)
Round 28: Make 2 HBhdc in first stitch, HBhdc around (32)
Round 29: HBhdc in each stitch around (32) - Taper off the cuff stitches by working the following: Sc 3, sl st 3, FO
Finish off the arm cuff and finger opening with a Round of SC in a Contrasting Color.
Thumb - If leaving the thumb uncovered, skip these instructions and work a round of SC in a contrasting color.
Pull up a loop in the second stitch that was skipped when making the thumb opening. The first round will have stitches placed evenly around, but with decreases made in the "corners" of the thumb - see images at end of file.
Round 1: Ch 1, HBhdc in first 2 stitches, HBhdc decrease, HBhdc in next 10 stitches, HBhdc decrease, HBhdc 1, join in first HBhdc (15)
Round 2: *HBhdc decrease, HBhdc in next 5 stitches* repeat once, HBhdc in last stitch, join (13)
Round 3: *HBhdc decrease, HBhdc in next 4 stitches* repeat once, HBhdc in last stitch, join (11)
Round 4: HBhdc in each stitch around, join (9)
Round 5 - 7: Repeat Round 4 - if you need to increase thumb length add another round of HBhdc
Round 8: *Sc2tog* 4 times, sc in last stitch, join and fasten off. With a yarn needle, weave the tail through the front loop of each stitch around and pull gently to close the opening.
Mitten Top - Leave a lengthy tail for making the button loop
Round 1: Ch 2, make 8 HBhdc in 2nd chain from hook, join in first HBhdc (8)
Round 2: Ch 1, make 2 HBhdc in each stitch around, join (16)
Round 3: Ch 1, *make 2 HBhdc in first stitch, HBhdc in next stitch* repeat around, join (24)
Round 4: Ch 1, make 2 HBhdc in first stitch, HBhdc in each remaining stitch around, join (25)
Round 5 - 12: Ch 1, HBhdc in each stitch around, join (25)
Fasten off, leaving a lengthy tail for sewing.
For placement of the mitten top, buttons and how to make the button loop, see the photos at the end of the file. -
Large Adult • Palm circumference = 7.75" - 9" • Finished size = 7.75" around palm, 14" in length
Round 1: Ch 28, HBhdc in 2nd ch from hook and in each chain across, join (27)
Round 2: Ch 1, sc in first stitch, HBhdc in each remaining stitch around, do not join (27)
Round 3 - 5: HBhdc in each stitch around (27)
Round 6: HBhdc in first 11 stitches, ch 9, skip 3, HBhdc in 4th stitch and each remaining stitch around (24 hdc, 9 chains)
Round 7: HBhdc around in each stitch and chain stitch (33)
Round 8: HBhdc in each stitch around (33)
Round 9: HBhdc decrease, HBhdc around (32)
Round 10: HBhdc decrease, HBhdc around (31)
Round 11: HBhdc decrease, HBhdc around (30)
Round 12: HBhdc decrease, HBhdc around (29)
Round 13: HBhdc decrease, HBhdc around (28)
Round 14 - 16: HBhdc in each stitch around (28)
Round 17: Make 2 HBhdc in first stitch, HBhdc around (29)
Round 18: HBhdc in each stitch around (29)
Round 19: Make 2 HBhdc in first stitch, HBhdc around (30)
Round 20: HBhdc in each stitch around (30)
Round 21: Make 2 HBhdc in first stitch, HBhdc around (31)
Round 22: HBhdc in each stitch around (31)
Round 23: Make 2 HBhdc in first stitch, HBhdc around (32)
Round 24: HBhdc in each stitch around (32)
Round 25: Make 2 HBhdc in first stitch, HBhdc around (33)
Round 26: HBhdc in each stitch around (33)
Round 27: Make 2 HBhdc in first stitch, HBhdc around (34)
Round 28: HBhdc in each stitch around (34)
Round 29: Make 2 HBhdc in first stitch, HBhdc around (35)
Round 30: HBhdc in each stitch around (35)
Round 31: Make 2 HBhdc in first stitch, HBhdc around (36)
Round 32: HBhdc in each stitch around (36)
Round 33: HBhdc in each stitch around (36) - Taper off the cuff stitches by working the following: Sc 3, sl st 3, FO
Finish off the arm cuff and finger opening with a Round of SC in a Contrasting Color.
Thumb- If leaving the thumb uncovered, skip these instructions and work a round of SC in a contrasting color.
Pull up a loop in the second stitch that was skipped when making the thumb opening. The first round will have stitches placed evenly around, but with decreases made in the "corners" of the thumb - see images at end of file.
Round 1: Ch 1, HBhdc in first 2 stitches, HBhdc decrease, HBhdc in next 11 stitches, HBhdc decrease, HBhdc 1, join in first HBhdc (16)
Round 2: *HBhdc decrease, HBhdc in next 6 stitches* repeat once, join (14)
Round 3: *HBhdc decrease, HBhdc in next 5 stitches* repeat once, join (12)
Round 4: HBhdc in each stitch around, join (12)
Round 5 - 7: Repeat Round 4 - if you need to increase thumb length add another round of HBhdc
Round 8: *Sc2tog* 5 times, join and fasten off. With a yarn needle, weave the tail through the front loop of each stitch around and pull gently to close the opening.
Mitten Top - Leave a lengthy tail for making the button loop
Round 1: Ch 2, make 8 HBhdc in 2nd chain from hook, join in first HBhdc (8)
Round 2: Ch 1, make 2 HBhdc in each stitch around, join (16)
Round 3: Ch 1, *make 2 HBhdc in first stitch, HBhdc in next stitch* repeat around, join (24)
Round 4: Ch 1, *make 2 HBhdc in first stitch, HBhdc in next 5 stitches* repeat around, join (28)
Round 5 - 13: Ch 1, HBhdc in each stitch around, join (27)
Fasten off, leaving a lengthy tail for sewing.
For placement of the mitten top, buttons and how to make the button loop, see the photos at the end of the file.
Photo Aids
-
Round 1 of the Thumb Instructions:
-
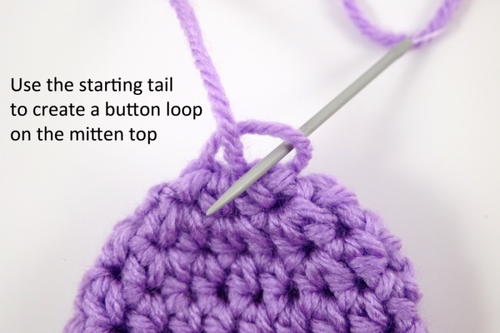
Making the Button Loop: Create a loop by weaving the tail through the opposite side of Round 1 and knot in place. Weave in the end.
-
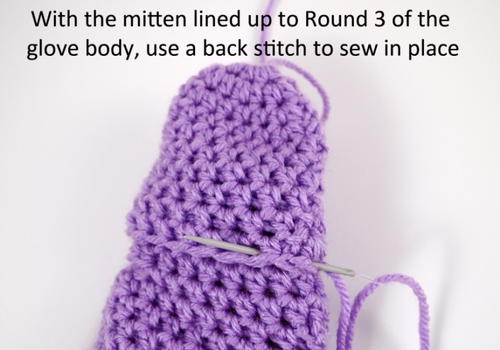
Attaching the Mitten Top: Sew the mitten top along the back of the hand only, so it can be flipped on or off the fingers.
Abbreviations
- Herringbone Half Double Crochet (HBhdc)
- yarn over, insert hook into the stitch being worked, yarn over, draw through the stitch and the first loop on the hook, yarn over, draw through both loops on the hook.
- HBhdc Decrease
- yarn over, insert hook into the stitch being worked, yarn over, draw through the stitch and the first loop on the hook, yarn over, insert hook into the next stitch, yarn over, draw through the stitch and the first loop on the hook, yarn over, draw through all loops on the hook to complete the stitch (decrease made).
Read NextIv Cover Or Fingerless Gloves
Your Recently Viewed Projects
Thanks for your comment. Don't forget to share!
mulberrygalprinces s
Sep 04, 2018
These are great. I have to make them for my cousin. She said fingerless gloves are ok but sometimes it's really cold and you need to cover the finger tips. This would solve that problem. She can take the tops off, text and then put them back on. Thank you for sharing.
Zeemer
Nov 25, 2016
Wow. Only for the effort of painstakingly writing the pattern for different ages, I'm giving this pattern a five-star rating. I am thankful. It's an A for the effort. Well, this Cosmic Convertible Crochet Fingerless Gloves is unique in the sense that the design includes an attached flap to cover the fingers in case it gets too cold. However, that flap looks weird when not being used as it hangs loosely by the wrist area looking like a skin tag. Well, you have the option to include or not to include the flap in case you want to do this fingerless glove. Thanks for the free pattern.
amberrae9238 67727 35
Nov 16, 2016
So, I've done the mitten and the flap. Very easy to follow and made the mitten and flap in about a day. I look forward to making more for Christmas gifts, except I don't know how to finish it! After you follow the directions for the flap, it tell you to get the instructions for attaching the flap and making the loop for the button with the pictures at the end of the file. I've looked everywhere and can't find anything! It's a little disappointing, especially since I really like this pattern. I'm not sure why the directions wouldn't just be put all in one place. If anyone has info on how to locate the rest of the directions, I'd be happy to hear for you. Until then, I guess I'm just going to try to finish it up without the directions and hope for the best.
Member 9265070
Dec 08, 2016
you continue to scroll do all the way (beyond all the clickbait) the pics showing the finishing will be there. Kind of a pain but they ARE there.
Report Inappropriate Comment
Are you sure you would like to report this comment? It will be flagged for our moderators to take action.
Thank you for taking the time to improve the content on our site.