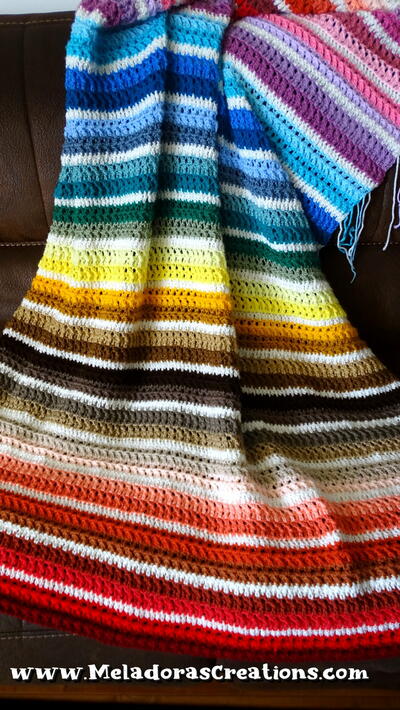
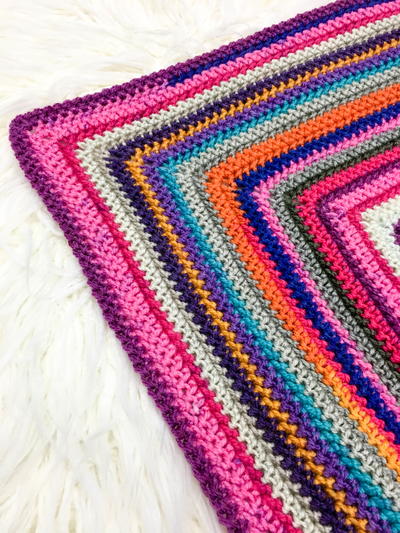
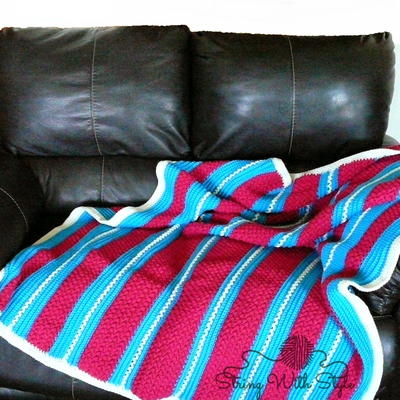
Striped Cotton Candy Afghan

For an afghan that has a unique look and feel, try the Striped Cotton Candy Afghan. It is worked from side to side instead of top to bottom, so the stitches have a nifty texture to them. By using such bright colors, you also get a fun accent piece that can brighten up any room. Show off your fun side by working up this crochet afghan pattern that will be unlike any other one you may already have. Vary the width of the stripes for the effect of an optical illusion!

Crochet HookK/10.5 or 6.5 mm hook
Yarn Weight(4) Medium Weight/Worsted Weight and Aran (16-20 stitches to 4 inches)
MATERIALS:
- Worsted Weight Yarn in 3 colors
- Color A: 1,110 yards (Model shown in Red Heart With Love Blue Hawaii)
- Color B: 1,480 yards (Model shown in Red Heart With Love Hot Pink)
- Color C: 370 yards (Model shown in Red Heart With Love Eggshell)
- Crochet Hook: K/6.5 mm
- Yarn Needle
4 sc x 12 rows in BLO = 4" x 3"
Notes
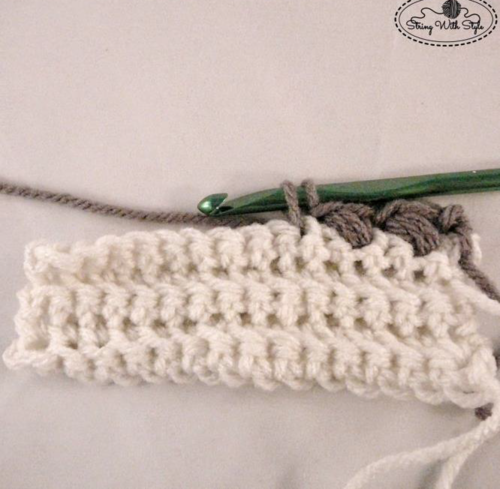
1. Make sure when working your bean sts that you don't yo before you insert your hook in the next st. If you yo before you insert your hook in the next st your bean sts won't lean to the side like they are supposed to.
2. Ch 2 at the beginning of bean st rows count as a hdc stitch.
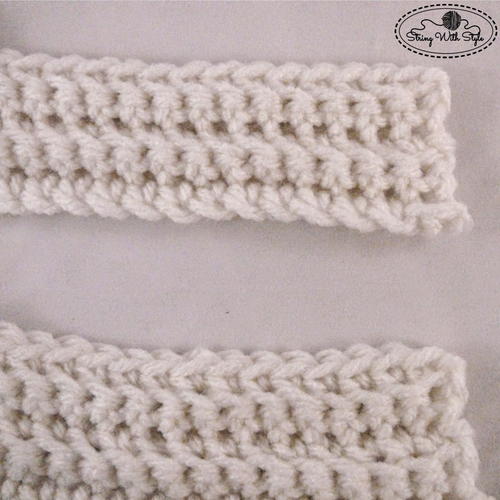
3. This afghan is worked in a total of 7 strips and then joined together.
4. After completing row 1 mark that row as the right side of your work. This will come in handy when it comes time to join all the strips together.
5. If you are a tighter crocheter make sure that you crochet your sc BLO rows bigger then you normally would or your bean sts will cause it arch. If you need to you can go up a hook size for that part.
Special Stitch:
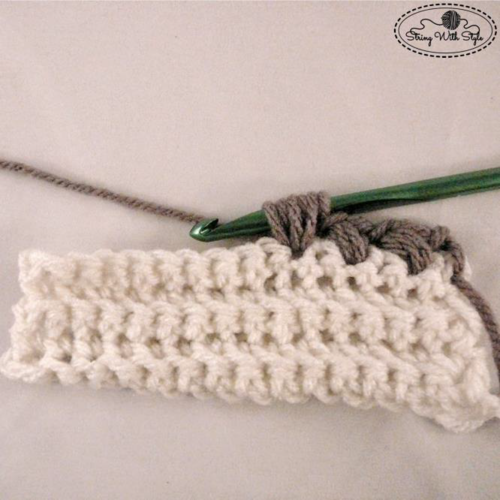
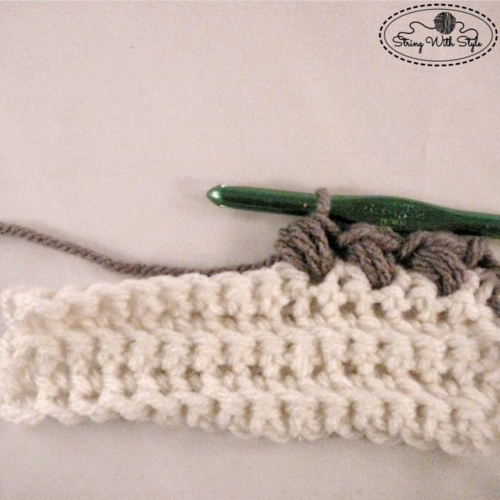
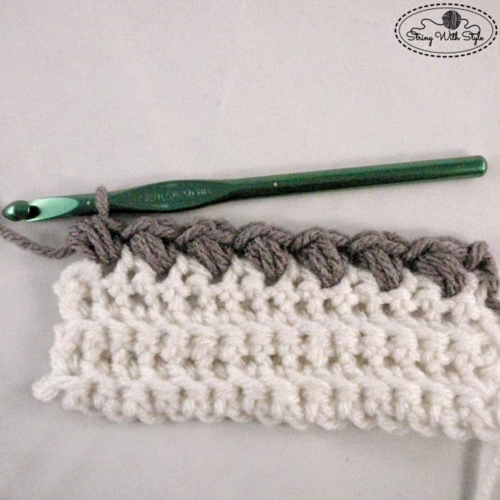
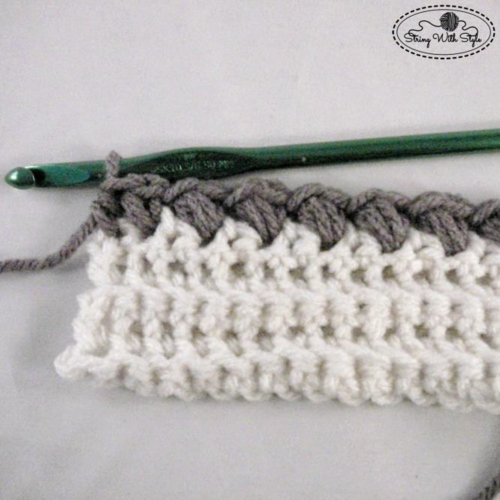
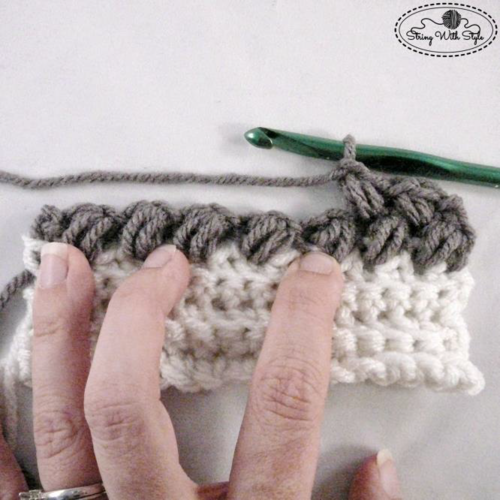
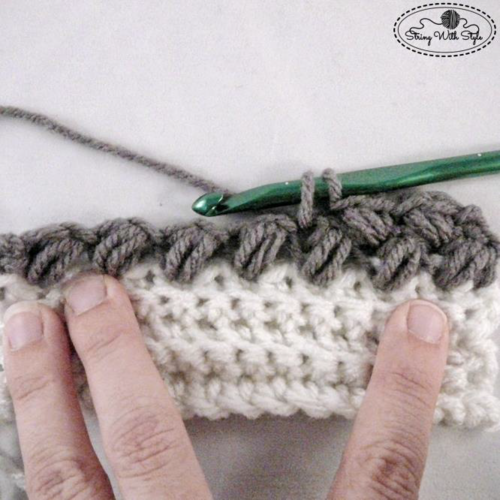
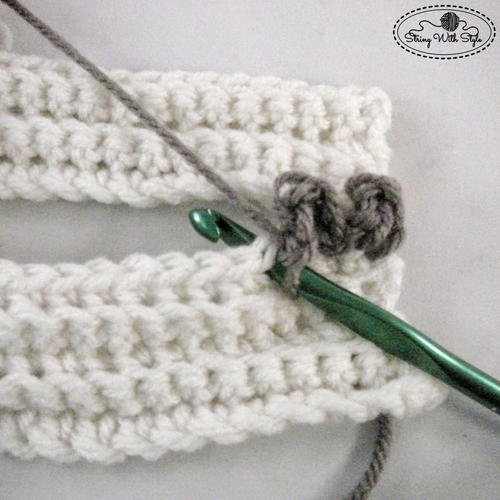
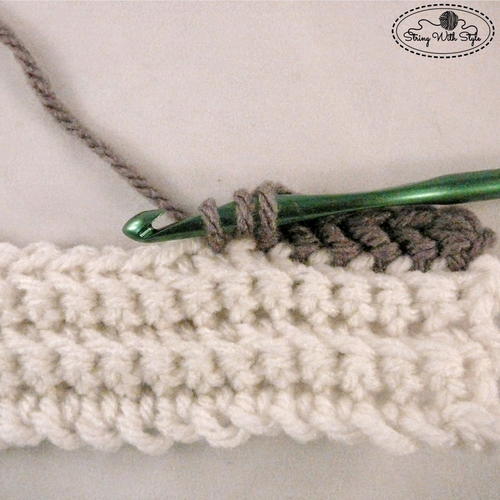
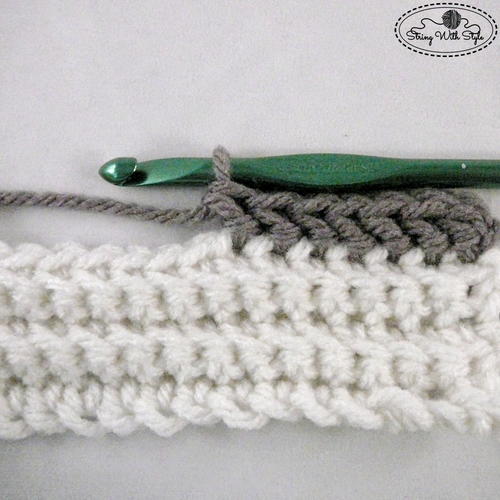
Bean Stitch:
-
Insert hook in designated st, draw up a loop to match height of previous st (about 1/2"),
-
*Yo, insert hook in same st, draw up a loop*, repeat *to* once more,
-
Yo, draw through all 6 loops on hook.
Directions for Strip 1 (Make 2)
-
Ch 182 with color A
-
Row 1: Beginning in second ch from hook sc in each ch. (181 sc) {Mark this as the right side}
-
Row 2: Ch 1, turn, working in BLO, sc in each st across. (181 sc)
-
Row 3-9: Repeat row 2. Change colors to color B at the end of row 9. (If you want to see how I change colors I always follow this tutorial from Sincerely Pam.)
-
Row 10: Ch 2, bean st in next st, *ch 1, skip next st, bean st in next st,* repeat *to* to the last st, DO NOT CH 1 AFTER THE LAST BEAN ST, hdc in last st. (90 bean sts)
-
Row 11: Ch 2, bean st in the top of the next bean st, *ch 1, skip one st, bean st in the top of the next bean st,* repeat *to* across row to last st (the ch 2 from the previous row), DO NOT CH 1 AFTER THE LAST BEAN ST, hdc in last st. (89 bean sts)
-
Row 12-14: Repeat rows 10 and 11 alternately ending with row 10. At the end of row 10 change back to color A.
-
Row 15: Ch 1, sc in the top of the hdc st and each bean st and ch st across. (181 sc)
-
Row 16-23: Repeat row 2.
-
Break yarn and weave in ends.
Directions for Strip 2 (Make 2)
-
Ch 182 with color A
-
Row 1: Beginning in second ch from hook sc in each ch. (181 sc) {Mark this as the right side}
-
Row 2: Ch 1, turn, working in BLO, sc in each st across. (181 sc)
-
Row 3-7: Repeat row 2. Change colors to color B at the end of row 9.
-
Row 8: Ch 2, bean st in next st, *ch 1, skip next st, bean st in next st,* repeat *to* to the last st, DO NOT CH 1 AFTER THE LAST BEAN ST, hdc in last st. (90 bean sts)
-
Row 9: Ch 2, bean st in the top of the next bean st, *ch 1, skip one st, bean st in the top of the next bean st,* repeat *to* across row to last st (the ch 2 from the previous row), DO NOT CH 1 AFTER THE LAST BEAN ST, hdc in last st. (89 bean sts)
-
Row 10-14: Repeat rows 10 and 11 alternately ending with row 10. At the end of row 10 change back to color A.
-
Row 15: Ch 1, sc in the top of the hdc st and each bean st and ch st across. (181 sc)
-
Row 16-21: Repeat row 2.
-
Break yarn and weave in ends.
Directions for Strip 3 (Make 2)
-
Ch 182 with color A
-
Row 1: Beginning in second ch from hook sc in each ch. (181 sc) {Mark this as the right side}
-
Row 2: Ch 1, turn, working in BLO, sc in each st across. (181 sc)
-
Row 3-5: Repeat row 2. Change colors to color B at the end of row 5.
-
Row 6: Ch 2, bean st in next st, *ch 1, skip next st, bean st in next st,* repeat *to* to the last st, DO NOT CH 1 AFTER THE LAST BEAN ST, hdc in last st. (90 bean sts)
-
Row 7: Ch 2, bean st in the top of the next bean st, *ch 1, skip one st, bean st in the top of the next bean st,* repeat *to* across row to last st (the ch 2 from the previous row), DO NOT CH 1 AFTER THE LAST BEAN ST, hdc in last st. (89 bean sts)
-
Row 8-14: Repeat rows 6 and 7 alternately ending with row 6. At the end of row 6 change back to color A.
-
Row 15: Ch 1, sc in the top of the hdc st and each bean st and ch st across. (181 sc)
-
Row 16-19: Repeat row 2.
-
Break yarn and weave in ends.
Directions for Strip 4 (Make 1)
-
Ch 182 with color A
-
Row 1: Beginning in second ch from hook sc in each ch. (181 sc) {Mark this as the right side}
-
Row 2: Ch 1, turn, working in BLO, sc in each st across. (181 sc)
-
Row 3: Repeat row 2. Change colors to color B at the end of row.
-
Row 4: Ch 2, bean st in next st, *ch 1, skip next st, bean st in next st,* repeat *to* to the last st, DO NOT CH 1 AFTER THE LAST BEAN ST, hdc in last st. (90 bean sts)
-
Row 5: Ch 2, bean st in the top of the next bean st, *ch 1, skip one st, bean st in the top of the next bean st,* repeat *to* across row to last st (the ch 2 from the previous row), DO NOT CH 1 AFTER THE LAST BEAN ST, hdc in last st. (89 bean sts)
-
Row 6-14: Repeat rows 4 and 5 alternately ending with row 4. At the end of row 4 change back to color A.
-
Row 15: Ch 1, sc in the top of the hdc st and each bean st and ch st across. (181 sc)
-
Row 16-17: Repeat row 2.
-
Break yarn and weave in ends.
Directions for Assembly
-
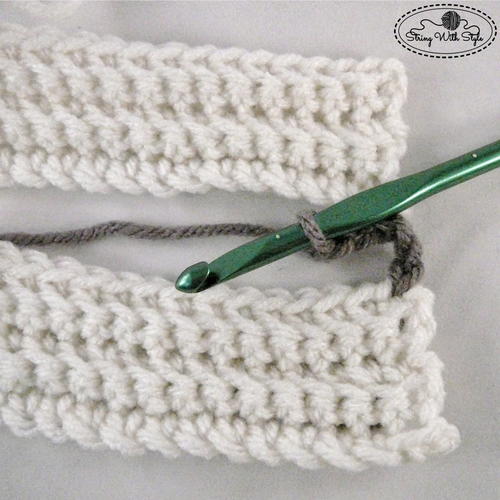
Begin by placing strip one and strip two back to back, wrong sides facing each other, and then lay them out flat. You are going to join the last row of strip one to the first row of strip two.
-
Join Color C yarn to first st on strip one, ch 2, sl st to first st on strip two. (Make sure that your hook is always going from the outside of your work, the right side, to the inside of your work, the wrong side. This will keep all the stitches on the top side of your afghan.)
-
Ch 2, sl st to the second st on strip one (you will not have skipped any stitches from the first stitch made on strip one).
-
Ch 2, skip one st on strip two, sl st to next st, *ch 2, skip one st on strip one, sl st to next st on strip one, ch 2, skip one st on strip two, sl st to next st on strip two* repeat *to* across, ch 2, sl st to last st on strip 1, break yarn.
-
Repeat the above steps joining your strips together in this order: Strip two to strip three. Strip three to strip four. Strip four to strip three. Strip three to strip two. Strip two to strip one. You may of course do this in any order that you like if you want a different effect out of your afghan.
Border
-
This section has a special st, the slant hdc. Please make sure that you look through these photos and reference back to them as needed. The entire border will be done with this st.
-
Yarn over, insert hook in st indicated, pull up a loop.
-
Take the loop closest to your hook and draw it through the loop just behind it leaving just two loops on your hook.
-
Yarn over and draw through both remaining loops on hook.
-
Join Color C to any st on one of the sides of the Vertical Textures Afghan, do not join on the top or the bottom. Ch 1, slant hdc in same st and each st along the side to the last st.
-
3 slant hdc in last st, mark center st of three stitches for next round.
-
Working across next side place one slant hdc in the end of each row (sc and bean st rows), place one slant hdc in the ch 1 spaces separating strips. When you reach the end of the row place 3 slant hdc in the last st, mark the center st of the three sts for the next round.
-
Work the next two sides in the same manner as you did the first two and join with a sl st to the top of the first slant hdc. Ch 1, turn.
-
Place one slant hdc in turning st and in each stitch around entire afghan. When you come to a st marker place 3 slant hdc in that stitch, mark the center st of the three stitches for the next round, join with a sl st to first slant hdc, ch 1 turn.
-
Work around the blanket one more time in the same manner you just did the last round, join with a sl st to top of first slant hdc, break yarn and weave in ends.

Read NextFireside Plaid Blanket
Your Recently Viewed Projects
Thanks for your comment. Don't forget to share!
JaneEK
Mar 29, 2018
Its not the stitch pattern or difficulty that grabbed my attention but rather the amazing color scheme. The most surprising thing by far is that this project is worked in strips rather than as one continuous afghan. Is there a reason for working this pattern this particular way? The Bean Stitch (EXCELLENT photo tutorial, by the way) is worked back and forth, so I dont see why this isnt one piece.
greenda 0213127
Mar 25, 2017
very frustrating - the pattern is not complete. please post full pattern
AFC Editor Julia
Mar 27, 2017
Hi greenda, Sorry for the inconvenience! I've just emailed the designer who created this pattern to send me any missing parts. I will update this page accordingly as soon as I hear back. Thank you! Julia, editor for AllFreeCrochet
AFC Editor Julia
Mar 29, 2017
Hi greenda, The pattern has been updated! :) Thanks, Julia, editor for AllFreeCrochet
kidderstoo 6041518
Aug 26, 2014
I'm really getting agitated by these so called patterns! They show you a picture,then what you need, click on the pattern .... NOT THERE!!!! try many times even in different ways.NOT THERE!!! Am I wasting my time on this site?
Report Inappropriate Comment
Are you sure you would like to report this comment? It will be flagged for our moderators to take action.
Thank you for taking the time to improve the content on our site.