This project was submitted by one of our readers, just like you.
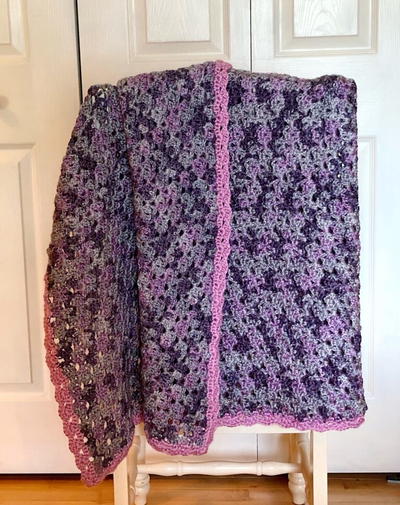
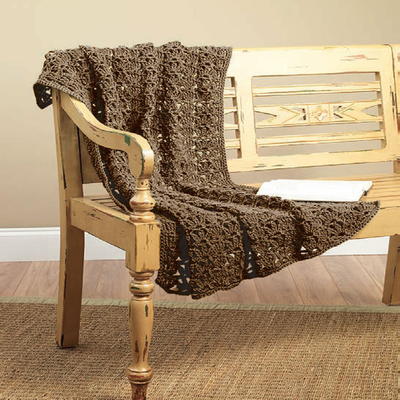
Modern Baroque Design Crochet Throw

Modern Baroque Design Crochet Throw
"Easily create this Modern Baroque Design Crochet Throw. Pair the intricate yarn colors with a textured crochet stitch for a beautiful ornate looking throw. If you love modern baroque interior designs and style, this blanket will fit in your home decor nicely. This crochet blanket pattern will be a treasured heirloom for years to come. Use two versions of the v stitch to achieve a beautiful look and feel. This pattern is a four-row repeat to create the luxurious crochet pattern. Each row is starts with a Chainless starting stitch. For instance, use the Chainless Double Crochet rather than a Chain 3. Use the Chainless Single Crochet rather than a Chain 1. Use Stitch Markers after each four-row repeat. This will help be able to tell what row pattern you are on when you pick your work back up. Special Stitches Used V Stitch: (DC, CH 1, DC) into the same stitch 2 DC – V Stitch: (2 DC, CH 1, 2 DC) into the same stitch."
NotesChanging the Blanket Size: The blanket is worked in multiples of 5 + 7. Therefore, if you would like the blanket wider or narrower, make sure that the foundational row of stitches is divisible by 5. Then add 7. For instance, this blanket is 145 + 7 stitches, which equals 152 stitches. Adjust the length by just stopping on after any one of the four row repeats.

Crochet HookH/8 or 5 mm hook
Yarn Weight(4) Medium Weight/Worsted Weight and Aran (16-20 stitches to 4 inches)
Crochet Gauge(16-20 stitches to 4 inches)
Finished SizeThe overall size of the blanket is 37.5 inches wide X 45 inches long.
Materials List
- Baroque Loops and Threads Yarn Total of 7 skeins or 1,449 yards.
- Blackberry Caron Simply Soft Yarn Total of 1/2 skein or approximately 160 yards.
- Crochet Hook Size H
- Yarn Needle
- Scissors
Instructions
-
Begin: Chain 152 Stitches
-
Row 2: Chainless DC into the first ST, Skip 2 STs, 2 DC – V Stitch into the next ST, [skip 4 STs, 2 DC – V Stitch into the next ST]. Repeat between [ ] until 3 Stitches left. Then SK 2 STs and DC in last ST, turn.
-
Row 3: 2 DC into first ST, CH 1, SK 2 STs, SC into the next CH 1 SP, CH 1. [SK 2 Sts, V Stitch into the next CH 1 SP of the V Stitch of the previous row, CH 1, SK 2 STs, Sc into the next CH 1 SP, CH 1]. Repeat between [ ] until 3 STs left. Then SK 2 STs and 2 DC into last ST, turn.
-
Row 4: (DC, CH 1, 2 DC) into first ST, [SK next (DC, CH 1 SP, SC, CH 1 SP), 2 DC – V Stitch into the next CH 1 SP of the V Stitch of the previous row]. Repeat between [ ] until the last CH 1 SP of the V Stitch, then SK (CH 1 SP, SC, CH 1 SP, DC). end with (2 DC, CH 1, DC) into the last DC ST, turn.
-
Row 5: SC into first ST, CH 1, SK next Ch 1 SP. [SK 2 STs, V Stitch into the CH 1 SP space between 2 DC – V Stitch of the previous row, CH 1, SK 2 STs, SC into the next CH 1 SP, CH 1]. Repeat between [ ] until last 2 DC – V Stitches of previous row. CH 1, SK 2 STs, SK next CH 1 SP, SC into last DC ST, turn.
-
Row 6: Dc into the first ST, SK next CH 1 SP. [2 DC – V Stitch into next CH 1 SP of the V Stitch of the previous row, SK next (CH 1 SP, SC, CH 1 SP)] Repeat between [ ] until the last CH 1 SP of the V Stitch of previous row. SK next CH 1 SP, DC into last SC ST, turn.
-
Row 7: 2 DC into the first ST, CH 1, SK 2 STs, SC into next CH 1 SP, CH 1 [SK 2 STs, V Stitch into the CH 1 space between the 2 DC – V Stitches of the previous row, CH 1 SK 2 STs, SC into the next CH 1 SP, CH 1]. Repeat to the last 2 STS. Skip to STs, DC into the last DC ST, turn.
-
Row 8: (DC, CH 1, 2 DC) into first ST, [SK next (DC, CH 1 SP, SC, CH 1 SP), 2 DC – V Stitch into the next CH 1 SP of the V Stitch of the previous row]. Repeat between [ ] until the last CH 1 SP of the V Stitch, then SK (CH 1 SP, SC, CH 1 SP, DC). end with (2 DC, CH 1, DC) into the last DC ST, turn.
-
Row 9: SC into first ST, CH 1, SK next Ch 1 SP. [SK 2 STs, V Stitch into the CH 1 SP space between 2 DC – V Stitch of the previous row, CH 1, SK 2 STs, SC into the next CH 1 SP, CH 1]. Repeat between [ ] until last 2 DC – V Stitches of previous row. CH 1, SK 2 STs, SK next CH 1 SP, SC into last DC ST, turn.
-
Repeat Crochet Rows
Continue on with the pattern making it as long as you wish by repeating rows 6 – 9. After the initial 9 row set up, I repeated rows 6 – 9 33 times or until the crochet blanket was 64 inches long.
Border
-
Begin with Single Crochet
Starting with the Blackberry Caron Simply Soft Yarn.
Both of the options include a Single Crochet in each Stitch all the way around the blanket. Make sure to Crochet 3 Single Crochet Stitches in each corner. This helps ease the stitches around the corners and they will lay flat. -
Second Row of Crochet: Both of the edge options also have the 2 double crochet v stitch.
Start in one of the corners with 2 DC. Skip 2, in the next ST, complete 2 DC, CH 1, 2 DC. [SK 4, in next ST, complete 2 DC, CH 1, 2 DC]. Repeat between [ ] until the next corner.
NOTE: Depending on how many stitches were completed along the edge, you my be a stitch short. Go ahead and adjust the last stitch count so that there is a 2 DC V Stitch 2 stitches away from the corner SC ST. -
Continuing On: Once the last 2 DC V Stitch is completed, SK 2 Stitches, complete a 2 DC V Stitch in the corner ST, SK 2 Stitches, complete 2 DC V Stitch. Then carry on with the repeating pattern [SK 4, in next ST, complete 2 DC, CH 1, 2 DC]. Repeat between [ ] until the next corner.
Complete the next two corners. End with 2 DC, CH 1, and a SL ST into the first DC. -
Second Edging Option: Complete the directions for the first edging option. There will be one more row added. There is also two options for this last row. One option is to use the Blackberry yarn and the other is to use the Baroque yarn.
DIRECTIONS: Complete a SC in each stitch. When you come to the CH 1 spaces between the 2 DC stitches, complete SC, CH 3, SC. Repeat this all the way around the blanket. SL ST into first ST. (you are creating a crochet picot stitch).

Read NextScrap Yarn Blanket