Tree Sloth Crochet Pattern

Turn your home into a crochet animal habitat with this cute Tree Sloth Crochet Pattern. Easily use this free crochet pattern to make multiple crochet sloths that you can use to hang inside a kid's bedroom or use as home decorations. Kids will love taking these little creatures on all their backyard adventures and will be excited to let these sloths become their new best friends! This crochet sloth pattern is a great project to make for kids who love animals or learning about the natural world. Find out how adorable these tree sloth friends will look once completed!

Notes1. Sloth is made from 8 pieces: 2 eye patches, 2 arms, 2 legs, head, and body.
2. Head, body, arms, and legs are worked in continuous rounds (spiral), with light side always facing. Claws are worked directly onto the ends of arms and legs. Eye patches begin in continuous rounds and end with a row.
3. Arms are attached to body while a neck round of body is worked. Body, head, legs and eye patches are sewn together. Body, head and legs can be sewn together using yarn scraps and long yarn tails. For best results, use
hand sewing thread and needle when sewing eye patches to face.
4. Eye patches are attached to head using safety eyes before head is complete, while head is still relatively flat, for ease in access. Do not use safety eyes if making for child under 2 years of age.
5. Gauge is not critical for this project. Work tightly so stuffing will not show
between stitches.
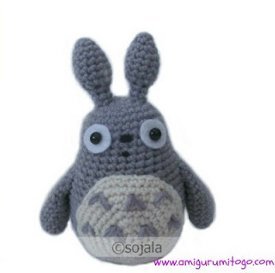
6. Use photograph as a guide for placement of pieces.

Crochet HookF/5 or 3.75 mm hook
Yarn Weight(4) Medium Weight/Worsted Weight and Aran (16-20 stitches to 4 inches)
Finished SizeSloth measures about 9" [23 cm] tall, measured in seated position from bottom to top of head. Sloth measures about 15" [38 cm] tall, measured from tip of leg claws to top of head.
Materials List
- RED HEART® With Love®: 1 skein each of 1401 Pewter A, 1101 Eggshell B, and 1979 Platinum C OR 1 skein each of 1441 Light Grey A, 1101 Eggshell B, and 1979 Platinum C
- Susan Bates® Crochet Hook: 3.75 mm [US F-5]
- Stitch marker
- Stuffing
- 1 pair of 10mm safety eyes
- Black embroidery floss and embroidery needle
- Black or charcoal sewing thread and hand sewing needle
- Straight pins
- Yarn needle
Instructions
Eye Patches (make 2)
-
Round 1 (right side): Ch 1, work 6 sc in ring; do not join, work in continuous rounds (spiral)—6 sc. Place a marker in the last sc worked to indicate end of round. Move marker up as each round is completed.
-
Round 2: Work 2 hdc in each st around—12 hdc.
-
Row 3: Ch 5, hdc in 2nd ch from hook and in next 3 ch, slip st in next hdc of Round 2. Fasten off.
Arms (make 2)
Beginning at top (shoulder) with A, leaving a 16" [40.5 cm] beginning tail, ch 14; join with slip st in first ch to form a ring.
-
Round 1: Ch 1, sc in same ch as joining slip st and in each remaining ch around; do not join, work in continuous rounds (spiral)—14 sc.
-
Place a marker in the last sc worked to indicate end of round. Move marker up as each round is completed.
-
Rounds 2-29: Sc in each st around, stuffing piece as work progresses.
-
Round 30: [Sc in next 2 sts, sc2tog] 3 times, sc in last 2 sts—11 sc.
-
Round 31: [Sc2tog, sc in next 2 sts] twice, sc2tog, sc in last st—8 sc. Finish stuffing piece. Fasten off, leaving a long tail. Hold edges of last round together, with 4 stitches on top layer matching 4 stitches on back layer. Use ending tail to sew end closed, sewing through back loop of top layer and front loop of back layer.
-
Close top opening: Working along opposite side of foundation ch, insert hook in ch at base of sc near beginning tail, with beginning tail, yarn over and draw up a loop, hold edges of top opening together, with 7 stitches on top layer and 7 stitches on back layer, ch 1, working through both layers, sc evenly across to close top opening. Securely weave in and trim end.
Legs (make 2)
Beginning at top (hip) with A, leaving a 14" [35.5 cm] beginning tail, ch 16; join with slip st in first ch to form a ring.
-
Round 1: Ch 1, sc in same ch as joining slip st and in each remaining ch around; do not join, work in continuous rounds (spiral)—16 sc.
Place a marker in the last sc worked to indicate end of round. Move marker up as each round is completed. -
Rounds 2-32: Sc in each st around, stuffing piece as work progresses.
-
Round 33: [Sc in next 2 sts, sc2tog] 4 times—12 sc.
-
Round 34: [Sc in next st, sc2tog] 4 times—8 sc.
Finish stuffing piece.
Fasten off, leaving a long tail. Hold edges of last round together, with 4 stitches on top layer matching 4 stitches on back layer. Use ending tail to sew end closed, sewing through back loop of top layer and front loop of back layer. -
Close top opening: Hold edges of top opening together. With beginning tail, sew edges together to close top opening. Do not weave in or trim end; it can be used later for sewing leg to body.
Head
Beginning at nose and working towards back of head, with C, ch 7.
-
Nose
Round 1 (right side): Working in back bumps of foundation ch, sc in 2nd ch from hook and next 5 ch; working along opposite side of foundation ch, sc in next 6 ch; join with slip st in first sc— 12 sc.
Round 2: Ch 1, sc in same st as joining slip st and in next 4 sts, 2 sc in next st, sc in next 5 sts, place a marker in the center sc of the 5 sc just made, 2 sc in last st; join with slip st in first sc—14 sc. Fasten off. -
Face
Round 3: With right side facing, working in back loops only, join B with slip st in marked sc of Round 2, remove marker, ch 1, sc in same sc and in each remaining sc around; join with slip st in first sc— 14 sc.
Round 4: [Sc in next st, 2 sc in next st] 7 times; do not join, work in continuous rounds (spiral)—21 sc. Place a marker in the last sc worked to indicate end of round. Move marker up as each round is completed.
Round 5: [Sc in next 2 sts, 2 sc in next st] 7 times—28 sc.
Round 6: [Sc in next 3 sts, 2 sc in next st] 7 times—35 sc.
Round 7: [Sc in next 4 sts, 2 sc in next st] 7 times—42 sc.
Round 8: [Sc in next 5 sts, 2 sc in next st] 7 times—49 sc.
Round 9: [Sc in next 6 sts, 2 sc in next st] 7 times—56 sc.
Rounds 10 and 11: Sc in each st around.
Round 12: Sc in each st around; join with slip st in first sc of this round. Fasten off.
Round 13: With right side facing, working in back loops only, join A with slip st in first sc of Round 12 (same sc as joining slip st), ch 1, sc in same sc and in each remaining sc around; do not join, work in continuous rounds (spiral)— 56 sc.
Place a marker in the last sc worked to indicate end of round. Move marker up as each round is completed.
Do not fasten off.
-
Attach Eyes
Use a length of contrasting color scrap yarn to mark face for eye patch placement as follows: Thread scrap yarn onto yarn needle. Imagine a straight line across face that lies straight across widest part of nose. Insert needle from back, onto the line and about 3 rounds in from edge of face (face is B-colored part), bring yarn straight across widest part of nose and then insert needle from front about 3 rounds in from opposite edge of face.
Attach a safety eye and eye patch on one side of face as follows: Insert a safety eye into the middle of the circular portion of one eye patch then between Rounds 9 and 10 of the face and on the scrap yarn line. Do not attach washer. Repeat to position second eye and eye patch on opposite side of face. Check for even placement. Make certain that the narrow portion (Row 3) of each eye patch faces downwards and outwards from the eye and that both eye patches are at about the same angle. Snap the safety eye washers into place. Do not sew the eye patches in place, they will be sewn to face later.
Tips: Pinning the eye patches using straight pins may be helpful in assuring that the patch locations and angles match. If double layer of crochet fabric is too thick to snap the washer in place, try putting the washer on upside down with the small raised ring on top of the washer facing in towards the post. -
Back of Head
Rounds 14-18: Sc in each st around.
Round 19: [Sc in next 6 sts, sc2tog] 7 times—49 sc.
Rounds 20 and 21: Sc in each st around.
Round 22: [Sc in next 5 sts, sc2tog] 7 times—42 sc.
Round 23: Sc in each st around.
Round 24: [Sc in next 4 sts, sc2tog] 7 times—35 sc.
Round 25: Sc in each st around.
Round 26: [Sc in next 3 sts, sc2tog] 7 times—28 sc. Stuff piece firmly.
Round 27: [Sc in next 2 sts, sc2tog] 7 times—21 sc.
Round 28: [Sc in next st, sc2tog] 7 times—14 sc.
Finish stuffing piece.
Fasten off, leaving a long tail. Thread ending tail through stitches of last round and pull to close opening. Securely weave in and trim end.
Body
Beginning at bottom of body with A, make an adjustable ring.
-
Round 1 (right side): Ch 1, work 6 sc in ring; do not join, work in continuous rounds (spiral)—6 sc.
Place a marker in the last sc worked to indicate end of round. Move marker up as each round is completed. -
Round 2: Work 2 sc in each st around—12 sc.
-
Round 3: [Sc in next st, 2 sc in next st] 6 times—18 sc.
-
Round 4: [Sc in next 2 sts, 2 sc in next st] 6 times—24 sc.
-
Round 5: [Sc in next 3 sts, 2 sc in next st] 6 times—30 sc.
-
Round 6: [Sc in next 4 sts, 2 sc in next st] 6 times—36 sc.
-
Round 7: [Sc in next 5 sts, 2 sc in next st] 6 times—42 sc.
-
Round 8: [Sc in next 6 sts, 2 sc in next st] 6 times—48 sc.
-
Round 9: [Sc in next 7 sts, 2 sc in next st] 6 times—54 sc.
-
Round 10: [Sc in next 8 sts, 2 sc in next st] 6 times—60 sc.
-
Round 11: [Sc in next 9 sts, 2 sc in next st] 6 times—66 sc
-
Rounds 12-14: Sc in each st around.
Note: Some stitches of next round are worked only into back loops. Later, the tops of the legs are sewn to the unused front loops. -
Round 15: Sc-blo in next 8 sts, sc in next 6 sts, sc-blo in next 8 sts, sc in each remaining st around.
-
Rounds 16-21: Sc in each st around.
-
Round 22: [Sc in next 9 sts, sc2tog] 6 times—60 sc.
-
Round 23: [Sc in next 4 sts, sc2tog] 10 times—50 sc.
-
Rounds 24-30: Sc in each st around.
-
Round 31: [Sc in next 8 sts, sc2tog] 5 times—45 sc.
-
Round 32: [Sc in next 7 sts, sc2tog] 5 times—40 sc.
-
Round 33: [Sc in next 6 sts, sc2tog] 5 times—35 sc.
-
Neck
Round 34: [Sc in next 5 sts, sc2tog] 5 times—30 sc. -
Mark Stitches for Arm Placement
Use a length of contrasting color scrap yarn to mark for arm placement as follows: Hold one end of scrap yarn immediately before the first unworked front loop of Round 15. Stretch the scrap yarn upwards in a straight line to Round 34 and place a marker in the Round 34 stitch at the straight line. Moving towards the back, skip the next 5 stitches of Round 34 and place a marker in the next stitch. The two markers just placed indicate the beginning and ending stitches where one arm will be attached. Repeat this process to mark stitches for the other arm, beginning by holding one end of scrap yarn immediately following the last unworked front loop of Round 15. -
Round 35: *Sc in each st to next arm marker, hold top of arm against Round 34 with sts matching the marked sts and the sts between the markers; working through both layers, sc in next 7 sts; repeat from * once more, sc in each st to end of round—30 sc. Remove arm markers.
-
Rounds 36-38: Sc in each st around. Stuff piece firmly. Fasten off, leaving a long tail for sewing head to body.
-
Claws
Working into stitches of last round of leg and over the sewing stitches used to close end of leg. Skip first st, join B with slip st in next st, *ch 6, slip st in back bump of 2nd ch from hook and in back bump of next 4 ch, slip st in same st of leg and in next st of leg; repeat from * once more (2 claws made), ch 6, slip st in back bump of 2nd ch from hook and in back bump of next 4 ch, slip st in same st of leg (3rd claw made). Fasten off. Weave in and trim ends. Repeat to work claws on second leg and both arms.
Finishing
-
Pin eye patches smoothly to face. With black sewing thread and needle, sew patches securely in place, using small whip stitches. Knot thread securely and trim excess. With three strands of black embroidery floss and embroidery needle, embroider a running stitch or outline stitch upward curving mouth on face. Embroider mouth over six single crochet stitches, evenly spaced about three rounds down from the bottom of the nose and following the curvature of the single crochet stitches.
-
Place head onto neck opening of body. Play around with the position to find the desired location for sewing head to neck. For example; having the face slightly turned to the side, facing frontwards or cocked to one side as if listening to something. Once position is decided, use yarn needle and yarn end from neck to sew head to neck. Sew through both loops of the neck opening stitches and around stitches from head for a secure attachment. Knot, weave in and trim yarn tail.
-
Sew legs to free front loops from Round 15 of body. Match the top edge of the leg with the eight unworked front loops. Using yarn needle and yarn end from leg, sew leg using a whip stitch in each front loop. Knot yarn securely and trim. Repeat for second leg.
-
Weave in and trim any remaining ends.

Abbreviations
- sc-blo (single crochet in back loop only)
- Insert hook in back loop only of next stitch, yarn over and pull up a loop, yarn over and draw through both loops on hook
- sc2tog (single crochet 2 stitches together)
- [Insert hook in next stitch, yarn over and pull up a loop] twice, yarn over and draw through all 3 loops on hook.
- Adjustable-ring
- Wrap yarn into a ring, ensuring that the tail falls behind the working yarn. Grip ring and tail between middle finger and thumb. Insert hook through center of ring, yarn over (with working yarn) and draw up a loop. Work stitches of first round in the ring, working over the yarn tail. After the first round of stitches is wo
- A, B, and C
- Color A, Color B, and Color C;
- ch
- chain
- hdc
- half double crochet
- sc
- single crochet
- st(s)
- stitch(es)
- [ ]
- work directions in brackets the number of times specified
- *
- repeat whatever follows the * as indicated