Fabulous Fall Table Runner
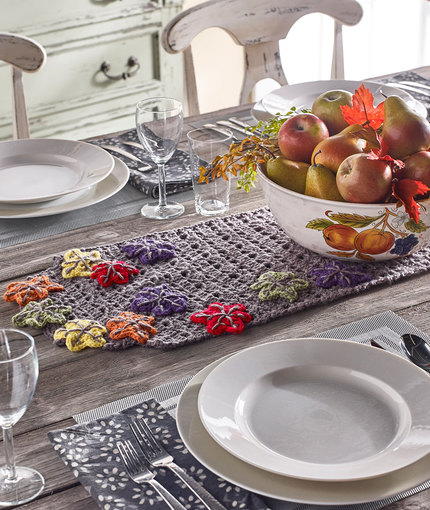
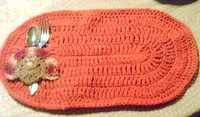
This Fabulous Fall Table Runner adds an elegant and festive touch to your table. Welcome your friends and family members to partake in a wonderful homemade meal by accenting your table with this leafy table runner. The fall leaves are crocheted separately, so you can make as many as you want in as many different colors as you want. All you need to do is attach them to the neutral background to create the perfect autumnal centerpiece. This fall table decoration looks great sitting underneath a bowl full of apples or pears. The warm and inviting colors of this crochet table runner pattern will make any tablescape pop.

Crochet HookH/8 or 5 mm hook
Yarn Weight(4) Medium Weight/Worsted Weight and Aran (16-20 stitches to 4 inches)
Crochet Gauge14 dc = 4 (10 cm); 8 rows = 4 (10 cm). CHECK YOUR GAUGE. Use any size hook to obtain the gauge.
Materials
- RED HEART® With Love®: 1 skein each 1
- 401 Pewter A
- 1201 Daffodil B
- 1909 Holly Berry C
- 1252 Mango D
- 1530 Violet E
Note: Only small quantities of B, C, D, and E are needed for this project.
- Susan Bates® Crochet Hook: 5mm [US H-8]
- Yarn needle
Runner measures 14” wide x 39” long (35.5 x 99 cm), excluding leaves.
Notes
Runner is worked from center out to curved ends. Leaves are made separately and sewn to runner.
Runner
First side
With A, ch 51.
Row 1 (right side): Dc in 4th ch from hook (beginning ch count as first dc) and in each ch across, turn—49 dc.
Row 2: Ch 1, sc in first dc, *ch 2, skip next 2 dc, dc in next dc, ch 2, skip next 2 dc, sc in next dc; repeat from * across ending with
last sc in 3rd ch of beginning ch, turn—9 sc, 8 dc, and 16 ch-2 spaces.
Row 3: Ch 3 (counts as first dc here and throughout), 2 dc in first sc, sc in next dc, *5 dc in next sc, sc in next dc; repeat from * to
last sc, 3 dc in last sc, turn—8 sc and 41 dc.
Row 4: Repeat Row 2.
Row 5: Ch 3, 2 dc in first ch-2 space, dc in next dc, 2 dc in next ch-2 space, dc in next sc, *2 dc in next ch-2 space, dc in next dc, 2
dc in next ch-2 space, dc in next sc; repeat from * across, turn—49 dc.
Row 6: Repeat Row 2.
Rows 7–30: Repeat Rows 3–6 six times.
Rows 31 and 32: Repeat Rows 3 and 4.
Row 33: Ch 1, slip st in first sc, slip st in first ch-2 space, slip st in next dc, slip st in next ch-2 space, slip st in next sc, ch 3, *2 dc in next ch-2 space, dc in next dc, 2 dc in next ch-2 space, dc in next sc; repeat from * 5 times; leave remaining sts and spaces unworked, turn—37 dc.
Row 34: Repeat Row 6.
Rows 35 and 36: Repeat Rows 3 and 4—7 sc, 6 dc, and 12 ch-2 spaces.
Row 37: Ch 1, slip st in first sc, slip st in first ch-2 space, slip st in next dc, slip st in next ch-2 space, slip st in next sc, ch 3, *2 dc in next ch-2 space, dc in next dc, 2 dc in next ch-2 space, dc in next sc; repeat from * 4 times; leave remaining sts and spaces unworked, turn—25 dc.
Row 38 and 39: Repeat Rows 2 and 3—6 sc and 26 dc.
Fasten off.
2nd Side
Row 1 (right side): With right side facing and working in opposite side of foundation ch, join A with slip st in first ch, ch 3, dc in each ch across, turn—49 dc.
Rows 2–39: Repeat Rows 2–39 of first side.
Find even more fall-tastic crochet patterns by checking out our collection of 15 Free Crochet Patterns for Harvest Decor.
Leaf
(make 16 - 4 each with B, C, D, and E)
Ch 7.
Row 1 (right side): Slip st in 2nd ch from hook and in next 4 ch (stem made), (slip st, 5 sc, slip st) in last ch, turn—5 sc.
Row 2: Ch 1, skip first slip st, 2 sc in first 2 sc, 3 sc in next sc, 2 sc in last 2 sc, turn—11 sc.
Row 3: Ch 4, slip st in 2nd ch from hook, hdc in next ch, dc in next ch, skip first sc, sc in next sc (point made); *ch 4, slip st in 2nd
ch from hook, hdc in next ch, dc in next ch, skip first sc, sc in next sc* (point made), ch 5, slip st in 2nd ch from hook, hdc next ch, dc in last 2 ch, skip next 2 sc, sc in next sc (point made); repeat from * to * twice—5 points. Do not turn.
Note: Do not worked around stem. When instructed to hold stem away from work, hold it towards you so chain is under stem on wrong side.
Round 4 (right side): Working in ends of rows, sc in first 2 rows, holding stem away from work, ch 1, skip next row (stem), sc in next 2 rows, *working in opposite side of foundation ch of next point, sc in each ch to next ch-1 space, (sc, ch 1, sc) in next ch-1 space, sc in each hdc and dc**, skip first foundation ch of next point; repeat from * 4 times, ending last repeat at **; join in first sc. Fasten off, leaving a long tail for sewing.
Finishing
Using photograph as a guide, with A, embroider veins on leaves with straight stitches and long back stitches. Arrange leaves as desired and sew in place. Weave in ends.
Abbreviations
A, B, C = Color A, Color B, Color C, etc.
ch = chain(s)
dc = double crochet
hdc = half double crochet
sc = single crochet
st(s) = stitch(es)
( ) = work directions in parentheses in same st
* = repeat whatever follows the * as indicated
Your Recently Viewed Projects
JaneEK
Oct 07, 2017
This is a very pretty table runner, but what mainly attracted me were the leaves. If you follow the directions on this post, you cant really see how to embroider the leaves. I found the original project at the Red Heart site, and downloaded the .pdf from there. That has a different camera view of the runner, and you can see the leaves much more clearly.
Delphine Bryant
Aug 21, 2017
Beautiful fall table runner. I love that I can use more or less of the crochet leaves. The open design in the runner adds a certain design element. I feel like I could get this project done in time to have for my fall tablescape. Just have to run out and get the necessary materials.
princess6860504
Feb 27, 2017
Here is a beautiful small table runner to keep in use during the entire holiday season. The main color gray keeps it classic. The leaves are constructed using pretty gem stone colors. You won't need much yardage for those colors. This would make a stunning housewarming gift for the young couple starting out!
mulberrygalprinces s
Dec 19, 2016
There is so much to like about this one. First of all, you don't have to download from another site. It's right here. Secondly, it's a very easy pattern and thirdly, you can use up your scrap yarn. So it's inexpensive, easy and cute. What more could you ask for in a project. Thanks for sharing it.
Report Inappropriate Comment
Are you sure you would like to report this comment? It will be flagged for our moderators to take action.
Thank you for taking the time to improve the content on our site.


