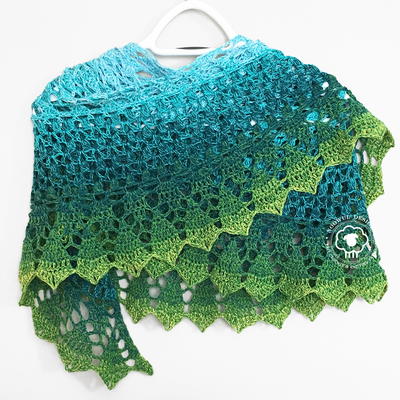
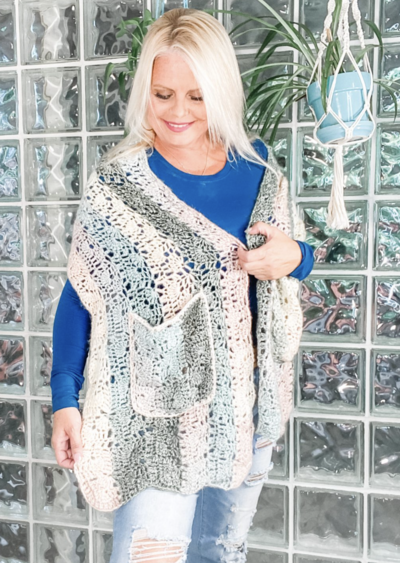
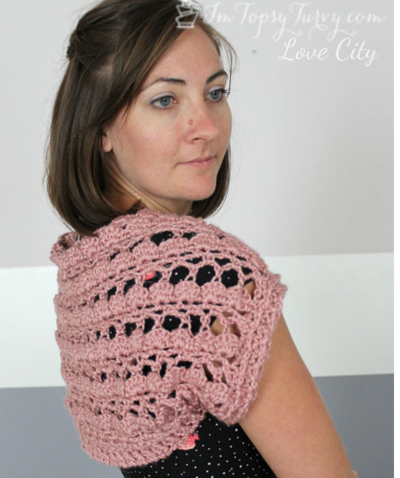
Classic Country Wrap
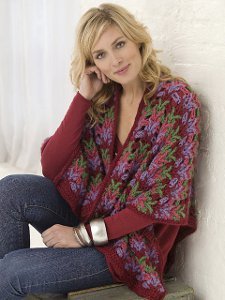
Wrap yourself up in the Classic Country Wrap for instant comfort. This cozy crochet shawl pattern is a perfect layering piece for the cold weather. Worked up in bulky weight yarn using a variety of crochet stitches, it's a wonderfully warm item to have in your closet. This intermediate crochet pattern features beautiful cluster stitches that adds alluring visual appeal. It's a figure-flattering design that will look great on women of all shapes and sizes.

Crochet HookK/10.5 or 6.5 mm hook
Yarn Weight(5) Bulky/Chunky (12-15 stitches for 4 inches)
MATERIALS
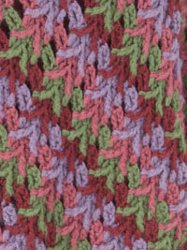
- Caron International's Dazzleaire (80% Acrylic, 20% Nylon; 3 oz/85g): 7 oz (A), 5 oz (B), 5 oz (C), 5 oz (D)
Shown in: #0008 Pinot Noir (A); #0002 Fern (B); #0001 Summer Rose (C); #0003 Thistle (D) - One size US K-10.5 (6.5mm) crochet hook, or size to obtain gauge.
- Stitch marker
- Yarn needle
SIZE:
First rectangle measures approximately 20 1/2"/52cm wide by 40"/101.5cm long, not including trim;
Second rectangle approximately 20 1/2"/52cm wide by 22 1/2"/57cm long, not including trim.
GAUGE:
In pattern, 11 sts and 8 rows = 4"/10cm.
SPECIAL STITCH:
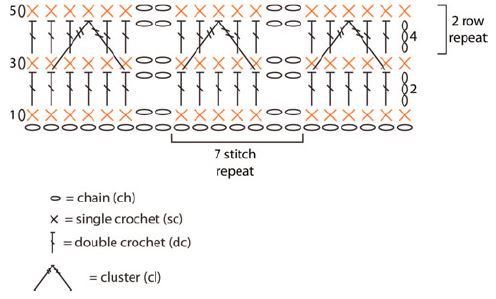
Cluster (worked over 5 sts)—First leg: [Yarn over] twice, insert hook from front to back to front again around post of indicated stitch, yarn over and draw up a loop, [yarn over and draw through 2 loops on hook] twice (2 loops remain on hook); 2nd leg: skip next 3 stitches, [yarn over] twice, insert hook from front to back to front again around post of next stitch, yarn over and draw up a loop, [yarn over and draw through 2 loops on hook] twice (3 loops remain on hook), yarn over and draw through all 3 loops on hook. Skip the stitch in the current row behind the cluster. Note: Clusters are worked around the first and last double crochet of a 5-dc group 2 rows below the current row (the row being worked).
NOTES
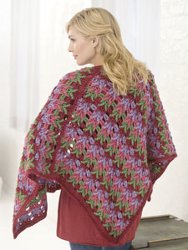
1. Wrap is made from two rectangles. The first rectangle forms the back and one side of the wrap. The 2nd rectangle forms the other side of the wrap. After the first rectangle is worked, work on the 2nd rectangle begins by working stitches across one half of one long edge of the first rectangle.
2. To change color, work last stitch of old color to last yarn over; yarn over with new color and draw through all loops on hook to complete stitch. Proceed with new color. Fasten off old color. Work over ends as work proceeds, to reduce number of ends to weave in when finishing.
WRAP
First Rectangle
- With A, ch 57.
- Row 1 (WS): Sc in 2nd ch from hook and in next 5 ch, *ch 2, sk next 2 ch, sc in next 5 ch; repeat from * across to last ch, sc in last ch, turn— 7 ch-2 sps.
- Row 2 (RS): Ch 3 (counts as first dc here and throughout), sk first sc, dc in next 5 sc (5-dc group made), *ch 2, sk next ch-2 sp, dc in next 5 sc (5-dc group made); repeat from * to last sc, dc in last sc, turn—Eight 5-dc groups.
- Row 3: Ch 1, sc in first 6 dc, *ch 2, sk next ch-2 sp, sc in next 5 dc; repeat from * across to last dc, sc in last dc (top of turning ch) and change to B, turn. Fasten off A.
- Row 4: With B, ch 3, sk first sc, *dc in next 2 sc, work cluster placing first leg in first dc and 2nd leg in last dc of 5-dc group 2 rows below (skipping 3 middle dc of the 5-dc group), dc in next 2 sc **, ch 2, sk next ch-2 sp; repeat from * across ending last repeat at **, dc in last sc, turn—8 clusters.
- Row 5: Ch 1, sc in first 6 sts, *ch 2, sk next ch-2 sp, sc in next 5 sts; repeat from * across to last dc, sc in last dc and change to C, turn.
- Fasten off B.
- Rows 6 and 7: With C, repeat Rows 4 and 5, change to D in last sc of Row 7. Fasten off C.
- Rows 8 and 9: With D, repeat Rows 4 and 5, change to A in last sc of Row 9. Fasten off D.
- Rows 10 and 11: With A, repeat Rows 4 and 5, change to B in last sc of Row 11. Fasten off A.
- Rows 12–75: Repeat Rows 4–11 eight times, do not change to B in last sc of Row 75. Fasten off A.
Second Rectangle
- With RS facing, place a marker in the end of Row 38 of first rectangle.
- With WS facing, join A with sl st in beginning of Row 1.
- Row 1 (WS): With A, ch 1, working in ends of rows, work 56 sc evenly spaced between end of Row 1 and marker, turn.
- Row 2: Ch 3, sk first sc, *dc in next 5 sc, ch 2, sk next 2 sc; repeat from * to last 6 sc, dc in next 5 sc (5-dc group made), dc in last sc, turn—7 ch-2 sps.
- Rows 3–11: Work Rows 3–11 of first rectangle.
- Rows 12–43: Repeat Rows 4–11 of first rectangle four times, do not change to B in last sc of Row 43. Fasten off A.
FINISHING
Edging
- With RS facing, join A with sl st anywhere on edge of wrap.
- Round 1 (RS): Ch 1, sc evenly spaced around entire outer edge of wrap, working 2 sc in each outer corner; join with sl st in first sc.
- Round 2: Ch 1, sc in each sc around, working 2 sc in each outer corner and skipping 1 sc in center of inner corner (at back neck); join with sl st in first sc. Fasten off.
- Using yarn needle, weave in all ends.
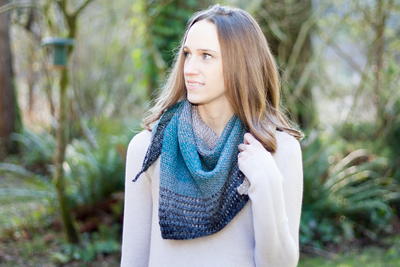
Read NextTelegraph Shawl
Your Recently Viewed Projects
Thanks for your comment. Don't forget to share!
Daughter of Light
Jan 30, 2018
This earthy, sculptural Classic Country Wrap has plenty of texture as well as organic beauty! I have to be honest and say that at first I wasn't crazy about the color combo, but it's seeped itself into my psyche and now I find it soothing and relaxing. The fact that it is made out of two rectangles lends itself to the country look. I agree Zeemer it is uncommon and that is what uniquely distinguishes it amongst the wrap patterns available!
Zeemer
Nov 13, 2017
I like the colors used in this Classic Country Wrap - subdued and earthy. I like the combination of pink, magenta, lilac accentuated by the green color. I'm currently crocheting scarves and Christmas skirts as new products in my online shop. This wrap be next in the production line. Cannot wait to make something not so common.
Cheryl Y
Aug 22, 2017
Wow this Classic Country Wrap is just Beautiful! The colors mix together nicely and look great together. I am so looking forward to making this one! After reading the written pattern and seeing the stitch chart I think I can make this. The cluster stitch is a new way of doing a cluster, but with the directions here on this page I think it will work and look great. I love learning new stitches! Looking forward to making this beautiful country wrap. Thank you so much for sharing this free crochet pattern.
Sharon M
Mar 23, 2017
I am a little confused with the new stitch. I wish someone would do a you tube video on the new stitch(es) and include the link for it somewhere in the pattern. I know I do better on stitches if I can see a video on how to do it. That way I can watch the video as often as I need to until I am comfortable doing the stitch. I am a person who does better watching how a stitch is done since the directions on the stitch sound Greek to me. I know I am not the only person like this.
AFC Editor Julia
Mar 24, 2017
Hi Sharon, We have plenty of cluster stitch tutorials on our site! There's a search bar at the top left of the page Feel free to search for cluster stitch in that search box to see what tutorials are there. There are even some video tutorials to help you out! Thanks, and I hope that helps! Julia, editor for AllFreeCrochet
Lynn K
Jan 20, 2017
Is there anyone who has made this beautiful wrap? I just love the look of it but am a little intimidated by what looks like quite a complicated design. Could you please tell me if it was terribly difficult to make? It looks so elegant and the design is very pretty indeed. I just know that if it is very difficult to make I will not finish the project and the half done wrap will be pushed into the craft closet with the collection of other things that I have not finished.
melissasea22
Feb 10, 2017
I made this with worsted #4 yarn, just because I needed it lighter for spring for my Momma in Law, It was easy after learning the new stitch and went faster than I expected. I used about 1 skein in each color but you should plan on more as you may not have the same tension as I do.
mmrb3618686
Dec 23, 2016
Could another weight yarn be used for this pattern? I am not a fan of bulky yarn.
KLC
Dec 29, 2016
Since it says to use a bulky or chunky yarn, my guess is that a smaller weight would be too thin for this particular pattern. It may be worth experimenting with. We also have several other wraps and some that use different yarn types: http://www.allfreecrochet.com/Crochet-Wrap-Patterns Thanks, Krista, Editor
melissasea22
Feb 10, 2017
I used a worsted #4 yarn it turned out lighter weight, but I needed that. So yes you can use a lighter weight yarn! If you want it wider just add 7 chains because it is a 7 plus 3 chain repeat pattern.
jodeegeick 1795777
Oct 11, 2016
I do not want the preview everly time I want to print a pattern.
AFC Editor Julia
Oct 12, 2016
Hi jodeegeick, I don't understand your question. To print this pattern, simply highlight the pattern text you want to print, then right click and select Print. This should allow you to print only what you have highlighted. I hope that helps! Julia, editor for AllFreeCrochet
ang0630 4940468
Jan 09, 2015
thank you. I'm happy to know which yarn to look for. I Love, Love, Love this pattern.
pseaton 3631740
Sep 04, 2014
This will be my late fall project - I found Red Heart Heads Up, a chunky wool-acrylic yarn in the best colors. I absolutely love this design and so many of her others.
sunnyosborn
May 30, 2014
Absolutely beautiful! But you'll have to find an alternate yarn because Caron no longer offers a bulky yarn. I wish allfreecrochet would have checked this before featuring this pattern.
mamatrek13
May 30, 2014
This country wrap looks gorgeous. I want to make one for myself, but if it doesn't take too long, I might make it for my sisters for Christmas. Love it!
Report Inappropriate Comment
Are you sure you would like to report this comment? It will be flagged for our moderators to take action.
Thank you for taking the time to improve the content on our site.