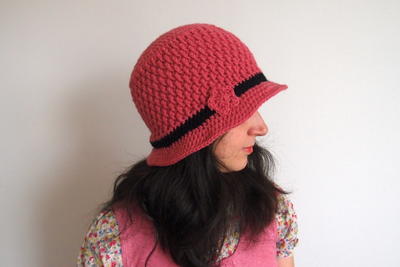
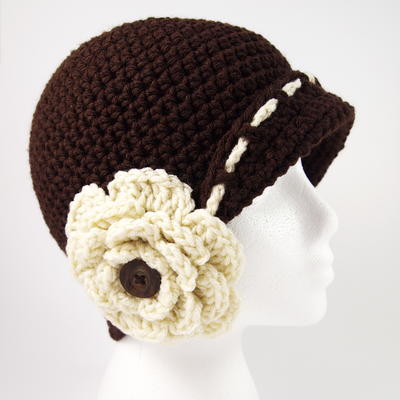
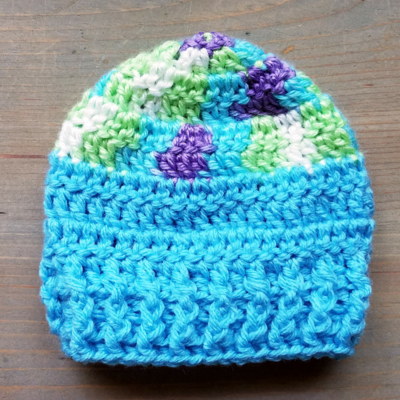
Vintage Flower Cloche Hat Crochet Pattern

Are you in love with all things retro and vintage? If so, you'll love the Vintage Flower Cloche Hat Crochet Pattern - it's straight out of the roaring '20s! Featuring a slight brim and a gorgeous oversized flower on the side, this gorgeous design will be the perfect finishing piece for all of your spring and summer outfits.
NotesSpecial Instructions:
•Ribbon is optional; instead you can make a chain just longer than the flap and weave it through the DC sts
•Hat and flower can be started with a Magic Ring or with the instructions given in Round 1
•Starting chain does NOT count as a stitch unless directed otherwise
•Each round is started in the same stitch as your starting chain unless directed otherwise
•The end of each round is joined by slip stitching in the first stitch of the round, not the starting chain
•Instructions for flower embellishment can be found at the end of the file

Crochet HookI/9 or 5.5 mm hook
Yarn Weight(4) Medium Weight/Worsted Weight and Aran (16-20 stitches to 4 inches)
Crochet Gauge12 stitches and 11 rows = 4" (10 cm) in hdc
Finished SizeNewborn, 0-3 Months, 3-6 Months, 6-12 Months, Toddler, Child, Teen/Small Adult, Medium Adult, Large Adult
Materials List
- Worsted weight yarn such as Red Heart With
- 5.5 mm (I-9) crochet hook or size needed to obtain the gauge
- Yarn needle for weaving in ends
Pattern
Newborn
Head Circumference = 13" - 15" • Hat Circumference = 13" • Height hat = 5"
Round 1: Ch 2, make 8 hdc in the 2nd chain from hook, join in first stitch (8)
Round 2: Ch 1, make 2 hdc in each stitch around, join (16)
Round 3: Ch 1, *2 hdc in first stitch, hdc in next stitch* repeat around, join (24)
Round 4: Ch 1, *2 hdc in first stitch, hdc in next 2 stitches* repeat around, join (32)
Round 5: Ch 1, hdc in the first 4 stitches, *2 hdc in next stitch, hdc in next 3 stitches* repeat around, join (39)
Round 6: Ch 1, hdc in each stitch around, join (39)
Round 7 - 12: Repeat Round 6 - hat height should be about 4.5 inches; adjust the number of rounds if needed
Round 13: Ch 1, sc in each stitch around, join and turn (39)
The following rows form a flap that will be folded up once completed.
Row 14: Sl st 2, sc in next 22 stitches, sl st 2, turn
Row 15: Ch 1, skip the two slip stitches, sc in next 19 stitches, sl st 2, turn
Row 16: Ch 1, skip the two slip stitches, sc in next 16 stitches, sl st 2, turn
Row 17: Ch 1, skip the two slip stitches, sc in next 13 stitches, sl st 2, turn
Round 18: In first slip stitch make an alt-ch, dc in each stitch across the flap including the end of each row until one row remains, make 1 hdc, continue working around the hat making 1 sc in each stitch until you get back to the flap, make 1 hdc in the end of the first row, dc in the remaining rows and each stitch back to the start, make an invisible join, FO leaving a lengthy tail. Fold the flap up and use the tail to stitch into place. Evenly weave ribbon or yarn through the dc stitches. Attach the flower to the side of the flap, covering the seam; weave in all ends.
0 - 3 Months
Head Circumference = 14" - 16" • Hat Circumference = 14" • Height hat = 5.5"
Round 1: Ch 2, make 8 hdc in the 2nd chain from hook, join in first stitch (8)
Round 2: Ch 1, make 2 hdc in each stitch around, join (16)
Round 3: Ch 1, *2 hdc in first stitch, 1 hdc in next stitch* repeat around, join (24)
Round 4: Ch 1, *2 hdc in first stitch, 1 hdc in next 2 stitches* repeat around, join (32)
Round 5: Ch 1, *2 hdc in first stitch, 1 hdc in next 3 stitches* repeat around, join (40)
Round 6: Ch 1, 2 hdc in first stitch, 1 hdc in in each remaining stitch, join (41)
Round 7: Ch 1, hdc in each stitch around, join (41)
Round 8 - 14: Repeat Round 7 - hat height should be about 5 inches; adjust the number of rounds if needed
Round 15: Ch 1, sc in each stitch around, join and turn (41)
The following rows form a flap that will be folded up once completed.
Row 16: Sl st 2, sc in next 23 stitches, sl st 2, turn
Row 17: Ch 1, skip the two slip stitches, sc in next 20 stitches, sl st 2, turn
Row 18: Ch 1, skip the two slip stitches, sc in next 17 stitches, sl st 2, turn
Row 19: Ch 1, skip the two slip stitches, sc in next 14 stitches, sl st 2, turn
Round 20: In first slip stitch make an alt-ch, dc in each stitch across the flap including the end of each row until one row remains, make 1 hdc, continue working around the hat making 1 sc in each stitch until you get back to the flap, make 1 hdc in the end of the first row, dc in the remaining rows and each stitch back to the start, make an invisible join, FO leaving a lengthy tail. Fold the flap up and use the tail to stitch into place. Evenly weave ribbon or yarn through the dc stitches. Attach the flower to the side of the flap, covering the seam; weave in all ends.
3 - 6 Months
Head Circumference = 15" - 17" • Hat Circumference = 15" • Height hat = 6"
Round 1: Ch 2, make 8 hdc in the 2nd chain from hook, join in first stitch (8)
Round 2: Ch 1, make 2 hdc in each stitch around, join (16)
Round 3: Ch 1, *2 hdc in first stitch, 1 hdc in next stitch* repeat around, join (24)
Round 4: Ch 1, *2 hdc in first stitch, 1 hdc in next 2 stitches* repeat around, join (32)
Round 5: Ch 1, *2 hdc in first stitch, 1 hdc in next 3 stitches* repeat around, join (40)
Round 6: Ch 1, *2 hdc in first stitch, 1 hdc in next 7 stitches* repeat around, join (45)
Round 7: Ch 1, hdc in each stitch around, join (45)
Round 8 - 15: Repeat Round 7 - hat height should be about 5.5 inches; adjust the number of rounds if needed
Round 16: Ch 1, sc in each stitch around, join and turn (45)
The following rows form a flap that will be folded up once completed.
Row 17: Sl st 2, sc in next 24 stitches, sl st 2, turn
Row 18: Ch 1, skip the two slip stitches, sc in next 21 stitches, sl st 2, turn
Row 19: Ch 1, skip the two slip stitches, sc in next 18 stitches, sl st 2, turn
Row 20: Ch 1, skip the two slip stitches, sc in next 15 stitches, sl st 2, turn
Round 21: In first slip stitch make an alt-ch, dc in each stitch across the flap including the end of each row until one row remains, make 1 hdc, continue working around the hat making 1 sc in each stitch until you get back to the flap, make 1 hdc in the end of the first row, dc in the remaining rows and each stitch back to the start, make an invisible join, FO leaving a lengthy tail. Fold the flap up and use the tail to stitch into place. Evenly weave ribbon or yarn through the dc stitches. Attach the flower to the side of the flap, covering the seam; weave in all ends.
6 - 12 Months
Head Circumference = 16" - 18" • Hat Circumference = 16" • Height hat = 6.5"
Round 1: Ch 2, make 8 hdc in the 2nd chain from hook, join in first stitch (8)
Round 2: Ch 1, make 2 hdc in each stitch around, join (16)
Round 3: Ch 1, *2 hdc in first stitch, 1 hdc in next stitch* repeat around, join (24)
Round 4: Ch 1, *2 hdc in first stitch, 1 hdc in next 2 stitches* repeat around, join (32)
Round 5: Ch 1, *2 hdc in first stitch, 1 hdc in next 3 stitches* repeat around, join (40)
Round 6: Ch 1, *2 hdc in first stitch, 1 hdc in next 4 stitches* repeat around, join (48)
Round 7: Ch 1, hdc in each stitch around, join (48)
Round 8 - 16: Repeat Round 7 - hat height should be about 6 inches; adjust the number of rounds if needed
Round 17: Ch 1, sc in each stitch around, join and turn (48)
The following rows form a flap that will be folded up once completed.
Row 18: Sl st 2, sc in next 25 stitches, sl st 2, turn
Row 19: Ch 1, skip the two slip stitches, sc in next 22 stitches, sl st 2, turn
Row 20: Ch 1, skip the two slip stitches, sc in next 19 stitches, sl st 2, turn
Row 21: Ch 1, skip the two slip stitches, sc in next 16 stitches, sl st 2, turn
Round 22: In first slip stitch make an alt-ch, dc in each stitch across the flap including the end of each row until one row remains, make 1 hdc, continue working around the hat making 1 sc in each stitch until you get back to the flap, make 1 hdc in the end of the first row, dc in the remaining rows and each stitch back to the start, make an invisible join, FO leaving a lengthy tail. Fold the flap up and use the tail to stitch into place. Evenly weave ribbon or yarn through the dc stitches. Attach the flower to the side of the flap, covering the seam; weave in all ends.
Toddler & Small Child
(Approximately 1 to 5 years – please measure for a more accurate fit)
Head Circumference = 17" - 19" • Hat Circumference = 17" • Height hat = 7"
Round 1: Ch 2, make 8 hdc in the 2nd chain from hook, join in first stitch (8)
Round 2: Ch 1, make 2 hdc in each stitch around, join (16)
Round 3: Ch 1, *2 hdc in first stitch, 1 hdc in next stitch* repeat around, join (24)
Round 4: Ch 1, *2 hdc in first stitch, 1 hdc in next 2 stitches* repeat around, join (32)
Round 5: Ch 1, *2 hdc in first stitch, 1 hdc in next 3 stitches* repeat around, join (40)
Round 6: Ch 1, *2 hdc in first stitch, 1 hdc in next 4 stitches* repeat around, join (48)
Round 7: Ch 1, *2 hdc in first stitch, 1 hdc in next 15 stitches* repeat around, join (51)
Round 8: Ch 1, hdc in each stitch around, join (51)
Round 9 - 18: Repeat Round 8 - hat height should be about 6.5 inches; adjust the number of rounds if needed
Round 19: Ch 1, sc in each stitch around, join and turn (51)
The following rows form a flap that will be folded up once completed.
Row 20: Sl st 2, sc in next 26 stitches, sl st 2, turn
Row 21: Ch 1, skip the two slip stitches, sc in next 23 stitches, sl st 2, turn
Row 22: Ch 1, skip the two slip stitches, sc in next 20 stitches, sl st 2, turn
Row 23: Ch 1, skip the two slip stitches, sc in next 17 stitches, sl st 2, turn
Round 24: In first slip stitch make an alt-ch, dc in each stitch across the flap including the end of each row until one row remains, make 1 hdc, continue working around the hat making 1 sc in each stitch until you get back to the flap, make 1 hdc in the end of the first row, dc in the remaining rows and each stitch back to the start, make an invisible join, FO leaving a lengthy tail. Fold the flap up and use the tail to stitch into place. Evenly weave ribbon or yarn through the dc stitches. Attach the flower to the side of the flap, covering the seam; weave in all ends.
Child
(Approximately 5 to 10 years – please measure for a more accurate fit)
Head Circumference = 18" - 20" • Hat Circumference = 18" • Height hat = 7.25"
Round 1: Ch 2, make 8 hdc in the 2nd chain from hook, join in first stitch (8)
Round 2: Ch 1, make 2 hdc in each stitch around, join (16)
Round 3: Ch 1, *2 hdc in first stitch, 1 hdc in next stitch* repeat around, join (24)
Round 4: Ch 1, *2 hdc in first stitch, 1 hdc in next 2 stitches* repeat around, join (32)
Round 5: Ch 1, *2 hdc in first stitch, 1 hdc in next 3 stitches* repeat around, join (40)
Round 6: Ch 1, *2 hdc in first stitch, 1 hdc in next 4 stitches* repeat around, join (48)
Round 7: Ch 1, *2 hdc in first stitch, 1 hdc in next 7 stitches* repeat around, join (54)
Round 8: Ch 1, hdc in each stitch around, join (54)
Round 9 - 19: Repeat Round 8 - hat height should be about 6.75 inches; adjust the number of rounds if needed
Round 20: Ch 1, sc in each stitch around, join and turn (54)
The following rows form a flap that will be folded up once completed.
Row 21: Sl st 2, sc in next 27 stitches, sl st 2, turn
Row 22: Ch 1, skip the two slip stitches, sc in next 24 stitches, sl st 2, turn
Row 23: Ch 1, skip the two slip stitches, sc in next 21 stitches, sl st 2, turn
Row 24: Ch 1, skip the two slip stitches, sc in next 18 stitches, sl st 2, turn
Round 25: In first slip stitch make an alt-ch, dc in each stitch across the flap including the end of each row until one row remains, make 1 hdc, continue working around the hat making 1 sc in each stitch until you get back to the flap, make 1 hdc in the end of the first row, dc in the remaining rows and each stitch back to the start, make an invisible join, FO leaving a lengthy tail. Fold the flap up and use the tail to stitch into place. Evenly weave ribbon or yarn through the dc stitches. Attach the flower to the side of the flap, covering the seam; weave in all ends.
Teen / Small Adult
Head Circumference = 19" - 21" • Hat Circumference = 19" • Height hat = 7.5"
Round 1: Ch 2, make 8 hdc in the 2nd chain from hook, join in first stitch (8)
Round 2: Ch 1, make 2 hdc in each stitch around, join (16)
Round 3: Ch 1, *2 hdc in first stitch, 1 hdc in next stitch* repeat around, join (24)
Round 4: Ch 1, *2 hdc in first stitch, 1 hdc in next 2 stitches* repeat around, join (32)
Round 5: Ch 1, *2 hdc in first stitch, 1 hdc in next 3 stitches* repeat around, join (40)
Round 6: Ch 1, *2 hdc in first stitch, 1 hdc in next 4 stitches* repeat around, join (48)
Round 7: Ch 1, *2 hdc in first stitch, 1 hdc in next 5 stitches* repeat around, join (56)
Round 8: Ch 1, make 2 hdc in the first stitch, hdc in each remaining stitch, join (57)
Round 9: Ch 1, hdc in each stitch around, join (57)
Round 10 - 20: Repeat Round 9 - hat height should be about 7 inches; adjust the number of rounds if needed
Round 21: Ch 1, sc in each stitch around, join and turn (57)
The following rows form a flap that will be folded up once completed.
Row 22: Sl st 2, sc in next 28 stitches, sl st 2, turn
Row 23: Ch 1, skip the two slip stitches, sc in next 25 stitches, sl st 2, turn
Row 24: Ch 1, skip the two slip stitches, sc in next 22 stitches, sl st 2, turn
Row 25: Ch 1, skip the two slip stitches, sc in next 19 stitches, sl st 2, turn
Round 26: In first slip stitch make an alt-ch, dc in each stitch across the flap including the end of each row until one row remains, make 1 hdc, continue working around the hat making 1 sc in each stitch until you get back to the flap, make 1 hdc in the end of the first row, dc in the remaining rows and each stitch back to the start, make an invisible join, FO leaving a lengthy tail. Fold the flap up and use the tail to stitch into place. Evenly weave ribbon or yarn through the dc stitches. Attach the flower to the side of the flap, covering the seam; weave in all ends.
Adult
Head Circumference = 21" - 23" • Hat Circumference = 20.5" • Height hat = 7.75"
Round 1: Ch 2, make 8 hdc in the 2nd chain from hook, join in first stitch (8)
Round 2: Ch 1, make 2 hdc in each stitch around, join (16)
Round 3: Ch 1, *2 hdc in first stitch, 1 hdc in next stitch* repeat around, join (24)
Round 4: Ch 1, *2 hdc in first stitch, 1 hdc in next 2 stitches* repeat around, join (32)
Round 5: Ch 1, *2 hdc in first stitch, 1 hdc in next 3 stitches* repeat around, join (40)
Round 6: Ch 1, *2 hdc in first stitch, 1 hdc in next 4 stitches* repeat around, join (48)
Round 7: Ch 1, *2 hdc in first stitch, 1 hdc in next 5 stitches* repeat around, join (56)
Round 8: Ch 1, hdc in first stitch, *2 hdc in next stitch, hdc in next 10 stitches* repeat between * around, join (61)
Round 9: Ch 1, hdc in each stitch around, join (61)
Round 10 - 20: Repeat Round 9 - hat height should be about 7.25 inches; adjust the number of rounds if needed
Round 21: Ch 1, sc in each stitch around, join and turn (61)
The following rows form a flap that will be folded up once completed.
Row 22: Sl st 2, sc in next 29 stitches, sl st 2, turn
Row 23: Ch 1, skip the two slip stitches, sc in next 26 stitches, sl st 2, turn
Row 24: Ch 1, skip the two slip stitches, sc in next 23 stitches, sl st 2, turn
Row 25: Ch 1, skip the two slip stitches, sc in next 20 stitches, sl st 2, turn
Round 26: In first slip stitch make an alt-ch, dc in each stitch across the flap including the end of each row until one row remains, make 1 hdc, continue working around the hat making 1 sc in each stitch until you get back to the flap, make 1 hdc in the end of the first row, dc in the remaining rows and each stitch back to the start, make an invisible join, FO leaving a lengthy tail. Fold the flap up and use the tail to stitch into place. Evenly weave ribbon or yarn through the dc stitches. Attach the flower to the side of the flap, covering the seam; weave in all ends.
Large Adult
Head Circumference = 22" - 24" • Hat Circumference = 21.5" • Height hat = 8"
Round 1: Ch 2, make 8 hdc in the 2nd chain from hook, join in first stitch (8)
Round 2: Ch 1, make 2 hdc in each stitch around, join (16)
Round 3: Ch 1, *2 hdc in first stitch, 1 hdc in next stitch* repeat around, join (24)
Round 4: Ch 1, *2 hdc in first stitch, 1 hdc in next 2 stitches* repeat around, join (32)
Round 5: Ch 1, *2 hdc in first stitch, 1 hdc in next 3 stitches* repeat around, join (40)
Round 6: Ch 1, *2 hdc in first stitch, 1 hdc in next 4 stitches* repeat around, join (48)
Round 7: Ch 1, *2 hdc in first stitch, 1 hdc in next 5 stitches* repeat around, join (56)
Round 8: Ch 1, *2 hdc in first stitch, 1 hdc in next 6 stitches* repeat around, join (64)
Round 9: Ch 1, make 2 hdc in first stitch, hdc in each remaining stitch, join (65)
Round 10: Ch 1, hdc in each stitch around, join (65)
Round 11 - 21: Repeat Round 10 - hat height should be about 7.5 inches; adjust the number of rounds if needed
Round 22: Ch 1, sc in each stitch around, join and turn (65)
The following rows form a flap that will be folded up once completed.
Row 23: Sl st 2, sc in next 30 stitches, sl st 2, turn
Row 24: Ch 1, skip the two slip stitches, sc in next 27 stitches, sl st 2, turn
Row 25: Ch 1, skip the two slip stitches, sc in next 24 stitches, sl st 2, turn
Row 26: Ch 1, skip the two slip stitches, sc in next 21 stitches, sl st 2, turn
Round 27: In first slip stitch make an alt-ch, dc in each stitch across the flap including the end of each row until one row remains, make 1 hdc, continue working around the hat making 1 sc in each stitch until you get back to the flap, make 1 hdc in the end of the first row, dc in the remaining rows and each stitch back to the start, make an invisible join, FO leaving a lengthy tail. Fold the flap up and use the tail to stitch into place. Evenly weave ribbon or yarn through the dc stitches. Attach the flower to the side of the flap, covering the seam; weave in all ends.
Instructions for Flower Embellishment
To make a smaller flower for baby sized hats, fasten off after Round 6.
Round 1: Ch 2, make 12 hdc in the 2nd chain from hook, join in first hdc (12)
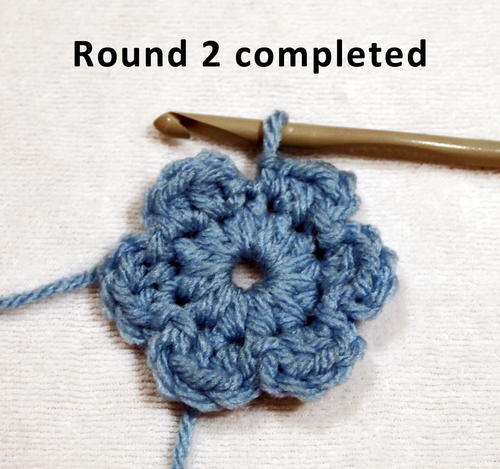
Round 2: *Ch 1, hdc in same stitch, hdc in next stitch, ch 1, sl st in same stitch as last hdc, sl st in next stitch* repeat 5 times, join in the base of the first petal (6 petals)
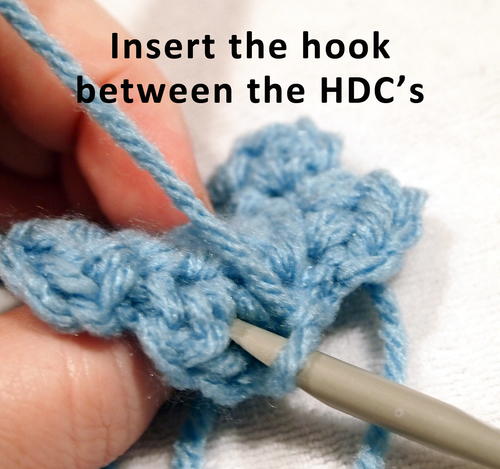
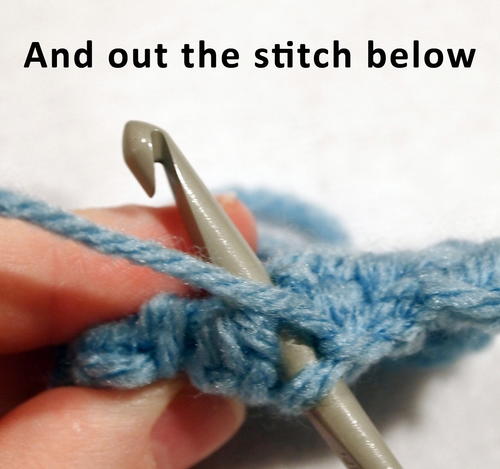
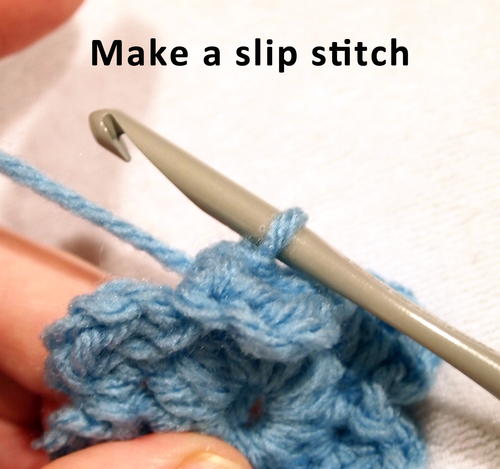
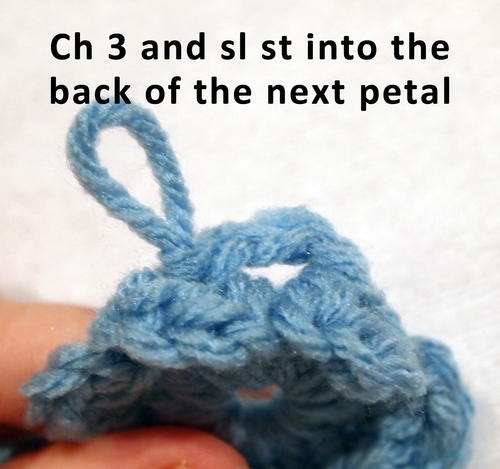
Round 3: *Ch 1, sl st into the back of the first petal by inserting the hook in between the hdc stitches and out through the stitch just below it, *ch 3, sl st between the hdc stitches of the next petal* repeat between * around, join in first ch-3 space (6 ch-3 spaces) *PHOTOS BELOW ILLUSTRATE THIS ROUND*
Round 4: *Ch 2, make 3 dc in the ch-3 space, ch 2, sl st in same space, sl st into next ch-3 space* repeat around, do not join (6 petals)
Round 5: Ch 2, *sl st into the back of the next petal by inserting the hook between the first two dc stitches and out through the ch-3 space, ch 4* repeat around, join in the first ch-4 space (6 ch-4 spaces)
Round 6: *Ch 2, make 5 dc in ch-4 space, ch 2, sl st in same space, sl into next ch-4 space* repeat around, do not join (6 petals)
Round 7: Ch 2, *sl st into the back of next petal between the 2nd and 3rd dc, ch 5* repeat around, join in first ch-5 space (6 ch-5 spaces)
Round 8: Ch 2, make 6 dc in ch-5 space, ch 2, sl st in same space, sl st in next ch-5 space* repeat around, leave a lengthy tail for sewing and fasten off (6 petals) - Sew a button to the center of the flower and attach it to your hat.

Abbreviations
- Alternate DC Turning Chain (alt-ch)
- Turn your work. Do not work any chains. Make a SC in the first stitch of the row, insert your hook into the front left vertical bar of the SC and yarn over, pull up a loop (2 loops on hook), yarn over and pull through both loops.
Read NextHearts and Darts Hat
Your Recently Viewed Projects
Thanks for your comment. Don't forget to share!
floroden 1128539
Jun 19, 2019
You say that there should be photos at the end of the pattern to illustrate Round 3 of the flower embellishment but I do not see any photos and I do think they would be helpful
EditorLP
Jun 24, 2019
Hi floroden 1128539, sorry for the confusion! The additional images were not showing up due to a technical error, but I have updated the article and the photos should now be visible. I hope the extra photos help! - Laura, editor of AllFreeCrochet
angiturnpaugh 6879 163
Feb 12, 2019
I am in the process of making the child size of this hat and I am confused by this line in round 25 "dc in each stitch across the flap including the end of each row until one row remains, " Should it read stitch instead of row? I am unsure of what "rows" it is referring to. Please Help!
EditorLP
Feb 13, 2019
Hi angiturnpaugh 6879 163, in round 25 you will be crocheting in the stitches which form the flap from rounds 20-24, and will continue around the outer edge of the rest of the hat. We hope this helps! - Editors of AllFreeCrochet
Hippie Chick
Apr 10, 2017
Cute hate. Has a very Downton Abbey look to it. A little surprised to see that it is available in so many sizes, especially for a newborn. I dont think this would really work very well for a newborn. I would think that the toddler and small child size would be as young as I would want to go for a hat like this due to safety concerns.
Report Inappropriate Comment
Are you sure you would like to report this comment? It will be flagged for our moderators to take action.
Thank you for taking the time to improve the content on our site.