This project was submitted by one of our readers, just like you.
Worry Worm Crochet Pattern

Worry Worm Crochet Pattern
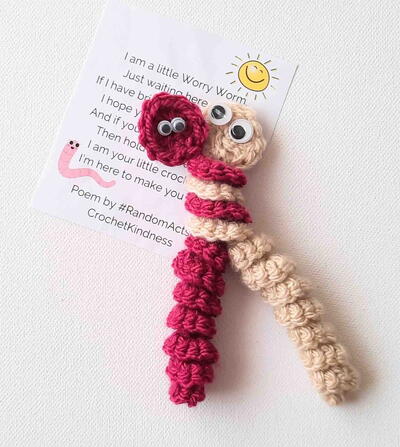
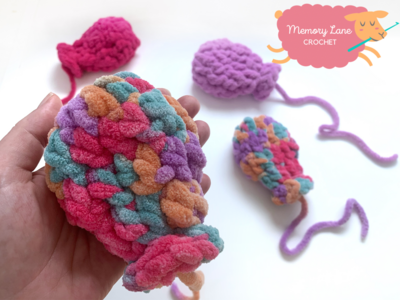
"Crochet Worry Worm Pattern + PDF Poem Tag Printable Crochet worry worms became a real hit when a FB Group called “Random Acts of Crochet Kindness” came up with the idea to distribute these simple crochet worry worms with a poem packaged in a small see-through plastic baggie or organza bag anywhere you can think of… in the woods, playground, nursing home, camping area… wherever. These cute crochet worry worms are meant to put a smile on whoever finds them and comfort them in times of sorrow or stress. In a previous post, I showed you how to crochet a flat spiral. So now, we’ll learn how to crochet a 3-dimensional spiral that twirls around itself creating this cute curly texture that is so ideal for this crochet worry worm project. Interesting Note: Did you know that the technique used to crochet curly surfaces is called hyperbolic crochet? When I discovered this was actually a mathematical term for “negative curvature”, I was really intrigued! Think of the types of curvature you see in coral reefs or lettuce leaves. These organic shapes can be replicated in crochet by adding stitches at a constant rate to each row of crochet. The more frequently you add stitches, the curlier (and more negatively curved) your crochet project gets. Now let’s experiment with hyperbolic crochet with our worry worm pattern… You can also download some Printable Worry Worm Tags for different poems/sayings that you could include in your baggies with your worry worms. Materials Needed - Some classic worsted weight yarn (color of your choice). Any yarn would do really, just make sure it’s not hairy or fuzzy. I used Paintbox Yarns for these worry worms. (5 Ball Colour Pack Designer Picks - Summer Garden by Kate Eastwood) - Lime Green (328), Vanilla Cream (307), Raspberry Pink (343), Ballet Pink (352), Blush Pink (353) - Crochet hook that fits your yarn. Generally I use between a size G/4mm to H/5mm hook. For this project I used a US Size G, 4.5 mm hook. - A tapestry needle - A pair of scissors - Goggly eyes, or black / brown fiber art beads, or a permanent marker Plastic or organza baggies - Printer & A4 paper to print your tags. You could choose to print your tags on card stock to make them more durable. Abbreviations ch = chain mc = magic circle sc = single crochet dc = double crochet sl st = slip stitch st = stitch sts = stitches Skill Level Beginner Gauge Gauge is not really that crucial for this tutorial. Just try experimenting with different hook sizes & different weight yarns to get a size you are happy with for the project you are working on. If your worry worm looks smaller than you anticipated, try a thicker weight yarn or a smaller size crochet hook. If you want your worry worm to be longer, just increase the number of stitches in your beginning chain. Notes - You can use any type of yarn as long as you have a corresponding crochet hook size (check yarn label for recommendations) You can make the pattern larger or smaller by changing the type of yarn and/or hook. Numbers at the end of each step in brackets indicate the number of final stitches in that step. Please note that I use US crochet terms. Please follow my social media accounts to see what else I’m up to and to keep in touch: @startcrochet You may sell any finished products that you make from this pattern. However, when selling online, please include a link back to my blog startcrochet dot com or tag me on social with hashtag #startcrochet Thank you!"

Crochet Hook4.5 mm hook
Yarn Weight(4) Medium Weight/Worsted Weight and Aran (16-20 stitches to 4 inches)
Crochet Gauge16 stitches and 8 rows = 10 cm in double crochet (US)
Finished Size15 cm length
Materials List
-
Some classic worsted weight yarn (color of your choice).
-
Crochet hook that fits your yarn. Generally I use between a size G/4mm to H/5mm hook. For this project I used a US Size G, 4.5 mm hook.
-
A tapestry needle
-
A pair of scissors
-
Goggly eyes, or black / brown fiber art beads, or a permanent marker
-
Plastic or organza baggies
-
Printer & A4 paper to print your tags. You could choose to print your tags on card stock to make them more durable.

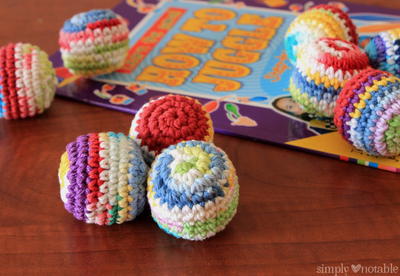
Read NextScrapbuster Crochet Juggling Balls