This project was submitted by one of our readers, just like you.
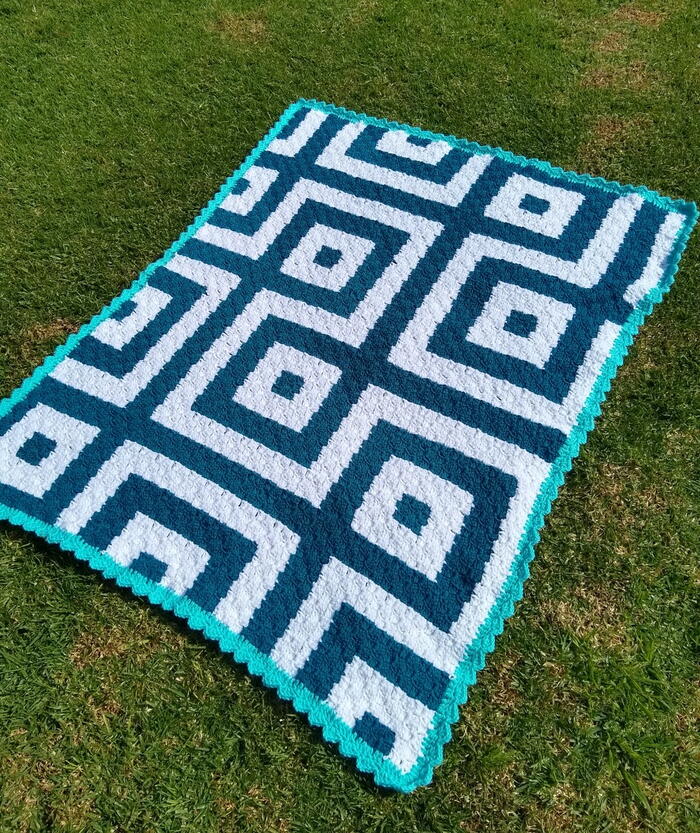
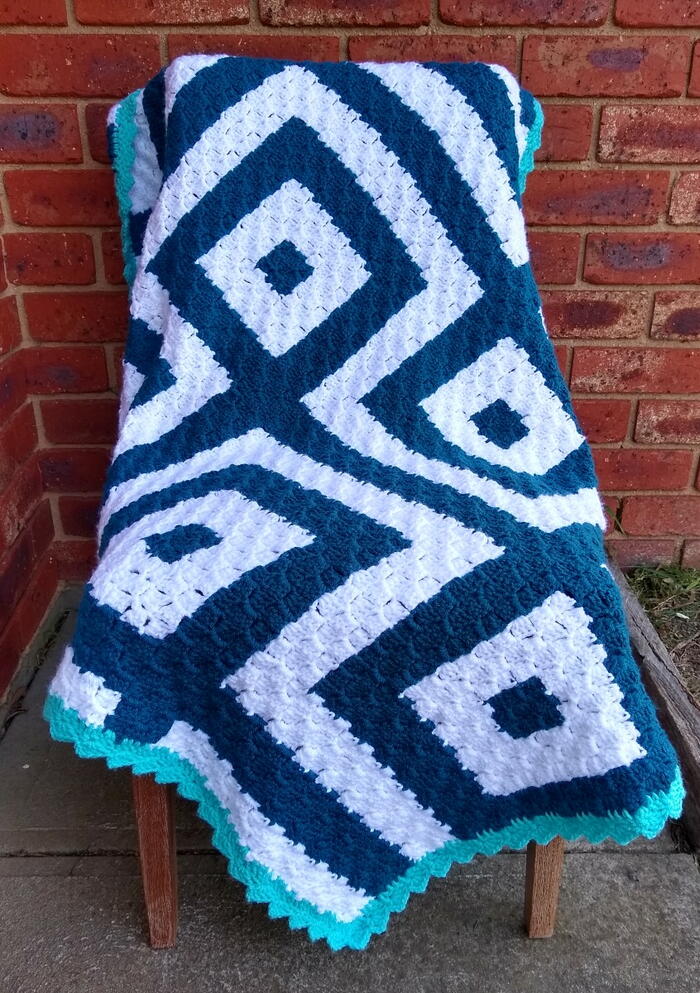
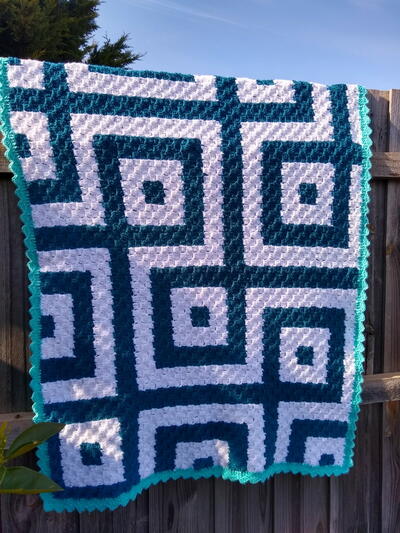
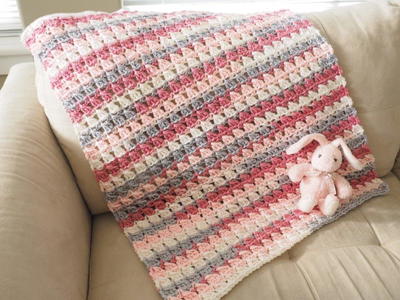
Connected Squares Blanket

Connected Squares Blanket
"C2C Blanket is made in contrasting colours to create a geometric pattern. It assumes a basic C2C knowledge. Stitch information is provided plus a graph to follow for colour changes. The pattern is worked from the bottom right corner of the graph. Worsted weight acrylic is used for the blanket. The sample used a yarn specific to Spotlight, Australia but Caron Simply Soft is a good alternative. Approximately 312m/200g will give a similar size if gauge is met. The finished size is 97cm by 130cm. Yarn amounts: White - 500g/780m Teal - 500g/770m Aqua (Border) - 97g/152m"

Crochet HookH/8 or 5 mm hook
Yarn Weight(4) Medium Weight/Worsted Weight and Aran (16-20 stitches to 4 inches)
Crochet Gauge5.75 C2C stitches is 10cm/4in with 5mm hook
Finished Size97cm by 130cm
Materials List
- Caron Simply Soft White/Off White - 3 balls 780m
- Caron Simply Soft Cool Green - 3 balls 770m
- Caron Simply Soft Robins Egg - 1 ball 152m
Instructions
Pattern Notes
Stitch Abbreviations
- C2C – corner to corner
- ch/s – chain/s
- st/es - stitch/es
- dc – double crochet
- sl st – slip stitch
- ch sp – chain space
- dec – decrease
- inc - increase
- sk – skip
- sc – single crochet
- inv jn – invisible join
- sdc – standing dc
Special stitches
The information below explains the stitches used in this sample.
C2C increase (C2C Inc)– ch 6, dc into the 4th chain from the hook, dc in the next 2 chs, turn work and sl st into the ch-3 of the previous worked stitch. This stitch is done at the beginning of each row on the side or sides that are increasing.
C2C stitch (C2C st) – ch 3, 3 dc sts in the same ch sp. This stitch is used for all the other stitches in the row after the first stitch.
C2C decrease (C2C Dec) – at the beginning of a decrease row turn work, sl st into the top of the next 3 dc sts and into the ch sp. Work the next C2C stitch.
Pattern
The graph alone can be used to create the blanket. One square on the graph represents one C2C stitch. The blanket is worked from the bottom right corner of the graph and is worked up one row and down the next. All odd row start at the bottom of the graph and work upwards diagonally and all even rows start from the right side of the graph and work down diagonally.
Colour changes occur on the last yarn over of the 3rd dc of the C2C stitch before the colour change on the graph. Small yarn balls or bobbins were used for each section of the row in that particular colour. This prevents the dark colour showing through the stitches if the yarn is carried along.
-
Row 1: Starting with A ch 6, dc in to the 4th ch from the hook, dc in the next 2 chs (C2C Inc).
Change colour as per the graph. -
Row 2: Ch 6, dc into the 4th ch from the hook, dc in the next 2 chs, turn work and sl st into ch-3 from previous row, 3 dc in ch-3 sp (C2C Inc, C2C st).
-
Row 3: Ch 6, dc into the 4th ch from the hook, dc in the next 2 chs, turn work and (sl st into ch-3 from previous row, 3 dc in ch-3 sp) twice (C2C Inc, 2 C2C sts).
-
Row 4-52: Repeat row 3 increasing by one st each row.
The blanket will now start decreasing on one side while continuing to increase on the other. Each odd row will start with decreasing. -
Row 53: Turn work, sl st in top of each dc of last C2C from previous row, sl st into ch-3, ch 3, 3 dc in ch-3 from previous row (C2C dec), continue working C2C sts to end of row (52 C2C sts).
-
Row 54: Repeat row 2
-
Row 55: Repeat row 53
-
Rows 56-67: Repeat row 2 and 53 alternately (52 C2C sts).
Both sides of the blanket will now decrease so each row will start with decreasing. Each row will have one less stitch then the row before. -
Row 68-118: Repeat row 53 to end of blanket.
Cut yarn throughout the blanket as you finish a colour section. Weave in all the ends making sure to weave the ends all on the same side of the blanket. There is no right or wrong side of the blanket. The wrong side will be the side you weaved in the ends on.
Edging
Border
The blanket will now be worked in rounds. Round 1 of the border needs to have a total number of stitches dividable by 4 to make round 2 work correctly. If you find the border ruffles you can decrease the amount of stitches in the round or use a smaller hook size.
-
Round 1: Attach border colour (C) to the first dc at the beginning of a short row using a sdc, 2 dc in same st, 128 dc sts, 5 dc in the corner, 166 dc sts, 5 dc in the corner, 128 dc, 5 dc in the corner, 166 dc, 2 dc in the same st as the beginning sdc, sl st to sdc.
-
Round 2: Ch1, sc in same st, ch 3, 3 dc in same st, *sk 3 sts, sc in next st, ch 3, 3 dc in same st; repeat from * till end of round, sc in same st as first sc, cut yarn and inv jn to first sc.
-
Weave in the last few ends. The blanket can be steam blocked if you feel it needs to be pulled into shape but blocking is not essential.
Pattern Graph
Editor's Note: click graph image below to enlarge.