Little Helper Crochet Elf Hat
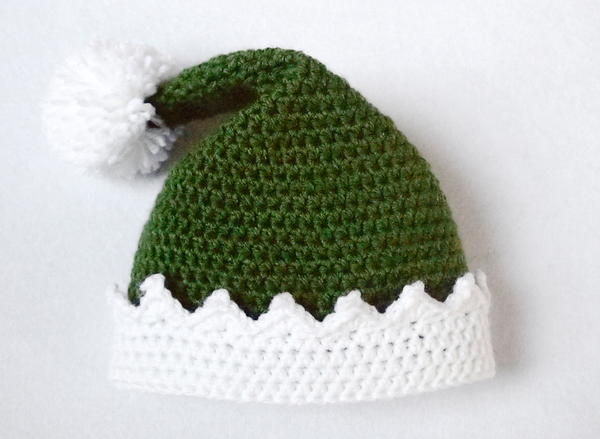
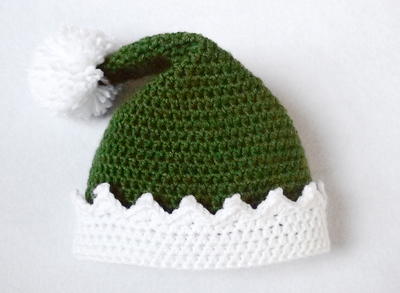
Dress your little holiday helper up in the adorable Little Helper Crochet Elf Hat. This easy crochet hat pattern is worked in the round in the half double crochet stitch, making it a fast project to complete. There's only one color change in the pattern, so if you're a little new at switching colors, have no fear! A cute little pompom dangles at the edge of the hat, and a delicate picot stitch edging sets off the color distinction. This crochet hat is available for the entire family, from newborn sizes all the way through large adult.
Sign Up for More Free Patterns!
NotesNotes
-Picot Stitch Instructions: Ch 3, sl st into the top loops of the last stitch made, continue with instructions
-Some heads do not conform to standard sizes by age, so please measure for a more accurate fit.
-The hat can be started with a Magic Ring or with the instructions given in Round 1
-Most of the rounds are worked in a spiral; use a stitch marker or piece of yarn to mark the first stitch
If you wish to make a striped hat you can create even stripes by joining all your rounds:
-Begin each round with a chain 1; this starting chain does not count as a stitch
-Make the first HDC of the round in the same stitch as your starting chain
-Make a join by slip stitching in the first HDC of the round

Crochet HookH/8 or 5 mm hook
Yarn Weight(4) Medium Weight/Worsted Weight and Aran (16-20 stitches to 4 inches)
Crochet Gauge14 stitches and 12 rows = 4” (10 cm)
Finished SizeNewborn - adult
Materials List
- Worsted weight yarn in Color A (Green) & Color B (White)
- 5.0 mm (H-8) crochet hook
- yarn needle
Pattern
-
Newborn • Head Circumference = 13" - 14" • Hat Circumference = 12.5" • Hat Height to the tip = 8.65"
Round 1: With Color A - Ch 2, make 5 hdc in first chain, do not join, continue working in a spiral until directed otherwise (5)
Round 2: Hdc in each stitch around (5)
Round 3: Make 2 hdc in each stitch around (10)
Round 4: Hdc in each stitch around (10)
Round 5: Make *2 hdc in first stitch, hdc in next stitch* repeat around (15)
Round 6: Hdc in each stitch around (15)
Round 7: Make *2 hdc in first stitch, hdc in next 2 stitches* repeat around (20)
Round 8: Hdc in each stitch around (20)
Round 9: Make *2 hdc in first stitch, hdc in next 3 stitches* repeat around (25)
Round 10: Hdc in each stitch around (25)
Round 11: Make *2 hdc in first stitch, hdc in next 4 stitches* repeat around (30)
Round 12: Hdc in each stitch around (30)
Round 13: Make *2 hdc in first stitch, hdc in next 5 stitches* repeat around (35)
Round 14: Hdc in each stitch around (35)
Round 15: Make *2 hdc in first stitch, hdc in next 6 stitches* repeat around (40)
Round 16: Hdc in each stitch around (40)
Round 17: Make *2 hdc in first stitch, hdc in next 9 stitches* repeat around (44)
Round 18 - 24: Hdc in each stitch around (44)
Fasten off Color A by making the following: Sc in next 2 stitches, sl st in next stitch, fasten off. Join Color B in any stitch.
Round 25: With Color B - Ch 1, hdc in each stitch around, join (44)
Round 26: Ch 1, hdc in each stitch around, join and turn your work - *this is the only round that is turned* (44)
The remaining rounds form the turned portion of the brim with the Elf Points.
Round 27: Working in Back Loops for this round only - Ch 1, hdc in each stitch around, join (44)
Round 28 - 29: Ch 1, hdc in each stitch around, join (44)
Round 30: *Sk 1 stitch, in the next stitch make [3 hdc, picot, 2 hdc], sk 1 stitch, sl st in next stitch* repeat around, when you get to the end sl st in the join space from the previous round and fasten off (11 Elf Points)
Fold the brim up along the Round that was worked into the Back Loop stitches and sew into place if desired. Attach a pompom to the tip of the hat. -
0 - 3 Months • Head Circumference = 14.5" - 16" • Hat Circumference = 14" • Hat Height to the tip = 9.65"
Round 1: With Color A - Ch 2, make 5 hdc in first chain, do not join, continue working in a spiral until directed otherwise (5)
Round 2: Hdc in each stitch around (5)
Round 3: Make 2 hdc in each stitch around (10)
Round 4: Hdc in each stitch around (10)
Round 5: Make *2 hdc in first stitch, hdc in next stitch* repeat around (15)
Round 6: Hdc in each stitch around (15)
Round 7: Make *2 hdc in first stitch, hdc in next 2 stitches* repeat around (20)
Round 8: Hdc in each stitch around (20)
Round 9: Make *2 hdc in first stitch, hdc in next 3 stitches* repeat around (25)
Round 10: Hdc in each stitch around (25)
Round 11: Make *2 hdc in first stitch, hdc in next 4 stitches* repeat around (30)
Round 12: Hdc in each stitch around (30)
Round 13: Make *2 hdc in first stitch, hdc in next 5 stitches* repeat around (35)
Round 14: Hdc in each stitch around (35)
Round 15: Make *2 hdc in first stitch, hdc in next 6 stitches* repeat around (40)
Round 16: Hdc in each stitch around (40)
Round 17: Make *2 hdc in first stitch, hdc in next 7 stitches* repeat around (45)
Round 18: Hdc in each stitch around (45)
Round 19: Make *2 hdc in first stitch, hdc in next 14 stitches* repeat around (48)
Round 20 - 27: Hdc in each stitch around (48)
Fasten off Color A by making the following: Sc in next 2 stitches, sl st in next stitch, fasten off. Join Color B in any stitch.
Round 28: With Color B - Ch 1, hdc in each stitch around, join (48)
Round 29: Ch 1, hdc in each stitch around, join and turn your work - *this is the only round that is turned* (48)
The remaining rounds form the turned portion of the brim with the Elf Points.
Round 30: Working in Back Loops for this round only - Ch 1, hdc in each stitch around, join (48)
Round 31 - 32: Ch 1, hdc in each stitch around, join (48)
Round 33: *Sk 1 stitch, in the next stitch make [3 hdc, picot, 2 hdc], sk 1 stitch, sl st in next stitch* repeat around, when you get to the end sl st in the join space from the previous round and fasten off (12 Elf Points)
Fold the brim up along the Round that was worked into the Back Loop stitches and sew into place if desired. Attach a pompom to the tip of the hat. -
3 - 6 Months • Head Circumference = 15.5" - 17" • Hat Circumference = 15" • Hat Height to the tip = 10.65"
Round 1: With Color A - Ch 2, make 5 hdc in first chain, do not join, continue working in a spiral until directed otherwise (5)
Round 2: Hdc in each stitch around (5)
Round 3: Make 2 hdc in each stitch around (10)
Round 4: Hdc in each stitch around (10)
Round 5: Make *2 hdc in first stitch, hdc in next stitch* repeat around (15)
Round 6: Hdc in each stitch around (15)
Round 7: Make *2 hdc in first stitch, hdc in next 2 stitches* repeat around (20)
Round 8: Hdc in each stitch around (20)
Round 9: Make *2 hdc in first stitch, hdc in next 3 stitches* repeat around (25)
Round 10: Hdc in each stitch around (25)
Round 11: Make *2 hdc in first stitch, hdc in next 4 stitches* repeat around (30)
Round 12: Hdc in each stitch around (30)
Round 13: Make *2 hdc in first stitch, hdc in next 5 stitches* repeat around (35)
Round 14: Hdc in each stitch around (35)
Round 15: Make *2 hdc in first stitch, hdc in next 6 stitches* repeat around (40)
Round 16: Hdc in each stitch around (40)
Round 17: Make *2 hdc in first stitch, hdc in next 7 stitches* repeat around (45)
Round 18: Hdc in each stitch around (45)
Round 19: Make *2 hdc in first stitch, hdc in next 8 stitches* repeat around (50)
Round 20: Hdc in each stitch around (50)
Round 21: Make *2 hdc in first stitch, hdc in next 24 stitches* repeat around (52)
Round 22 - 30: Hdc in each stitch around (52)
Fasten off Color A by making the following: Sc in next 2 stitches, sl st in next stitch, fasten off. Join Color B in any stitch.
Round 31: With Color B - Ch 1, hdc in each stitch around, join (52)
Round 32: Ch 1, hdc in each stitch around, join and turn your work - *this is the only round that is turned* (52)
The remaining rounds form the turned portion of the brim with the Elf Points.
Round 33: Working in Back Loops for this round only - Ch 1, hdc in each stitch around, join (52)
Round 34 - 35: Ch 1, hdc in each stitch around, join (52)
Round 36: *Sk 1 stitch, in the next stitch make [3 hdc, picot, 2 hdc], sk 1 stitch, sl st in next stitch* repeat around, when you get to the end sl st in the join space from the previous round and fasten off (13 Elf Points)
Fold the brim up along the Round that was worked into the Back Loop stitches and sew into place if desired. Attach a pompom to the tip of the hat. -
6 - 12 Months • Head Circumference = 16.5" - 18" • Hat Circumference = 16" • Hat Height to the tip = 11"
Round 1: With Color A - Ch 2, make 5 hdc in first chain, do not join, continue working in a spiral until directed otherwise (5)
Round 2: Hdc in each stitch around (5)
Round 3: Make 2 hdc in each stitch around (10)
Round 4: Hdc in each stitch around (10)
Round 5: Make *2 hdc in first stitch, hdc in next stitch* repeat around (15)
Round 6: Hdc in each stitch around (15)
Round 7: Make *2 hdc in first stitch, hdc in next 2 stitches* repeat around (20)
Round 8: Hdc in each stitch around (20)
Round 9: Make *2 hdc in first stitch, hdc in next 3 stitches* repeat around (25)
Round 10: Hdc in each stitch around (25)
Round 11: Make *2 hdc in first stitch, hdc in next 4 stitches* repeat around (30)
Round 12: Hdc in each stitch around (30)
Round 13: Make *2 hdc in first stitch, hdc in next 5 stitches* repeat around (35)
Round 14: Hdc in each stitch around (35)
Round 15: Make *2 hdc in first stitch, hdc in next 6 stitches* repeat around (40)
Round 16: Hdc in each stitch around (40)
Round 17: Make *2 hdc in first stitch, hdc in next 7 stitches* repeat around (45)
Round 18: Hdc in each stitch around (45)
Round 19: Make *2 hdc in first stitch, hdc in next 8 stitches* repeat around (50)
Round 20: Hdc in each stitch around (50)
Round 21: Hdc in the first 2 stitches, *2 hdc in next stitch, hdc in next 7 stitches* repeat between * to end (56)
Round 22 - 31: Hdc in each stitch around (56)
Fasten off Color A by making the following: Sc in next 2 stitches, sl st in next stitch, fasten off. Join Color B in any stitch.
Round 32: With Color B - Ch 1, hdc in each stitch around, join (56)
Round 33: Ch 1, hdc in each stitch around, join and turn your work - *this is the only round that is turned* (56)
The remaining rounds form the turned portion of the brim with the Elf Points.
Round 34: Working in Back Loops for this round only - Ch 1, hdc in each stitch around, join (56)
Round 35 - 36: Ch 1, hdc in each stitch around, join (56)
Round 37: *Sk 1 stitch, in the next stitch make [3 hdc, picot, 2 hdc], sk 1 stitch, sl st in next stitch* repeat around, when you get to the end sl st in the join space from the previous round and fasten off (14 Elf Points)
Fold the brim up along the Round that was worked into the Back Loop stitches and sew into place if desired. Attach a pompom to the tip of the hat. -
Toddler (Approximately 1 to 3 years) • Head Circumference = 18" - 19" • Hat Circumference = 17" • Hat Height to the tip = 12"
Round 1: With Color A - Ch 2, make 5 hdc in first chain, do not join, continue working in a spiral until directed otherwise (5)
Round 2: Hdc in each stitch around (5)
Round 3: Make 2 hdc in each stitch around (10)
Round 4: Hdc in each stitch around (10)
Round 5: Make *2 hdc in first stitch, hdc in next stitch* repeat around (15)
Round 6: Hdc in each stitch around (15)
Round 7: Make *2 hdc in first stitch, hdc in next 2 stitches* repeat around (20)
Round 8: Hdc in each stitch around (20)
Round 9: Make *2 hdc in first stitch, hdc in next 3 stitches* repeat around (25)
Round 10: Hdc in each stitch around (25)
Round 11: Make *2 hdc in first stitch, hdc in next 4 stitches* repeat around (30)
Round 12: Hdc in each stitch around (30)
Round 13: Make *2 hdc in first stitch, hdc in next 5 stitches* repeat around (35)
Round 14: Hdc in each stitch around (35)
Round 15: Make *2 hdc in first stitch, hdc in next 6 stitches* repeat around (40)
Round 16: Hdc in each stitch around (40)
Round 17: Make *2 hdc in first stitch, hdc in next 7 stitches* repeat around (45)
Round 18: Hdc in each stitch around (45)
Round 19: Make *2 hdc in first stitch, hdc in next 8 stitches* repeat around (50)
Round 20: Hdc in each stitch around (50)
Round 21: Make *2 hdc in first stitch, hdc in next 9 stitches* repeat around (55)
Round 22: Hdc in each stitch around (55)
Round 23: Make *2 hdc in first stitch, hdc in next 10 stitches* repeat around (60)
Round 24 - 34: Hdc in each stitch around (60)
Fasten off Color A by making the following: Sc in next 2 stitches, sl st in next stitch, fasten off. Join Color B in any stitch.
Round 35: With Color B - Ch 1, hdc in each stitch around, join (60)
Round 36: Ch 1, hdc in each stitch around, join and turn your work - *this is the only round that is turned* (60)
The remaining rounds form the turned portion of the brim with the Elf Points.
Round 37: Working in Back Loops for this round only - Ch 1, hdc in each stitch around, join (60)
Round 38 - 40: Ch 1, hdc in each stitch around, join (60)
Round 41: *Sk 1 stitch, in the next stitch make [3 hdc, picot, 2 hdc], sk 1 stitch, sl st in next stitch* repeat around, when you get to the end sl st in the join space from the previous round and fasten off (15 Elf Points)
Fold the brim up along the Round that was worked into the Back Loop stitches and sew into place if desired. Attach a pompom to the tip of the hat. -
Child (Approximately 4 to 10 years) • Head Circumference = 19" - 20" • Hat Circumference = 18" • Hat Height to the tip = 13.25"
Round 1: With Color A - Ch 2, make 5 hdc in first chain, do not join, continue working in a spiral until directed otherwise (5)
Round 2: Hdc in each stitch around (5)
Round 3: Make 2 hdc in each stitch around (10)
Round 4: Hdc in each stitch around (10)
Round 5: Make *2 hdc in first stitch, hdc in next stitch* repeat around (15)
Round 6: Hdc in each stitch around (15)
Round 7: Make *2 hdc in first stitch, hdc in next 2 stitches* repeat around (20)
Round 8: Hdc in each stitch around (20)
Round 9: Make *2 hdc in first stitch, hdc in next 3 stitches* repeat around (25)
Round 10: Hdc in each stitch around (25)
Round 11: Make *2 hdc in first stitch, hdc in next 4 stitches* repeat around (30)
Round 12: Hdc in each stitch around (30)
Round 13: Make *2 hdc in first stitch, hdc in next 5 stitches* repeat around (35)
Round 14: Hdc in each stitch around (35)
Round 15: Make *2 hdc in first stitch, hdc in next 6 stitches* repeat around (40)
Round 16: Hdc in each stitch around (40)
Round 17: Make *2 hdc in first stitch, hdc in next 7 stitches* repeat around (45)
Round 18: Hdc in each stitch around (45)
Round 19: Make *2 hdc in first stitch, hdc in next 8 stitches* repeat around (50)
Round 20: Hdc in each stitch around (50)
Round 21: Make *2 hdc in first stitch, hdc in next 9 stitches* repeat around (55)
Round 22: Hdc in each stitch around (55)
Round 23: Make *2 hdc in first stitch, hdc in next 10 stitches* repeat around (60)
Round 24: Hdc in each stitch around (60)
Round 25: Make *2 hdc in first stitch, hdc in next 14 stitches* repeat around (64)
Round 26 - 38: Hdc in each stitch around (64)
Fasten off Color A by making the following: Sc in next 2 stitches, sl st in next stitch, fasten off. Join Color B in any stitch.
Round 39: With Color B - Ch 1, hdc in each stitch around, join (64)
Round 40: Ch 1, hdc in each stitch around, join and turn your work - *this is the only round that is turned* (64)
The remaining rounds form the turned portion of the brim with the Elf Points.
Round 41: Working in Back Loops for this round only - Ch 1, hdc in each stitch around, join (64)
Round 42 - 44: Ch 1, hdc in each stitch around, join (64)
Round 45: *Sk 1 stitch, in the next stitch make [3 hdc, picot, 2 hdc], sk 1 stitch, sl st in next stitch* repeat around, when you get to the end sl st in the join space from the previous round and fasten off (16 Elf Points)
Fold the brim up along the Round that was worked into the Back Loop stitches and sew into place if desired. Attach a pompom to the tip of the hat. -
Teen / Small Adult • Head Circumference = 20" - 21.5" • Hat Circumference = 19" • Hat Height to the tip = 14.25"
Round 1: With Color A - Ch 2, make 5 hdc in first chain, do not join, continue working in a spiral until directed otherwise (5)
Round 2: Hdc in each stitch around (5)
Round 3: Make 2 hdc in each stitch around (10)
Round 4: Hdc in each stitch around (10)
Round 5: Make *2 hdc in first stitch, hdc in next stitch* repeat around (15)
Round 6: Hdc in each stitch around (15)
Round 7: Make *2 hdc in first stitch, hdc in next 2 stitches* repeat around (20)
Round 8: Hdc in each stitch around (20)
Round 9: Make *2 hdc in first stitch, hdc in next 3 stitches* repeat around (25)
Round 10: Hdc in each stitch around (25)
Round 11: Make *2 hdc in first stitch, hdc in next 4 stitches* repeat around (30)
Round 12: Hdc in each stitch around (30)
Round 13: Make *2 hdc in first stitch, hdc in next 5 stitches* repeat around (35)
Round 14: Hdc in each stitch around (35)
Round 15: Make *2 hdc in first stitch, hdc in next 6 stitches* repeat around (40)
Round 16: Hdc in each stitch around (40)
Round 17: Make *2 hdc in first stitch, hdc in next 7 stitches* repeat around (45)
Round 18: Hdc in each stitch around (45)
Round 19: Make *2 hdc in first stitch, hdc in next 8 stitches* repeat around (50)
Round 20: Hdc in each stitch around (50)
Round 21: Make *2 hdc in first stitch, hdc in next 9 stitches* repeat around (55)
Round 22: Hdc in each stitch around (55)
Round 23: Make *2 hdc in first stitch, hdc in next 10 stitches* repeat around (60)
Round 24: Hdc in each stitch around (60)
Round 25: Make *2 hdc in first stitch, hdc in next 11 stitches* repeat around (65)
Round 26: Hdc in each stitch around (65)
Round 27: Hdc in first 2 stitches, *2 hdc in next stitch, hdc in next 20 stitches* repeat between * to end (68)
Round 28 - 41: Hdc in each stitch around (68)
Fasten off Color A by making the following: Sc in next 2 stitches, sl st in next stitch, fasten off. Join Color B in any stitch.
Round 42: With Color B - Ch 1, hdc in each stitch around, join (68)
Round 43: Ch 1, hdc in each stitch around, join and turn your work - *this is the only round that is turned* (68)
The remaining rounds form the turned portion of the brim with the Elf Points.
Round 44: Working in Back Loops for this round only - Ch 1, hdc in each stitch around, join (68)
Round 45 - 47: Ch 1, hdc in each stitch around, join (68)
Round 48: *Sk 1 stitch, in the next stitch make [3 hdc, picot, 2 hdc], sk 1 stitch, sl st in next stitch* repeat around, when you get to the end sl st in the join space from the previous round and fasten off (17 Elf Points)
Fold the brim up along the Round that was worked into the Back Loop stitches and sew into place if desired. Attach a pompom to the tip of the hat. -
Medium Adult • Head Circumference = 22" - 23" • Hat Circumference = 21" • Hat Height to the tip = 15.25"
Round 1: With Color A - Ch 2, make 5 hdc in first chain, do not join, continue working in a spiral until directed otherwise (5)
Round 2: Hdc in each stitch around (5)
Round 3: Make 2 hdc in each stitch around (10)
Round 4: Hdc in each stitch around (10)
Round 5: Make *2 hdc in first stitch, hdc in next stitch* repeat around (15)
Round 6: Hdc in each stitch around (15)
Round 7: Make *2 hdc in first stitch, hdc in next 2 stitches* repeat around (20)
Round 8: Hdc in each stitch around (20)
Round 9: Make *2 hdc in first stitch, hdc in next 3 stitches* repeat around (25)
Round 10: Hdc in each stitch around (25)
Round 11: Make *2 hdc in first stitch, hdc in next 4 stitches* repeat around (30)
Round 12: Hdc in each stitch around (30)
Round 13: Make *2 hdc in first stitch, hdc in next 5 stitches* repeat around (35)
Round 14: Hdc in each stitch around (35)
Round 15: Make *2 hdc in first stitch, hdc in next 6 stitches* repeat around (40)
Round 16: Hdc in each stitch around (40)
Round 17: Make *2 hdc in first stitch, hdc in next 7 stitches* repeat around (45)
Round 18: Hdc in each stitch around (45)
Round 19: Make *2 hdc in first stitch, hdc in next 8 stitches* repeat around (50)
Round 20: Hdc in each stitch around (50)
Round 21: Make *2 hdc in first stitch, hdc in next 9 stitches* repeat around (55)
Round 22: Hdc in each stitch around (55)
Round 23: Make *2 hdc in first stitch, hdc in next 10 stitches* repeat around (60)
Round 24: Hdc in each stitch around (60)
Round 25: Make *2 hdc in first stitch, hdc in next 11 stitches* repeat around (65)
Round 26: Hdc in each stitch around (65)
Round 27: Make *2 hdc in first stitch, hdc in next 12 stitches* repeat around (70)
Round 28: Hdc in each stitch around (70)
Round 29: Make *2 hdc in first stitch, hdc in next 34 stitches* repeat around (72)
Round 30 - 44: Hdc in each stitch around (72)
Fasten off Color A by making the following: Sc in next 2 stitches, sl st in next stitch, fasten off. Join Color B in any stitch.
Round 45: With Color B - Ch 1, hdc in each stitch around, join (72)
Round 46: Ch 1, hdc in each stitch around, join and turn your work - *this is the only round that is turned* (72)
The remaining rounds form the turned portion of the brim with the Elf Points.
Round 47: Working in Back Loops for this round only - Ch 1, hdc in each stitch around, join (72)
Round 48 - 50: Ch 1, hdc in each stitch around, join (72)
Round 51: *Sk 1 stitch, in the next stitch make [3 hdc, picot, 2 hdc], sk 1 stitch, sl st in next stitch* repeat around, when you get to the end sl st in the join space from the previous round and fasten off (18 Elf Points)
Fold the brim up along the Round that was worked into the Back Loop stitches and sew into place if desired. Attach a pompom to the tip of the hat. -
Large Adult • Head Circumference = 23" - 24" • Hat Circumference = 22" • Hat Height to the tip = 15.65"
Round 1: With Color A - Ch 2, make 5 hdc in first chain, do not join, continue working in a spiral until directed otherwise (5)
Round 2: Hdc in each stitch around (5)
Round 3: Make 2 hdc in each stitch around (10)
Round 4: Hdc in each stitch around (10)
Round 5: Make *2 hdc in first stitch, hdc in next stitch* repeat around (15)
Round 6: Hdc in each stitch around (15)
Round 7: Make *2 hdc in first stitch, hdc in next 2 stitches* repeat around (20)
Round 8: Hdc in each stitch around (20)
Round 9: Make *2 hdc in first stitch, hdc in next 3 stitches* repeat around (25)
Round 10: Hdc in each stitch around (25)
Round 11: Make *2 hdc in first stitch, hdc in next 4 stitches* repeat around (30)
Round 12: Hdc in each stitch around (30)
Round 13: Make *2 hdc in first stitch, hdc in next 5 stitches* repeat around (35)
Round 14: Hdc in each stitch around (35)
Round 15: Make *2 hdc in first stitch, hdc in next 6 stitches* repeat around (40)
Round 16: Hdc in each stitch around (40)
Round 17: Make *2 hdc in first stitch, hdc in next 7 stitches* repeat around (45)
Round 18: Hdc in each stitch around (45)
Round 19: Make *2 hdc in first stitch, hdc in next 8 stitches* repeat around (50)
Round 20: Hdc in each stitch around (50)
Round 21: Make *2 hdc in first stitch, hdc in next 9 stitches* repeat around (55)
Round 22: Hdc in each stitch around (55)
Round 23: Make *2 hdc in first stitch, hdc in next 10 stitches* repeat around (60)
Round 24: Hdc in each stitch around (60)
Round 25: Make *2 hdc in first stitch, hdc in next 11 stitches* repeat around (65)
Round 26: Hdc in each stitch around (65)
Round 27: Make *2 hdc in first stitch, hdc in next 12 stitches* repeat around (70)
Round 28: Hdc in each stitch around (70)
Round 29: Hdc in first 4 stitches, *2 hdc in next stitch, hdc in next 10 stitches* repeat around (76)
Round 30 - 45: Hdc in each stitch around (76)
Fasten off Color A by making the following: Sc in next 2 stitches, sl st in next stitch, fasten off. Join Color B in any stitch.
Round 46: With Color B - Ch 1, hdc in each stitch around, join (76)
Round 47: Ch 1, hdc in each stitch around, join and turn your work - *this is the only round that is turned* (76)
The remaining rounds form the turned portion of the brim with the Elf Points.
Round 48: Working in Back Loops for this round only - Ch 1, hdc in each stitch around, join (76)
Round 49 - 51: Ch 1, hdc in each stitch around, join (76)
Round 52: *Sk 1 stitch, in the next stitch make [3 hdc, picot, 2 hdc], sk 1 stitch, sl st in next stitch* repeat around, when you get to the end sl st in the join space from the previous round and fasten off (19 Elf Points)
Fold the brim up along the Round that was worked into the Back Loop stitches and sew into place if desired. Attach a pompom to the tip of the hat.
Up Next:
Read NextRibbon Candy Christmas Ornament
Member 5071769
Dec 19, 2021
These hats are SO great and easy to make. I used red and white and switched colours every 2 rows, then used a bright green for the bottom and they look fabulous. My kids get compliments everywhere we go. They grew out of the first ones I made so I made them bigger ones this year. Great for the Christmas photos and for the whole family.
brezers 0853497
Nov 18, 2020
I am half way through this adult hat (round 21). It seems small. Will this fit an adult or should I frog it and do over with an I or J hook?
Ioanna
Oct 02, 2020
Hello, I would like to ask if the finished products can be put up for sale. Not the pattern of course.
lcarr
Dec 27, 2017
I wish I had seen this pattern last week. My youngest wanted a Santa or elf hat to wear on Christmas, but the one we have is not stretchy at all and did not fit him. He would have loved this one. I am going to make one up this week to put aside for next year!
mjewell 7836323
Nov 30, 2017
Hi, I'm wondering how you would change this for a preemie? Thank you in advance.
AFC Editor Julia
Nov 30, 2017
Hi! We actually have a preemie version of this on the site: Adorable Elfish Preemie Hat, https://www.allfreecrochet.com/Baby-Hats/Adorably-Elfish-Preemie-Hat Julia, AFC editor
Member 5071769
Nov 27, 2017
I switched up the colours a bit and LOVE it! Very easy directions to follow and easy to make.
princess6860504
Nov 15, 2017
Okay, if you are married with children, you have got to consider making these for the entire family and use it in your annual holiday photo! There are sizes available for every single age and size known to man. Why not make each family member their own favorite color? They don't have to match.
mulberrygalprinces s
Aug 24, 2017
What a cute item. I have also made many Santa and elf hats but like a previous poster said, they seemed to be missing something. Then I saw this pattern and realized it was the trim. That makes a big different. I am starting a new one right now to go with a diaper cover. Thank you for offering it.
pven1953 3263014
Nov 20, 2016
I started this hat tonight. I'm having trouble with the increases. The top of the hat is looking too wide. Not as cylindrical as the pic. Also, how to crochet in the same stitch as the starting chain. Is that on the next round? Its so cute, I don't know what I'm doing wrong!
achumley0003 31706 34
Nov 06, 2016
I have seen many crochet elf hat patterns, and most of them were also cute, but it just seemed like something was missing to make them look more like traditional elf hats. Seeing this one, I now realize it is the edging. The picot edging makes it look the way you picture an elf hat in your head. I will definitely try this pattern and I love that it includes sizes for the whole family.
Cheryl Y
Nov 05, 2016
This Little Helper Crochet Elf Hat is way to cute! I just love it.. I know I will be making at least 8 of these for my Grand kids who are big helpers.. The pattern is very well written and I sure hope mine comes out as well as the picture! Has anyone made this hat with the written pattern? If so how did it come out for you? I need to get the yarn and try this one. Thank you so much for sharing this free crochet pattern.
rinkanaslie 934391 3
Nov 03, 2016
Wow
Daughter of Light
Nov 03, 2016
WOW is right! This is absolutely adorable. I'm thinking about making one of these up for myself but maybe in red. I love to make people smile and I think this would do just that! I think with my trusty Dummies' Guide to Crochet I can figure out the stitching. It's so great that you have all the different sizes available but that's where I need help. Can someone tell me exactly how to measure on my head for the size? Would it be straight across above both my ears or at a slant or does it depend on how I would wear it? Not sure on this part--help please?!?
spiderlady56
Nov 04, 2016
Place a tape measure around your head, about 1/8" above your ear, across the mid-forehead, completely circling your head. Hold the tape firmly, but not too tightly. Basically you need to measure your head exactly where the hat will sit. If your measurement falls between sizes, choose the next largest size. Hope this helps! =)
AFC Editor Annalis a
Oct 21, 2016
So cute! It would be adorable for a baby's first Christmas photo shoot.
Report Inappropriate Comment
Are you sure you would like to report this comment? It will be flagged for our moderators to take action.
Thank you for taking the time to improve the content on our site.

