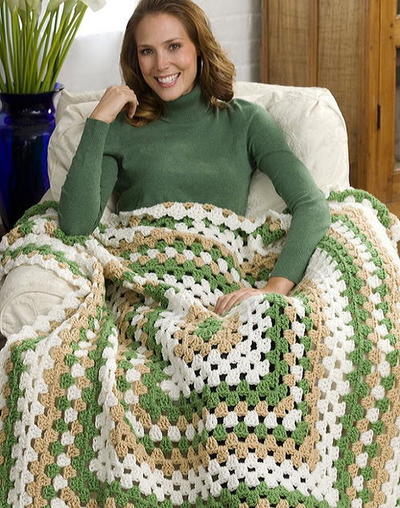
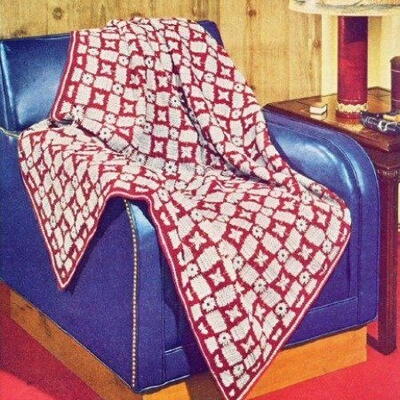
Interlocked Granny Throw Blanket

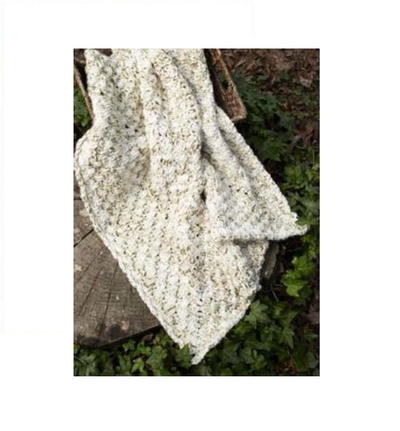
This classy Interlocked Granny Throw Afghan uses interlocking yarn instead of a pattern to make an interesting design. It is a classy throw for any occasion and any season. The chunky weight yarn makes it cozy in the winter time. You must be comfortable with forming the long double crochet stitch, but it's an easy crochet pattern. All you need is Almond colored bulky yarn, an N hook, and a yarn needle to complete this lovely crochet blanket. The subtle contrast between the stitching and yarn color might be just what your home needs.
NotesThrow is worked in rounds. Join each rnd as specified in instructions; do not turn.

Crochet HookN/15 or 10 mm hook
Yarn Weight(5) Bulky/Chunky (12-15 stitches for 4 inches)
Crochet GaugeRnd 1 = 3" square. Use any size hook necessary to obtain the specified gauge.
Finished Size38 in. square, including border.
Materials List
- Deborah Norville Collection Chunky Weight - 11 balls 01 Almond
- Crochet hook: N-15 (10mm)
- Extras: Large-eye yarn needle
Instructions
Special Abbreviation
Ldc (long double crochet): Yo, insert hook in specified stitch and draw up a lp even with top of working row, [yo and pull yarn through 2 lps on hook] twice.
Throw
Ch 4; join with a sl st to form a ring.
Rnd 1 (RS): Ch 3, 2 dc in ring, ch 2 - corner, [3 dc in ring, ch 2] 3 times; join with a sl st in third ch of beg ch-3.
Rnd 2: Ch 1, sc in same ch as joining, sc in each st to ch-2 corner, ch 3 - corner, [sc in each st to ch-2 corner, ch 3] 3 times; join with a sl st in first sc.
Rnd 3: Sl st to ch-3 corner and in ch-3 corner, ch 3, (2 dc, ch 2, 3 dc) in same ch-3 corner, ch 1, [(3 dc, ch 2, 3 dc) in next ch-3 corner, ch 1] 3 times; join with a sl st in third ch of beg ch-3.
Rnd 4: Ch 1, sc in same ch as joining, sc in each of next 2 dc, ch 3, sc in each of next 3 dc, ch 1, [sc in each of next 3 dc, ch 3, sc in each of next 3 dc, ch 1] 3 times; join with a sl st in first sc.
Rnd 5: Sl st to ch-3 corner and in ch-3 corner, ch 3, (2 dc, ch 2, 3 dc) in same ch-3 corner, ch 1, 3 Ldc in second sc under next ch-1 sp in row below, ch 1, [(3 dc, ch 2, 3 dc) in next ch-3 corner, ch 1, 3 Ldc in second sc under next ch-1 sp in row below, ch 1] 3 times; join with a sl st in third ch of beg ch-3.
Rnd 6: Ch 1, sc in same ch as joining, sc in each dc around, working a ch 1 over each ch-1 sp and a ch-3 corner over each ch-2 corner; join with a sl st in first sc.
Rnd 7: Sl st to ch-3 corner and in ch-3 corner, ch 3, (2 dc, ch 2, 3 dc) in same ch-3 corner, ch 1, [3 Ldc in second sc under next ch-1 sp in row below, ch 1] twice, * (3 dc, ch 2, 3 dc) in next ch-3 corner, ch 1, [3 Ldc in second sc under next ch-1 sp in row below, ch 1] twice; rep from * around; join with a sl st in third ch of beg ch-3.
Rep Rnds 6 and 7, working one more (3 Ldc, ch 1) rep to corner in every Rnd 7, until Throw is approximately 37" square, ending with Rnd 7. Do not fasten off at end of last rnd.
Border
Ch 1, * sc in each of next 3 sts, 5 sc in corner, [sc in each of next 3 sts, sl st in second sc under next ch-1 sp in row below; rep from * across to within 3 sts of next corner] 3 times, 5 sc in last corner, + sc in each of next 3 sc, sl st in second sc under next ch-1 sp; rep from + to end; join with a sl st in first sc; rep from * around; fasten off.
Finishing
Weave in ends using large-eye yarn needle.
Read NextSquares Throw
Your Recently Viewed Projects
Thanks for your comment. Don't forget to share!
Delphine Bryant
Aug 02, 2018
This is interesting. After reading Morehouse17 post I too did some research. I like the way the design works out and from the pictures that the designer used different color yarns you can really see the texture.
Morehouse17
Jul 28, 2018
It was necessary for me to do a little research to understand this project. I think I finally get it. It is the long double crochet stitch that provides the design. A different picture of the finished project may would have helped understand it also. This picture does not provide a good look at the finished project.
Report Inappropriate Comment
Are you sure you would like to report this comment? It will be flagged for our moderators to take action.
Thank you for taking the time to improve the content on our site.