Black Cat Applique
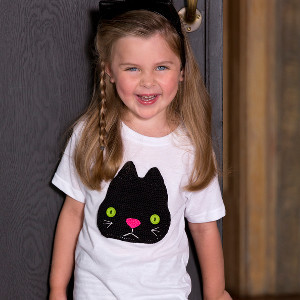
Get your kid excited for Halloween with this Black Cat Applique crochet pattern from Red Heart. It is the perfect addition to a shirt, bag, or other accessory for Halloween. Attach it to a headband and have a super realistic homemade cat Halloween costume! This crochet applique works up quickly and adds a cute touch to your Halloween accessories and decorating. Work up a batch for all the kids at school to make their own decorative shirts.

Crochet HookD/3 or 3.25 mm hook
Yarn Weight(5) Bulky/Chunky (12-15 stitches for 4 inches)
MATERIALS:
- Aunt Lydia's Classic Crochet Thread, Size 10:
- A: 12 Black (1 ball)
- B: 332 Hot Pink (1 ball)
- Aunt Lydia's Fashion Crochet Metallics, Size 5: C: 410S Silver/Silver (1 ball)
- Susan Bates Crochet Hook (D/3, 3 mm)
- Two green buttons, 19 mm diameter
- Small amount of silver thread
- Hand sewing needle and matching thread
- White cotton tee-shirt
- Yarn needle
GAUGE:
Gauge is not important for this project.
Pieces are worked with thread held doubled throughout.
SIZE:
Kitty Applique is 6” tall x 5½” wide
[15 x 14 cm]
SPECIAL STITCH:
sc2tog: [draw up a loop in next st] twice, yarn over and draw through all 3 loops on hook.
KITTY HEAD
Holding 2 strands of A together, ch 25.
Row 1: Working in back loops only, sc in 2nd ch from hook and each ch across – 24 sts.
Row 2: Ch 1, turn, [sc in next st, 2 sc in next st] twice, sc in next 16 sts, [2 sc in next st, sc in next st] twice – 28 sts.
Row 3: Ch 1, turn, sc in each st across.
Row 4: Ch 1, turn, [sc in next st, 2 sc in next st] twice, sc in next 20 sts, [2 sc in next st, sc in next st] twice – 32 sts.
Row 5: Ch 1, turn, sc in each st across.
Row 6: Ch 1, turn, [sc in next st, 2 sc in next st] twice, sc in next 24 sts, [sc in next st, 2 sc in next st] twice – 36 sts.
Rows 7-18: Ch 1, turn, sc in each st across.
Row 19: Ch 1, turn, [sc in next st, sc2tog] twice, sc in next 24 sts, [sc2tog, sc in next st] twice – 32 sts.
Row 20: Ch 1, turn, sc in each st across.
Row 21: Ch 1, turn, [sc in next st, sc2tog] twice, sc in next 20 sts, [sc2tog, sc in next st] twice – 28 sts.
Rows 22-31: Ch 1, turn, sc in each st across.
Row 32: Ch 1, turn, [sc in next st, sc2tog] twice, sc in next 16 sts, [sc2tog, sc in next st] twice – 24 sts.
Row 33: Ch 1, turn, sc in each st across.
Row 34: Ch 1, turn, [sc in next st, sc2tog] twice, sc in next 12 sts, [sc2tog, sc in next st] twice – 20 sts.
Row 35: Ch 1, turn, sc in each st across.
Shape First Ear
Row 36: Ch 1, turn, sc in next 8 sts, leave remaining sts unworked – 8 sts.
Row 37: Ch 1, turn, sc in each st across.
Row 38: Ch 1, turn, skip first st, sc in next 5 sts, sc2tog – 6 sts.
Row 39: Ch 1, turn, sc in each st across.
Row 40: Ch 1, turn, skip first st, sc in next 3 sts, sc2tog – 4 sts.
Row 41: Ch 1, turn, sc in each st across.
Row 42: Ch 1, turn, [sc2tog] twice – 2 sts.
Fasten off.
Shape Second Ear
Row 36: Skip next 4 unworked sts on Row 36, join yarn in next st, ch 1, sc in same st, sc in next 7 sts – 8 sts.
Rows 37-42: Work as for First Ear. Do Not Fasten Off.
Edging: Ch 1, sc evenly spaced around entire Head, slip st in first sc to join. Fasten off.
NOSE
Holding 2 strands of B together, ch 8.
Row 1: Working in back loops only, sc in 2nd ch from hook and each ch across – 7 sts.
Row 2: Ch 1, turn, skip first st, sc in next 4 sts, sc2tog – 5 sts.
Row 3: Ch 1, turn, skip first st, sc in next 2 sts, sc2tog – 3 sts.
Row 4: Ch 1, turn, skip first st, sc2tog – 1 st.
Edging: Ch 1, sc evenly spaced around entire Nose, slip st in first sc to join. Fasten off.
FINISHING
Following photo, sew Nose in center of Head. Sew buttons on Head for eyes. With 2 strands of C held together, embroider mouth with straight stitches from tip of Nose. Sew 3 whiskers on either side of Nose. For best results, lay tee-shirt flat and insert a piece of cardboard inside and smooth the shirt front. Referring to the photo, pin head in center of shirt. Carefully hand-stitch pieces using matching thread, being careful not to pull the thread too tightly in order to prevent puckering.
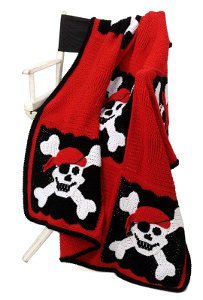
Read NextCoolest Pirate Afghan Ever
Your Recently Viewed Projects
Thanks for your comment. Don't forget to share!
JaneEK
Aug 16, 2017
This is an adorable appliqu, but why on earth use #10 crochet thread when a worsted acrylic would work perfectly well instead? It would work up a lot faster even if you use a G or H size hook. Ill have to play around with the pattern because I really like this and have several ideas about where to use it.
Report Inappropriate Comment
Are you sure you would like to report this comment? It will be flagged for our moderators to take action.
Thank you for taking the time to improve the content on our site.