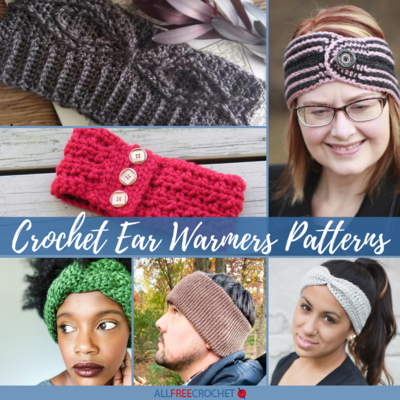
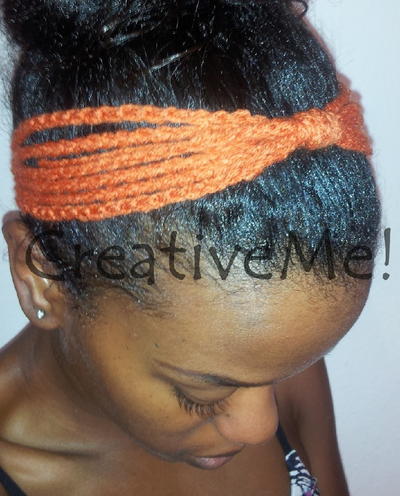
Most Comfortable Crochet Headband Ever

No need to search high and low for a comfortable headband because we've just found it for you. The Most Comfortable Crochet Headband Ever is created by placing buttons at your perfect comfort place to ensure a comfortable fit. You'll never have to worry about your headband bring just the right size ever again. Plus, this crochet pattern calls for a single skein of Red Heart Boutique Midnight yarn, so it has just the right amount of sparkle to make you feel like a queen.

Crochet HookJ/10 or 6 mm hook
Yarn Weight(4) Medium Weight/Worsted Weight and Aran (16-20 stitches to 4 inches)
MATERIALS:
- RED HEART® Boutique Midnight®: 1 ball 1944 Harvest Moon
- Susan Bates® Crochet Hook: 6 mm [J-10 US].
- Yarn needle,
- stitch marker,
- two 11/8” (28.5 mm) wooden buttons,
- sewing needle and matching thread (optional for buttons)
GAUGE: 16 sts = 4” (10 cm); 15 rows = 4” (10 cm) in single crochet. CHECK YOUR GAUGE. Use any size hook to obtain the gauge.
SIZE: Headband measures 3” x 22” (7.5 x 56 cm), unbuttoned
Special Stitches
sc2tog = [Insert hook in next stitch, yarn over and pull up a loop] twice, yarn over and draw through all 3 loops on hook.
sc3tog = [Insert hook in next stitch, yarn over and pull up a loop in next st] 3 times, yarn over and draw through all 4 loops on hook.
Notes
1. Headband is worked in joined rounds with right side facing at all times.
2. Cinching band is worked in rows, wrapped around headband at midsection, and tacked in place.
3. Buttonholes cross at back of headband and loop over buttons. Buttons are worn at nape of neck.
HEADBAND
First Side
Ch 24; taking care not to twist ch, join with slip st in first sc in first ch to form ring.
Round 1: Ch 1, working in back bars, sc in each ch around; join with slip st in first sc—24 sc. Place marker for beginning of round and move marker up as each round is completed.
Round 2–22: Ch 1, sc in in each sc around; join with slip st in first sc.
Round 23: Ch 1, sc in first sc, sc2tog twice, sc to last 5 sc, sc2tog twice, sc in last sc; join with slip st in first sc—20 sc.
Round 24: Ch 1, sc in in each sc around; join with slip st in first sc.
Rounds 25–30: Repeat last 2 rounds 3 times—8 sc.
Round 31: Ch 1, sc in first sc, sc2tog, sc in next 2 sc, sc2tog, sc in last sc; join with slip st in first sc—6 sc.
Round 32: Ch 1, sc in in each sc around; join with slip st in first sc.
Round 33: Sc2tog 3 times; join with slip st in first sc—3 sc.
Row 34: Sc3tog—1 sc. Do not fasten off.
Buttonhole Loop Row: Ch 12, working in back bars, slip st in 2nd ch from hook and in each ch. Fasten off, leaving long tail for sewing.
Second Side
With right side facing, join yarn with slip st to first ch of foundation ch.
Round 1: Working across opposite side of foundation ch, ch 1, sc in each ch around; join with slip st in first sc—24 sc.
Rounds 2–34 and Buttonhole Loop Row: Repeat Rounds 2–34 Buttonhole Loop Row of first side.
FINISHING HEADBAND
To form buttonhole loop, sew end of buttonhole loop row to Row 34 of first side. Repeat for second side.
CINCHING BAND
Ch 3.
Row 1: Sc in 2nd and last ch from hook, turn—2 sc.
Rows 2–5: Ch 1, sc in each sc, turn.
Row 6: Ch 1, 2 sc in each sc, turn—4 sc.
Row 7: Ch 1, sc in each sc, turn.
Row 8: Ch 1, 2 sc in first sc, sc in next 2 sc, 2 sc in last sc, turn—6 sc.
Row 9: Ch 1, sc in each sc, turn.
Row 10: Ch 1, 2 sc in first sc, sc in next 4 sc, 2 sc in last sc, turn—8 sc.
Rows 11 and 12: Ch 1, sc in each sc, turn.
Row 13: Ch 1, skip first sc, sc to last 2 sc, sc2tog, turn—6 sc.
Row 14: Ch 1, sc in each sc, turn.
Rows 15 and 16: Repeat last 2 rows—4 sc.
Row 17: Ch 1, skip first sc, sc in next sc, sc2tog, turn—2 sc.
Row 18: Ch 1, sc in each sc, turn.
Round 19: Ch 1, sc evenly spaced around; join with slip st in first sc. Fasten off.
 FINISHING
With yarn needle, gather midsection of headband by weaving length of yarn in and out, pulling tightly, and securing. Wrap the cinching band around the gathered section and sew ends together; tack band in place to underside of headband. Center each button on top side 6” (15 cm) (or at desired distance) from end of each buttonhole loop and sew in place with strand of yarn or matching thread.
Weave in ends.
ABBREVIATIONS
ch = chain; sc = single crochet; sp(s) = space(s); st(s) = stitch(es); [ ] = work directions in brackets the number of times specified; * = repeat whatever follows the * as indicated.
Read NextSpring Blossoms Necklace
Thanks for your comment. Don't forget to share!
TheLoric
Apr 27, 2017
@JaneEK My reply might be a bit late, but this project is a Red Heart original. You can find it either by searching the free patterns in Red Heart Boutique Midnight yarn (pattern# LW3822), or using the direct web page http//www.redheart.com/free-patterns/buttoned-croc == het-headband#. I'm not sure why All Free Crochet doesn't just use Red Heart's link. However, I know from personal experience that Red Heart has a bad habit of changing the pattern name, number, and the page's web address, after an un-established period of time. This sometimes makes it difficult to locate the pattern at a later date. It's why I save them in a PDF to my computer. It could also be AFC's reason for not linking the Red Heart page. Keep calm and crochet on! - Lori
JaneEK
Jan 14, 2017
This seems like it should be an easy project, but these instructions leave something to be desired. There is a nice photo of the front of the headband which includes how the cinching band should be positioned. But for the back of the headband, where the buttons and loops are fastened, there is only a small photonot large enough to provide the necessary detail. How can this be addressed?
TheLoric
Apr 27, 2017
@JaneEK See my reply above ... Also, I have attached to this pattern a photo from Red Heart's pattern that shows the Headband from the "Rearview". If AFC approves it, it should show up momentarily. Cheers! - Lori
banjojane66 197751 1
Apr 25, 2014
Please don't take this comment the wrong way, but the lady in this picture has beautiful features, like Kate Middleton's picture! Am I the only one who noticed her pretty face? This is a very comfortable looking headband. The colors are very nice. Thank you for the pattern. I love to crochet and this is my new project.
Report Inappropriate Comment
Are you sure you would like to report this comment? It will be flagged for our moderators to take action.
Thank you for taking the time to improve the content on our site.