Holiday Hippie Vest Pattern

Have yourself a groovy little Christmas with this Holiday Hippie Vest Pattern. This free crochet vest pattern has a 1960s inspired look. Loose and trendy, this crochet vest is perfect for layering over a long-sleeved shirt. Get the look of a laid-back Christmas elf with this free-spirited vest. Style this vest up or down depending on your accessories. You'll be comfortable and hip in this long vest. The hippie aesthetic is totally Christmas appropriate. After all, Christmas is all about peace and love.

Crochet HookK/10.5 or 6.5 mm hook
Yarn Weight(4) Medium Weight/Worsted Weight and Aran (16-20 stitches to 4 inches)
Crochet GaugeIn pattern, 3 pattern repeats and 6 rows = 5"/12.5cm. Note: One pattern repeat consists of one shell or one V-st and one ch-2 sp.
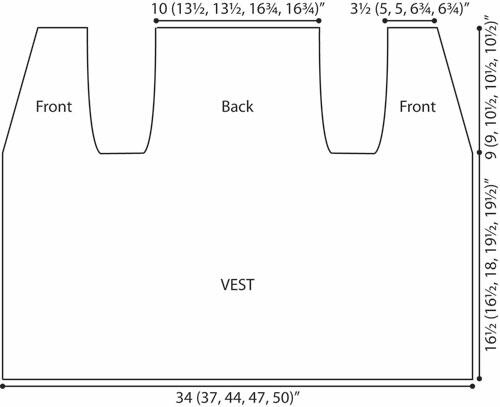
Finished SizeFinished Chest S 34" [86.5 cm] M 37" [94 cm] L 44" [112 cm] XL 47" [119.5 cm] 2XL 50" [127 cm] Finished Length S 25.5" [65 cm] M 25.5" [65 cm] L 28.5" [72.5 cm] XL 30" [76 cm] 2XL 30" [76 cm]
Materials List
- Main Color (MC): Simply Soft Party | Spring Sparkle, 0002
- Aluminum Crochet Hook 6"
- Size K10.5/6.5mm
- Bent Tip Steel Yarn Needles
Instructions
SPECIAL STITCHES:
shell: 6 dc in indicated stitch or space.
half-shell: 3 dc in indicated stitch or space.
V-st: V-stitch—(Dc, ch 1, dc) in indicated space.
NOTE:
Vest is worked in one piece from lower edge up to underarm. The piece is then divided for armholes. The back and fronts are then worked separately up to shoulders.
VEST:
Beginning at lower edge, ch 108 (118, 138, 148, 158).
-
Row 1 (WS): Shell in 8th ch from hook, *sk next 4 ch, shell in next ch; repeat from * across to last 5 ch, ch 1 sk next 4 ch, dc in last ch, turn—20 (22, 24, 26, 28) shells.
-
Row 2 (RS): Ch 5, *V-st between 3rd and 4th dc of next shell, ch 2; repeat from * across, sk next ch, tr in next ch (6th ch of beginning ch), turn—20 (22, 24, 26, 28) V-sts.
-
Row 3: Ch 4, shell in ch-1 sp of each V-st across, ch 1, dc in 3rd ch of turning ch, turn.
-
Row 4: Ch 5, *V-st between 3rd and 4th dc of next shell, ch 2; repeat from * across, tr in 3rd ch of turning ch, turn.
-
Repeat Rows 3 and 4 until piece measures 16 1/2 (16 1/2, 18, 19 1/2, 19 1/2)"/42 (42, 45.5, 49.5, 49.5)cm from beginning. Take care that the last row you work is a Row 4 (RS row).
FIRST FRONT
-
L (1X, 2X) Only: Row 1 (WS): Ch 4, shell in ch-1 sp of first 5 (6, 6) V-sts, dc in first dc of next V-st; leave remaining sts unworked, turn—5 (6, 6) shells.
-
Row 2: Ch 5, *V-st between 3rd and 4th dc of next shell, ch 2; repeat from * across, tr in 3rd ch of turning ch, turn.
-
Proceed to Shape Neck for All Sizes. Note that Row 1 will be your Row 3.
-
Shape Neck -- All Sizes: Row 1 (WS): Ch 4, half-shell in ch-1 sp of first V-st, shell in ch-1 sp of next 3 (3, 4, 5, 5) V-sts, ch 1, dc in first dc of next V-st; leave remaining sts unworked, turn—3 (3, 4, 5, 5) shells and 1 half-shell.
-
Row 2: Ch 5, *V-st between 3rd and 4th dc of next shell, ch 2; repeat from * across to half shell, dc in first dc of half shell, tr in 3rd ch of turning ch, turn—3 (3, 4, 5, 5) V-sts.
-
Row 3: Ch 4, shell in ch-1 sp of each V-st across, ch 1, dc in 3rd ch of turning ch, turn.
-
Row 4: Ch 5, *V-st between 3rd and 4th dc of next shell, ch 2; repeat from * across, tr in 3rd ch of turning ch, turn.
-
Row 5: Ch 4, half-shell in ch-1 sp of first V-st, shell in ch-1 sp of each V-st across, ch 1, dc in 3rd ch of turning ch, turn—2 (2, 3, 4, 4) shells and 1 half-shell.
-
Rows 6–8: Repeat Rows 2–4—2 (2, 3, 4, 4) V-sts.
-
Rows 9 and 10: Repeat Rows 3 and 4.
-
Row 11: Ch 4, 4 dc in ch-1 sp of each V-st across, ch 1, dc in 3rd ch of turning ch.
-
Fasten off.
BACK
-
With WS facing, sk V-st immediately following first front (the V-st with a dc worked in the first dc), skip next 1 (1, 2, 1, 2) unworked V-sts, join yarn with sl st in 2nd dc of next V-st.
-
Row 1 (WS): Ch 4, shell in ch-1 sp of next 6 (8, 8, 10, 10) V-sts, ch 1, dc in first dc of next V-st, turn—6 (8, 8, 10, 10) shells.
-
Row 2 (RS): Ch 5, *V-st between 3rd and 4th dc of next shell, ch 2; repeat from * across, sk next ch, tr in 3rd ch of turning ch, turn—6 (8, 8, 10, 10) V-sts.
-
Row 3: Ch 4, shell in ch-1 sp of each V-st across, ch 1, dc in 3rd ch of turning ch, turn.
-
Rows 4–11 (11, 13, 13, 13): Repeat last 2 rows 4 (4, 5, 5, 5) times.
-
Fasten off.
SECOND FRONT
-
With WS facing, sk V-st immediately following back front (the V-st with a dc worked in the first dc), skip next 1 (1, 2, 1, 2) unworked V-sts, join yarn with sl st in 2nd dc of next V-st.
-
L (1X, 2X) Only: Row 1 (WS): Ch 4, shell in ch-1 sp of each V-st across, ch 1, dc in 3rd ch of turning ch, turn—5 (6, 6) shells.
-
Row 2: Ch 5, V-st between 3rd and 4th dc of next shell, ch 2; repeat from * across, tr in 3rd ch of turning ch, turn.
-
Proceed to Shape Neck for All Sizes. Note that Row 1 will be your Row 3.
-
Shape Neck -- All Sizes: Row 1 (WS): Ch 4, half-shell in ch-1 sp of first V-st, shell in ch-1 sp of next 3 (3, 4, 5, 5) V-sts, ch 1, dc in first dc of next V-st; leave remaining sts unworked, turn—3 (3, 4, 5, 5) shells and 1 half-shell.
-
Row 2: Ch 5, *V-st between 3rd and 4th dc of next shell, ch 2; repeat from * across to half shell, dc in first dc of half shell, tr in 3rd ch of turning ch, turn—3 (3, 4, 5, 5) V-sts.
-
Row 3: Ch 4, shell in ch-1 sp of each V-st across, ch 1, dc in 3rd ch of turning ch, turn.
-
Row 4: Ch 5, *V-st between 3rd and 4th dc of next shell, ch 2; repeat from * across, tr in 3rd ch of turning ch, turn.
-
Row 5: Ch 4, half-shell in ch-1 sp of first V-st, shell in ch-1 sp of each V-st across, ch 1, dc in 3rd ch of turning ch, turn—2 (2, 3, 4, 4) shells and 1 half-shell.
-
Rows 6–8: Repeat Rows 2–4—2 (2, 3, 4, 4) V-sts.
-
Rows 9 and 10: Repeat Rows 3 and 4.
-
Row 11: Ch 4, 4 dc in ch-1 sp of each V-st across, ch 1, dc in 3rd ch of turning ch.
-
Fasten off.
FINISHING
-
Seam shoulders: Fold fronts over back, with RS of fabric facing each other and stitches of shoulders matching. Working through both thicknesses, inserting hook into front loop of top layer and back loop of lower layer, join yarn with sl st at beginning of shoulder, sl st in each st across shoulder. Fasten off. Repeat across other shoulder.
-
Front and Lower Edging: With RS facing, join yarn with sl st in lower front corner of vest, ch 1, sc evenly spaced across all outer edges of vest; join with sl st in first sc. Fasten off.
-
Armhole Edging: With RS facing, join yarn with sl st in armhole at underarm, ch 1, sc evenly spaced around armhole; join with sl st in first sc. Fasten off. Repeat around other armhole.
-
Closure: Cut a 5 yd/4.5m length of yarn. Measure 100"/254cm from one end of length and make a slip knot. Place slip knot on hook and ch 48, working with the long end of the yarn, leaving the 100" section unworked. Sl st in 4th ch from hook to form a ring, ch 2, work 16 dc in the ring; join with sl st in first dc. Fasten off. Reinsert hook at base of beginning slip knot; with 100"/254cm section, sl st in 4th ch from hook to form a ring, ch 2, work 16 dc in the ring; join with sl st in first dc. Fasten off. Thread closure through fronts, near beginning of neck shaping.
-
Using yarn needle, weave in all ends.
Read NextQuick Gnome Candy Ornaments
Your Recently Viewed Projects
Thanks for your comment. Don't forget to share!
princess6860504
Dec 13, 2017
For me, I don't really care for the green color, even though it is marketed as a holiday vest. I think it would be much prettier and more holiday if it were done up in a classic black with metallic flecks or a metallic thread. It's a nice idea, but it sounds like the pattern is not all accurate. ??
Hippie Chick
Sep 19, 2017
Not sure about the holiday part, but this is totally a classic seventies vest. I remember wearing one like it over my dresses and jeans when I was in middle school or as they called it when I went Jr. High. Those were the days. Thanks for sharing this pattern and picture because it brings back so many memories.
simonewheeler 3099 131
Feb 27, 2017
The second front is just a copy of the first front and it shouldn't be this way. In fact doing so you end up with the 2 fronts exactly the same way and it should be a mirror image as the picture shows. On the first front you start with a half shell and on the second front you start with a half shell as well, if you follow the pattern. On the second front you should start with the shell and end the row with the half shell. I just finished my vest and had to redo the whole second half. Now it looks right. I have just to do the finishing.
mulberrygalprinces s
Dec 16, 2016
This is a very basic pattern that your can have fun with. To will work up quickly and take no more than three skeins so it won't be that expensive.My grand daughter will love it. I want to use a variegated yarn so it will stripe itself. Thank you so much for sharing this one.
Crafter 7184027
Mar 23, 2015
I'm working this vest I'm at the joining of the yarn for the second front the pattern is very unclear, hate that I've gotten this far hit this little glitch!!! Wow!!! Any help out there? Pattern states to start at back front but then your garment doesn't match the other front side.
TheLoric
Sep 17, 2014
This pattern is called the "Mary Kate Vest" at the Yarnspirations web site. I truly dislike when a pattern is renamed because then I tend to download it multiple times thereby having multiple copies of the same. exact. pattern.
Report Inappropriate Comment
Are you sure you would like to report this comment? It will be flagged for our moderators to take action.
Thank you for taking the time to improve the content on our site.