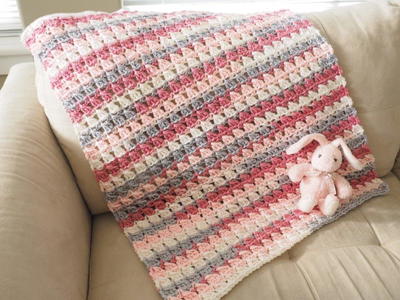
Heart Throb Blanket

With its beautiful design and vibrant colors, the Heart Throb Blanket is the perfect Valentine's Day gift idea for that close friend or relative who loves to stay warm while watching TV. Are you heading to a baby shower soon? This beautiful crochet blanket would also be a wonderful way to show the newest arrival in your family how much he or she is already loved. In addition to the message "LOVE" in a bold script, the crochet blanket incorporates a red heart in the design. This crochet pattern is at the intermediate level and is ideal for crocheters looking for a bit of a challenge.
NotesNotes:
-Blanket is worked in a diagonal from corner to corner.
-All right side (odd numbered rows) are worked from top right to bottom left, and all wrong side (even numbered rows) are worked from bottom left to top right.
-Change colors on the last yarn-over of the last st of the square to the next color indicated by chart.

Crochet HookJ/10 or 6 mm hook
Yarn Weight(4) Medium Weight/Worsted Weight and Aran (16-20 stitches to 4 inches)
Crochet GaugeRows 1-11 = 6” (15 cm) across straight edge. CHECK YOUR GAUGE. Use any size needles to obtain the gauge given.
Finished SizeBlanket measures 35 x 31” (89 x 79 cm)
Materials List
- RED HEART Super Saver yarn:3 skeins 373 Petal Pink B, 2 skeins each 706 Perfect Pink A, 311 White C, and 1 skein 390 Hot Red D
- Susan Bates Crochet Hook: 6 mm [US J-10]
- Yarn needle
Blanket
-
With A, ch 6
-
Row 1 (right side): Skip 3 ch, hdc in 4th ch from hook and in each of 2 remaining ch, turn – 1 square made.
-
Row 2 (wrong side): Ch 6, skip 3 ch, hdc in 4th ch from hook and in each of next 2 ch, (sc, ch 3, 3 hdc) in ch-3 space of Row 1, turn – 2 squares.
-
Row 3: Ch 6, skip 3 ch, hdc in 4th ch from hook and in each of next 2 ch, (sc, ch 3, 3 hdc) in each ch-3 space of previous row, turn – 3 squares.
-
Rows 4-54: Repeat Row 3, changing colors as indicated by chart, turn – 54 squares across last row.
-
Row 55: Slip st in each of first 3 sts, ch 1, (sc, ch 3, 3 hdc) in each ch-3 space of previous row, changing colors as indicated by chart, turn – 54 squares.
-
Row 56: Ch 6, skip 3 ch, hdc in 4th ch from hook and in each of next 2 ch, (sc, ch 3, 3 hdc) in each ch-3 space to last space, skip last space, turn – 54 squares.
-
Row 57-61: Repeat Rows 55 and 56 twice more, then repeat Row 55 only once more.
-
Row 62: Slip st in each of first 3 sts, ch 1, (sc, ch 3, 3 hdc) in each ch-3 space of previous row to last space changing colors as indicated by chart, skip last space, turn – 53 squares.
-
Rows 63-114: Repeat Row 62, changing colors as indicated by chart, turn – 1 square at end of Row 114.
-
Fasten off.
Border
-
Round 1 (RS): Join B with a slip st at top right corner, ch 2 (counts as 1 hdc), 2 hdc in same st as joining slip st, * work 120 hdc evenly to next corner, 3 hdc in corner st, 105 hdc evenly to next corner, ** 3 hdc in corner st; repeat from * to ** once more, join with a slip st in first st – 462 hdc.
-
Round 2: Ch 2 (counts as 1 hdc), 3 hdc in next st, * hdc in each st to corner st, 3 hdc in corner st, repeat from * twice more, hdc in each st to end, join with slip st in first st – 474 hdc.
-
Round 3: Ch 1, sc in same st as joining slip st, * skip 2 sts, 5 dc in next st, skip 2 sts, sc in next st; repeat from * around eliminating final sc, join with a slip st in first sc.
-
Fasten off.
Finishing
-
Weave in loose ends.
Project Diagram
-
Click the image to enlarge, or click here for a bigger version.
Abbreviations
- A, B
- Color A, Color B
- ch
- chain
- dc
- double crochet
- hdc
- half double crochet
- sc
- single crochet
- st(s)
- stitch(es)
- * or **
- repeat whatever follows the * or ** as indicated
Read NextGrandma's Lap Blanket
Your Recently Viewed Projects
Thanks for your comment. Don't forget to share!
Polli
Feb 06, 2022
I made this for my granddaughter in 2017. It has been on her bed ever since.it is beautiful, and washes and wears well. I did make in with cotton yarn as her parents did not want polyester yarns. It worked well.
JaneEK
Jul 31, 2018
This is a lovely blanket with a decidedly modern look. One big advantage to the Corner to Corner projects is that they lend themselves to graphic designs almost better than straight crocheted rows. The small size makes it perfect for a baby blanket, and consequently, wont take too long to work up. Since its a Red Heart pattern, the original can be downloaded from here http//www.redheart.com/free-patterns/heart-throb-b == lanket
Hippie Chick
Aug 30, 2017
This is so cute and would make the perfect baby shower gift or a welcoming gift for that new baby girl. I love the colors and the heart within a heart within the word LOVE. So I guess that I LOVE this blanket. I love pink too so this could be my next blanket for myself.
Hippie Chick
Jun 23, 2017
Awww. This is so cute. This is a C2C blanket. I have never actually made a blanket using the C2C technique. I need a baby blanket for a baby shower in the next few months and I have been looking for something that will give me a challenge. I read over the directions and they appear to be fairly easy to understand so I may give it a try.
schiebet
Apr 03, 2017
This is absolutely adorable!! I can't wait to get the yarn and get it started. I might change the light pink to a gray so it's not quite so girly? I would really like a blue option. Does anyone have any ideas for a blue option? Thanks for the help.
AFC Editor Annalis a
Mar 10, 2017
This is such a unique baby blanket! It would look adorable in any nursery.
Report Inappropriate Comment
Are you sure you would like to report this comment? It will be flagged for our moderators to take action.
Thank you for taking the time to improve the content on our site.