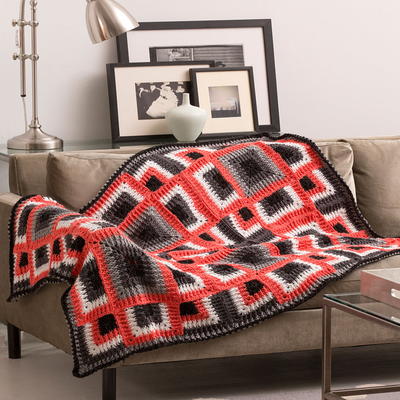
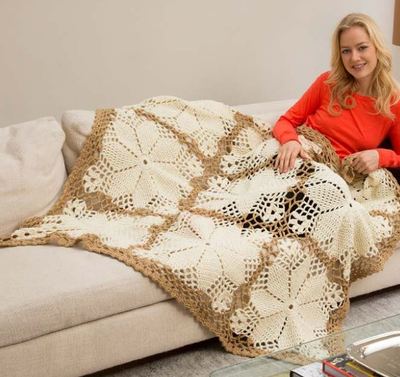
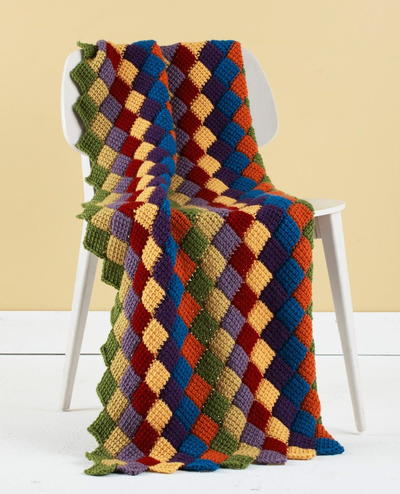
Honeycomb Crochet Throw
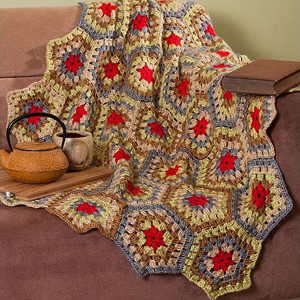
Take a look at this psychedelic Honeycomb Crochet Throw that is sure to add a pop of color to any room in your home. Work up each honeycomb motif to put together for the whole crochet blanket. Even though it is made up of worsted weight yarn, the Premier Yarns Eversoft is sure to be more comfortable than you imagine. Keep it as home decor or use this as a soft and warm crochet blanket on any chilly day.

Crochet HookH/8 or 5 mm hook
Yarn Weight(4) Medium Weight/Worsted Weight and Aran (16-20 stitches to 4 inches)
MATERIALS:
- Premier Yarns Ever Soft:
- A: Red (1 ball)
- B: Tan (2 balls)
- C: Grey (2 balls)
- D: Linen (2 balls)
- E: Clover (2 balls)
- Crochet Hook (Size H/8, 5 mm)
- Yarn Needle
- Throw Pattern Diagram
SIZE:
Length: 45"
Width: 42"
GAUGE:
14 sts x 5 rows = 4" in double crochet
1 motif measures 6 1/2" across
Note: Motifs are joined as you go. Refer to diagram for color placement, or use your own creativity to achieve a completely different look.
PATTERN STITCHES
Extended Double Crochet (EDC): YO, insert hook into st or sp indicated & pull up a lp, yo through 1 lp on hook, (yo & pull through 2 lps on hook) 2 times.
Leaning Tower Stitch (LTS): Complete 1 EDC in st or sp indicated, work 2 dc into base of prev EDC as follows: * yo, insert hook under both strands which form base of prev EDC & pull up lp, (yo & pull through 2 lps) 2 times; rep from * once more.
Partial Leaning Tower Stitch (PLTS): Complete 1 EDC in st or sp indicated, dc into base of prev EDC as follows: yo, insert hook under both strands which form base of prev EDC & pull up a lp, (yo & pull through 2 lps) 2 times.
MOTIF
Begin with sliding lp.
Rnd 1: With A, ch 1, 12 sc in ring, join with sl st to first sc.
Rnd 2: Ch 4, PLTS in same st, * ch 1, sk 1 sc, LTS in next sc; rep from * 4 more times, sk 1 sc, join with sc to top of ch-3. Break A.
Rnd 3: With next color indicated, ch 3, LTS in space made by joining sc, (2 LTS in sp made by joining sc, (2 LTS in next ch-1 sp) 5 times, PLTS in beg sp, join with sl st to top of ch-3, sl st in sp bef next EDC. Break color.
Rnd 4: With next color indicated, ch 3, LTS bet ch-3 & first tower st in prev rnd, LTS in sp bet next 2 tower sts, * 2 LTS in sp bet next 2 tower sts, LTS in sp bet next 2 tower sts; rep from * 4 more times, PLTS in beg sp, join with sl st to top of ch-3, sl st in sp bef next EDC. Break color.
Rnd 5: With next color indicated, ch 3, LTS bet ch-3 & first tower st in prev rnd, * (LTS in sp bet next 2 tower sts) 2 times **, 2 LTS in sp bet next 2 tower sts; rep from * around, ending last rep at **, PLTS in beg sp, join with sl st to top of ch-3, sl st to sp bef next EDC. Break color.
Rnd 6: With next color indicated, ch 3, LTS bet ch-3 & first tower st in prev rnd, * (LTS in sp bet next 2 tower sts) 3 times **, [LTS, ch 2, LTS] in sp bet next 2 tower sts; rep from * around, ending last rep at **, PLTS in beg sp, ch 2, join to top of ch-3. Fasten off. Break color.
THROW
Make one motif, working Rnds 1-6 of Motif. (Motif 1 on diagram)
For the next motif (Motif 2 on diagram), work rnds 1-5 of Motif. Rnd 6: (Joining rnd): Ch 3, LTS bet ch-3 & first tower st in prev rnd, * (LTS in sp bet next 2 tower sts) 3 times **, [LTS, ch 2, LTS] in sp bet next 2 tower sts; rep from * around 3 sides of the hexagon, at the next corner, work: LTS in ch-2 sp bet next 2 tower sts, sl st to sp bet tower sts on corresponding position of Motif 1, LTS in same sp as last LTS, * sl st to sp bet tower sts on correspong position of Motif 1, LTS in sp bet next 2 tower sts; rep from * 2 times, sl st to sp bet tower sts on Motif 1, LTS in corner sp bet next 2 tower sts, sl st to corresponding sp on Motif 1, LTS in same sp as last LTS, (joining complete), complete Rnd 6 as established. Attach Motifs 3 & 4 as for Motif 2. Continue attaching motifs, following diagram for guidance on joining.
FINISHING
Weave in ends.
(See Diagram)
Read NextAran Nosegay Crochet Throw
Your Recently Viewed Projects
Thanks for your comment. Don't forget to share!
elocin1104 2800379
Nov 26, 2018
These colors look so amazing together. I love patterns like this that are different shaped than your traditional granny squares. If these colors do not fit with your decor, you could substitute any colors you like and make this just as beautifully. What are your favorite colors for an afghan?
Delphine Bryant
Jul 13, 2018
Patterns made with motifs are one of my favorite types of projects. I think this honeycomb design is really pretty. I am not a fan of the colors but I know with some color adjustments this will be a great addition to the ever growing afghan collection that I have.
Morehouse17
Jun 30, 2018
I would have loved to have some pictures to look at as how to join these motifs as you go. I have a little experience with motif projects and I think I can figure it out. Love the design and I can not wait to get started. I want to give this as a Christmas gift this year to my sister in law.
Lynn K
May 06, 2017
Another great retro design for a throw or afghan that the ladies at the chronic care facility that a few of us crochet for are going to love! A lovely color combination too. Most of the clients at the facility are elderly and the ladies respond with delight when we crochet granny square wraps or afghans for them.
Zeemer
Jul 08, 2016
Wow. There is a center of attraction in this throw - the red star in the center of each hexagon. Beautiful. And the gray stripes surrounding the star gives a contrasting effect to the afghan. It helps that the pattern is just right on the same page.
Sleepy Jules
Feb 05, 2016
I love these join as you go projects - they're so great for working on the go!
Kayseateds 9054735
Jun 16, 2015
How do you work out what ply wool to use.I am in Australia and don't understand what worsted weight means as we usually just go on ply
gsimpspp 5236371
Jun 23, 2014
I can't read the diagram. It is too small a picture. Thank you; Diana
Report Inappropriate Comment
Are you sure you would like to report this comment? It will be flagged for our moderators to take action.
Thank you for taking the time to improve the content on our site.