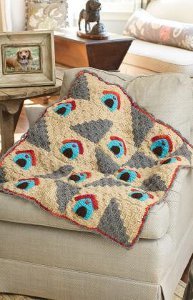
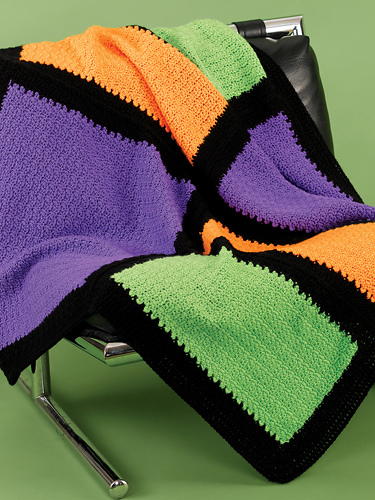
Dynamic Squares Crochet Throw

If you have a modern touch to your home, this crochet throw is perfect! It is made up of large squares, small squares and rectangles that are worked separately and then joined together at the end. This crochet pattern is shown in five colors that will add a bright pop of modern to your home decor, but you can work this up in any five colors you choose, giving you the option to make it match any room of the house or make it clean and neutral. This intermediate crochet pattern is perfect for crocheters on the go and can provide a great practice piece for any novice crocheter looking to improve.

Crochet HookI/9 or 5.5 mm hook
Yarn Weight(4) Medium Weight/Worsted Weight and Aran (16-20 stitches to 4 inches)
Crochet GaugeRounds 1–4 of large square = 4½” (11.5 cm).
Finished Size 40” wide x 60” long (101.5 x 152.5 cm); Large square measures: 10” (25.5 cm), Small square measures: 5” (12.5 cm), and Rectangle measures: 10” x 5” (25.5 x 12.5 cm).
Materials List
- Red Heart Soft: #9010 Charcoal (B, 3 balls), #9440 Light Grey Heather (C, 2 balls), #4600 White (E, 2 balls)
- Red Heart Sparkle Soft: #9291 Coral (D, 4 balls), #9012 Black (A, 2 balls)
- US size I/9 (5.5 mm) hook
Pattern Notes
-
Throw is made from 6 large squares, 24 small squares, and 24 rectangles.
-
To change color, work last stitch of old color to last yarn over. Yarn over with new color and draw through all loops on hook to complete stitch. Proceed with new color. Cut old color
-
Block all pieces to finished measurements before assembly. Squares and rectangles are arranged as shown in Assembly Diagram and sewn together.
Special Stitches
-
Bpdc (back post double crochet) = Yarn over, insert hook from back side of work to front and to back again around the post of indicated stitch; yarn over and pull up a loop (3 loops on hook), yarn over and draw through 2 loops (2 loops on hook), yarn over and draw through 2 loops (1 loop on hook). Skip the stitch “in front of” the Bpdc.
-
dc2tog = [Yarn over, insert hook in next seam or space, yarn over and pull up loop, yarn over, draw through 2 loops] 2 times, yarn over, draw through all 3 loops on hook.
-
Fpdc (Front post double crochet) = Yarn over, insert hook from front side of work to back and to front again around post of indicated stitch; yarn over and pull up a loop (3 loops on hook), yarn over and draw through 2 loops (2 loops on hook), yarn over and draw through 2 loops (1 loop on hook).
Throw Pattern
Large Square (make 6)
-
With A, ch 4; join with slip st in first ch to form a ring.
-
Round 1 (right side): Ch 3 (counts as first dc here and throughout), 2 dc in ring, [ch 2, 3 dc in ring] 3 times, ch 2; join with slip st in top of beginning ch—12 dc and 4 ch-2 spaces.
-
Round 2: Slip st in next dc, ch 3, Fpdc around next dc, (2 dc, ch 2, 2 dc) in first ch-2 space, *Fpdc around next dc, dc in next dc, Fpdc around next dc, (2 dc, ch 2, 2 dc) in next ch-2 space; repeat from * twice, Fpdc around last dc; join with slip st in top of beginning ch—28 dc and 4 ch-2 spaces. Fasten off.
-
Round 3: With right side facing, join B with slip st in any ch-2 space, (ch 3, dc, ch 2, 2 dc) in same space, *Fpdc around next dc, [dc in next dc, Fpdc around next Fpdc] across to next ch-2 space, (2 dc, ch 2, 2 dc) in next ch-2 space; repeat from * twice, Fpdc around next dc, [dc in next dc, Fpdc around next Fpdc] across to beginning ch; join with slip st in top of beginning ch—44 dc and 4 ch-2 spaces.
-
Round 4: Slip st in next dc, slip st in first ch-2 space, (ch 3, dc, ch 2, 2 dc) in same space, *Fpdc around next dc, [dc in next dc, Fpdc around next Fpdc] across to next ch-2 space, (2 dc, ch 2, 2 dc) in next ch-2 ?space; repeat from * twice, Fpdc around next dc, [dc in next dc, Fpdc around next Fpdc] across to beginning ch; join with slip st in top of beginning ch—60 dc and 4 ch-2 spaces. Fasten off.
-
Rounds 5 and 6: With C, repeat Rounds 3 and 4—92 dc and 4 ch-2 spaces.
-
Rounds 7 and 8: With D, repeat Rounds 3 and 4—124 dc and 4 ch-2 spaces.
Small Square
(make 24)
-
With A, ch 4; join with slip st in first ch to form a ring.
-
Round 1 (right side): Ch 3, 2 dc in ring, [ch 2, 3 dc in ring] 3 times, ch 2; join with slip st in top of beginning ch—12 dc and 4 ch-2 spaces.
-
Row 2: Slip st in next 2 dc, slip st in first ch-2 space, ch 3, dc in same space, dc in next dc, Fpdc around next dc, dc in next dc, (2 dc, ch 2, 2 dc) in next ch-2 space, dc in next dc, Fpdc around next dc, dc in next dc, 2 dc in next ch-2 space; leave remaining sts unworked—14 dc and 1 ch-2 space. Fasten off.
-
Row 3: With right side facing, join D with slip st in top of beginning ch-3, ch 3, [Fpdc around next dc, dc in next dc] across to ch-2 space, (2 dc, ch 2, 2 dc) in ch-2 space, [dc in next dc, Fpdc around next dc] across to last dc, dc in last dc, turn—18 dc and 1 ch-2 space
-
Row 4: Ch 3, [Bpdc around next dc, dc in next dc] across to ch-2 space, (2 dc, ch 2, 2 dc) in ch-2 space, [dc in next dc, Bpdc around next dc] across to beginning ch, dc in top of beginning ch; change to E, turn— 22 dc and 1 ch-2 space.
-
Row 5: Ch 3, [Fpdc around next dc, dc in next dc] across to ch-2 space, (2 dc, ch 2, 2 dc) in ch-2 space, [dc in next dc, Fpdc around next dc] across to last dc, dc in last dc, turn—26 dc and 1 ch-2 space.
-
Row 6: Repeat Row 4; change to B, turn—30 dc and 1 ch-2 space.
-
Rows 7 and 8: Repeat Rows 5 and 6; do not change color at end of Row 8—38 dc and 1 ch-2 space.
-
Fasten off.
Rectangle
(make 24)
-
With A, ch 4; join with slip st in first ch to form a ring.
-
Row 1 (right side): Ch 3, 2 dc in ring, [ch 2, 3 dc in ring] twice, turn—9 dc and 2 ch-2 spaces.
-
Row 2: Ch 3, Bpdc around next dc, dc in next dc, (2 dc, ch 2, 2 dc) in first ch-2 space, dc in next dc, Bpdc around next dc, dc in next dc, (2 dc, ch 2, 2 dc) in next ch-2 space, dc in next dc, Bpdc around next dc, dc in top of beginning ch; change to B, turn—17 dc and 2 ch-2 spaces.
-
Row 3: Ch 3, *[Fpdc around next dc, dc in next dc] across to first ch-2 space, (2 dc, ch 2, 2 dc) in next ch-2 space, dc in next dc; repeat from * across, Fpdc around next dc, dc in next dc, Fpdc around next dc, dc in top of beginning ch, turn—25 dc and 2 ch-2 spaces.
-
Row 4: Ch 3, *[Bpdc around next dc, dc in next dc] across to first ch-2 space, (2 dc, ch 2, 2 dc) in next ch-2 space, dc in next dc; repeat from * across, Bpdc around next dc, dc in next dc, Bpdc around next dc, dc in top of beginning ch; change to E, turn—33 dc and 2 ch-2 spaces.
-
Rows 5 and 6: Repeat Rows 3 and 4; change to D at end of Row 6—49 dc and 2 ch-2 spaces.
-
Rows 7 and 8: Repeat Rows 3 and 4; do not change color at end of Row 8—65 dc and 2 ch-2 spaces.
-
Fasten Off.
Assembly
With right sides facing, arrange squares and rectangles as shown in Assembly Diagram and sew together to form a block. Repeat to make 5 more blocks. Arrange blocks 2 across and 3 down and sew together.

Finishing - Border
Notes: For double crochet decrease between pieces, work into seam and adjacent stitch or ch-2 space as needed to maintain pattern stitch. For double crochet decrease between blocks, skip the seam and work the chain-2 space on each side of the seam.
-
Round 1 (right side): With right side facing, join C with slip st in any outer corner ch-2 space, (ch 3, dc, ch 2, 2 dc) in same space, {*dc in next dc, [Fpdc around next Fpdc, dc in next dc] across to next seam, dc2tog; repeat from * across to last small square, dc in next dc, [Fpdc around next Fpdc, dc in next dc] across to next corner ch-2 space**, (2 dc, ch 2, 2 dc) in next corner ch-2 space} 4 times ending last repeat at **; join with slip st in top of beginning ch.
-
Round 2: Slip st in next dc, slip st in first ch-2 space, (ch 3, dc, ch 2, 2 dc) in same space, *dc in next dc, [Fpdc around next st, dc in next dc] across to next ch-2 space**, (2 dc, ch 2, 2 dc) in next ch-2 space; repeat from * 4 times ending last repeat at **; join with slip st in top of beginning ch. Fasten off
-
Round 3: With right side facing, join A with slip st in any ch-2 space, (ch 3, dc, ch 2, 2 dc) in same space, *dc in next dc, [Fpdc around next Fpdc, dc in next dc] across to next ch-2 space**, (2 dc, ch 2, 2 dc) in next ch-2 space; repeat from * 4 times ending last repeat at **; join with slip st in top of beginning ch.
-
Fasten off.
-
Weave in ends.
Read Next"Long Live the Queen" Throw
Your Recently Viewed Projects
Thanks for your comment. Don't forget to share!
elocin1104 2800379
Jun 14, 2018
I love the look of this throw. The motif is not like anything I have ever seen before, and I am really interested to try the design. I like the colors pictured here, but I would definitely change the colors to go with my decor. There are so many colors available, I can make so many!
Morehouse17
Apr 30, 2018
What a different motif design throw. By making three different types of motifs this is the final result. Before I read the directions, I was under the impression the design came for the changing of the yarn. I really like this pattern. Going to the save pile right now.
Delphine Bryant
Apr 29, 2018
Now that I read your post JaneEK, I can see this as a quilt. I was just mesmerized by the colors. This is a beautiful pattern and I am sure no matter the color yarns you select, the end result will be amazing.
JaneEK
Mar 22, 2018
I love finding projects that look like handmade quilts, and this one ticks all the boxes for me. It reminds me of a rather complex Log Cabin design. The contrast between the square block design and light and dark stripes is just spectacular. The original pattern is available as a free download and located at the Red Heart website http//www.redheart.com/free-patterns/dynamic-squar == es-throw
Daughter of Light
Feb 28, 2018
This Dynamic Squares Crochet Throw from Red Heart has such depth! I love it! It is great that the background is in neutral colors and then you can add a color that matches your decor or that of the one you're gifting this throw to. It is also nice that the squares arranged as they are will give it some texture. The assembly graph does enlarge making it easier to see and create!
dianasmith87 59961 68
Jan 12, 2018
can i make it larger
AFC Editor Julia
Jan 15, 2018
Hi dianasmith, You can always work more squares to increase the size! As it is now it's 3 blocks wide and 2 blocks tall - you can definitely add more blocks to fit the size you want! :) Julia, AFC editor
princess6860504
Feb 12, 2017
I love the Red Heart Soft yarn! Using this favorite yarn of mine will make this throw so cushy and cozy and soft to the touch. I like the use of a sparkle yarn thrown in there, too, to add more interest. It's a very nice pattern. I may have just the person on my list for this modern crochet pattern. He would like it in grays and blacks. Maybe a splash of teal??
Member 4186219
Jul 20, 2016
Not sure if I'm ready for an intermediate pattern yet but this is so pretty and pattern is written very clear. Thank you for that!
Princess Carolyn
Jul 15, 2016
I like this pattern a lot, too. It would look great in a room that had a contemporary style or midcentury modern style.
Zeemer
Jul 09, 2016
I love how the squares have been arranged here. Some of them appear to be overlapping over the smaller squares. It helps that the pattern is just right on the same page.
Report Inappropriate Comment
Are you sure you would like to report this comment? It will be flagged for our moderators to take action.
Thank you for taking the time to improve the content on our site.