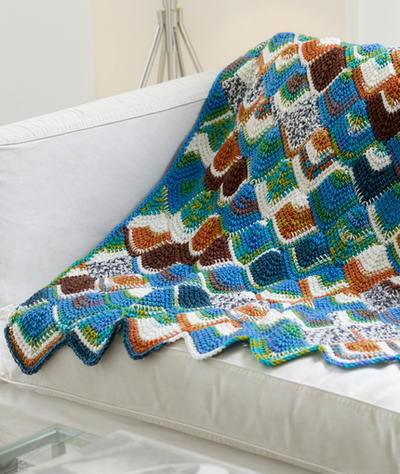
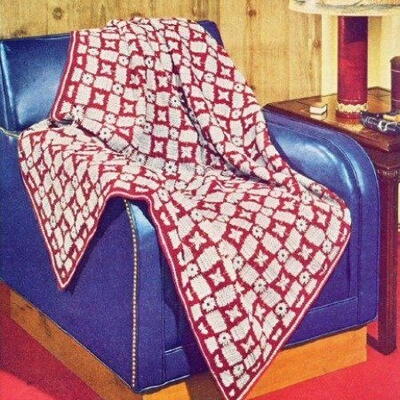
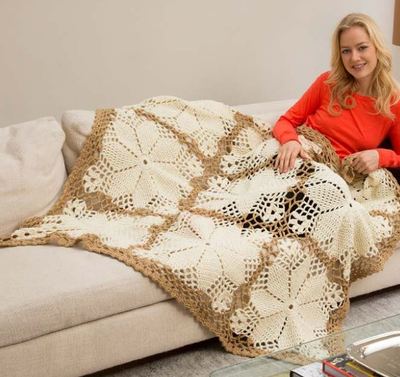
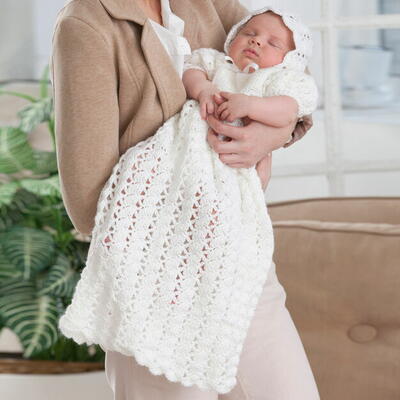
"Long Live the Queen" Throw

Celebrate the birth of the new royal baby with this "Long Live the Queen" Throw. This crochet pattern is one of the most beautiful Red Heart Yarn patterns we've ever had. The royal pattern has delicate lacy flowers in understated yet classy colors fit for a queen. Perfect for warmer summer months, you'll look regal sitting on your porch with this crochet afghan pattern. This crochet blanket pattern would make a wonderful wedding or housewarming gift for anyone you'd consider as special as the royal family.
NotesNotes
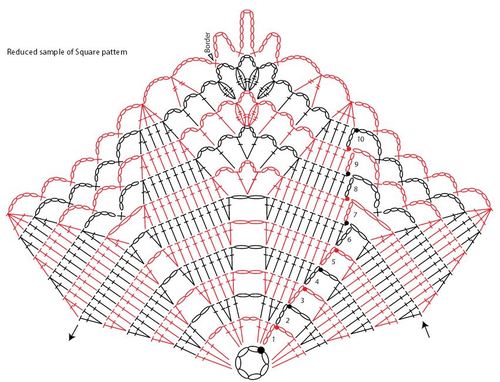
1. Throw is made from nine squares. All nine squares are made separately. Then a border is worked around each square. Squares are joined to previous squares while the border is worked.
2. Squares will flare somewhat until decreases are made and border is completed.
3. After all squares are joined, edging is worked around entire outer edge of throw.

Crochet HookJ/10 or 6 mm hook
Yarn Weight(4) Medium Weight/Worsted Weight and Aran (16-20 stitches to 4 inches)
Crochet GaugeRounds 1 and 2 = 4 (10 cm) across; One Square = 17 x 17 (43 x 43 cm). CHECK YOUR GAUGE. Use any size hook to obtain the gauge.
Finished SizeThrow measures 54 x 54 (137 x 137 cm)
Materials List
- RED HEART® With Love®: 4 skeins 1303 Aran A, and 2 skeins 1308 Tan B
- Susan Bates® Crochet Hook: 6mm [US J-10]
- Yarn needle
Squares (Make 9)
-
With A, ch 7; join with slip st in first ch to form a ring.
-
Round 1 (right side): Ch 3 (counts as first dc here and throughout), work 23 dc in ring; join with slip st in top of beginning ch—24 dc.
-
Round 2: Ch 3, 2 dc in next st, dc in next st, *ch 2, dc in next dc, 2 dc in next dc, dc in next dc; repeat from * 6 more times, ch 2; join with slip st in top of beginning ch—32 dc and 8 ch-2 spaces (consisting of eight 4-dc groups for petals, separated by ch-2 spaces).
-
Round 3: Ch 3, dc in same st as join, dc in next 2 sts, 2 dc in next st, *ch 2, skip next ch-2 space, 2 dc in next st, dc in next 2 sts, 2 dc in next st; repeat from * 6 more times, ch 2, skip last ch-2 space; join with slip st in top of beginning ch—48 dc and 8 ch-2 spaces (eight 6-dc petals).
-
Rounds 4 and 5: Ch 3, dc in same st as join, dc in each st to 1 dc before next ch-2 space, 2 dc in next dc, *ch 2, skip next ch-2 space, 2 dc in next st, dc in each st to 1 dc before next ch-2 space, 2 dc in next dc; repeat from * 6 more times, ch 2, skip last ch-2 space; join with slip st in top of beginning ch—Eight 10-dc petals) at the end of Round 5.
-
Round 6: Ch 3, dc in same st as join, dc in each st to 1 dc before next ch-2 space, 2 dc in next dc, *ch 2, skip next ch-2 space, 2 dc in next st, dc in each st to 1 dc before next ch-2 space, 2 dc in next dc; repeat from * 6 more times, ch 2; skip the beginning ch and join with slip st in first dc—Eight 12-dc petals.
-
Round 7: Ch 3, dc in next 8 sts, dc2tog, *ch 3, (dc, ch 5, dc) in next ch-2 space (corner made), ch 3, dc2tog, dc in next 8 sts, dc2tog, ch 3, skip next ch-2 space **, dc2tog, dc in next 8 sts, dc2tog; repeat from * 3 more times ending last repeat at **; skip the beginning ch and join with slip st in first dc—Eight 10-dc petals and 4 corners.
-
Round 8: Ch 3, dc in next 6 sts, dc2tog, *ch 3, skip next ch-3 space, dc in next dc, ch 3, (dc, ch 5, dc) in corner ch-5 space, ch 3, dc in next dc, ch 3, skip next ch-3 space, dc2tog, dc in next 6 sts, dc2tog, ch 5, sc in next ch-3 space, ch 5 **, dc2tog, dc in next 6 sts, dc2tog; repeat from * 3 more times ending last repeat at **; skip the beginning ch and join with slip st in first dc—Eight 8-dc petals.
-
Round 9: Ch 3, dc in next 4 sts, dc2tog, *[ch 3, skip next ch-3 space, dc in next dc] twice, ch 3, (Cl, ch 5, Cl) in corner ch-5 space, ch 3, [dc in next dc, ch 3, skip next ch-3 space] twice, dc2tog, dc in next 4 sts, [Key to Chart] dc2tog, [ch 5, sc in next ch-5 space] twice, ch 5 **, dc2tog, dc in next 4 sts, dc2tog; repeat from * 3 more times ending last repeat at **; skip the beginning ch and join with slip st in first dc—Eight 6-dc petals.
-
Round 10: Ch 3, dc in next 2 sts, dc2tog, *[ch 3, skip next ch-3 space, dc in next dc] twice, ch 3, skip next ch-3 space, Cl in next Cl, ch 5, (Cl, ch 5, Cl) in corner ch-5 space, ch 5, Cl in next Cl, ch 3, skip next ch-3 space, [dc in next dc, ch 3, skip next ch-3 space] twice, dc2tog, dc in next 2 sts, dc2tog, [ch 5, sc in next ch-5 space] 3 times, ch 5 **, dc2tog, dc in next 2 sts, dc2tog; repeat from * 3 more times ending last repeat at **; join with slip st in top of beginning ch—Eight 4-dc petals. Fasten off.
Borders
Squares are joined into 3 rows of 3 squares each. Refer to diagram below before working Border Round to determine the number of neighboring squares to which the current square is to be joined.
Second–Ninth Square Notes:
- One or two sides of each square are joined to one side of one or two neighboring squares.
- To join squares, the chain-spaces across a side (from corner to corner) are threaded through the corresponding chain-spaces of the neighboring square(s), as follows:
--- ch-11-join: Ch 6, drop loop from hook, insert hook from right side to wrong side through corresponding corner ch-11 of neighboring square, replace dropped loop on hook and draw loop through, ch 6.
--- ch-11-join (use when 4 corners meet joining fifth, sixth, eighth, and ninth squares): Visiting the 3 neighboring squares counter-clockwise. Ch 6, drop loop from hook, insert hook from right side to wrong side through corresponding corner ch-11 of first neighboring square, replace dropped loop on hook and draw loop through, ch 1, drop loop from hook, skip next neighboring square (diagonally across), insert hook from right side to wrong side through corresponding corner ch-11 of next neighboring square, replace dropped loop on hook and draw through, ch 6.
--- ch-7-join: Ch 4, drop loop from hook, insert hook from right side to wrong side through corresponding corner ch-7 of neighboring square, replace dropped loop on hook and draw loop through, ch 4.
--- ch-5-join: Ch 3, drop loop from hook, insert hook from right side to wrong side through corresponding corner ch-5 of neighboring square, replace dropped loop on hook and draw loop through, ch 3.
-
Joining Diagrams
-
First Square Border Round (right side): From right side, join B with sc in last ch-5 space of any corner (between the 3rd and 4th Cl), *ch 7, skip next Cl and ch-3 space, tr2tog-over-space, ch 7, skip next ch-3 space, dc4tog, [ch 5, sc in next ch-5 space] 4 times, ch 5, dc4tog, ch 7, skip next ch-3 space, tr2tog-over-space, ch 7, skip next ch-3 space and Cl, sc in next ch-5 space, ch 7, (sc, ch 11, sc) in corner ch-5 space, ch 7 **, sc in next ch-5 space; repeat from * 3 more times ending last repeat at **; join with slip st in first sc. Fasten off.
-
Begin first side: From right side, join B with sc in last ch-5 space of any corner (between the 3rd and 4th Cl), ch 7, skip next Cl and ch-3 space, tr2tog-over-space, ch 7, skip next ch-3 space, dc4tog, [ch 5, sc in next ch-5 space] 4 times, ch 5, dc4tog, ch 7, skip next ch-3 space, tr2tog-over-space, ch 7, skip next ch-3 space and Cl, sc in next ch-5 space, ch 7.
-
Join next side to neighboring square(s): (Sc, ch-11-join, sc) in corner ch-5 space, *ch-7-join, sc in next ch-5 space, ch-7-join, skip next Cl and ch-3 space, tr2tog-over-space, ch-7-join, skip next ch-3 space, dc4tog, [ch-5-join, sc in next ch-5 space] 4 times, ch-5-join, dc4tog, ch-7-join, skip next ch-3 space, tr2tog-over-space, ch-7-join, skip next ch-3 space and Cl, sc in next ch-5 space, ch-7-join, (sc, ch-11-join, sc) in corner ch-5 space; if joining to next neighboring square, repeat from * once more.
-
Complete remaining sides: Ch 7, sc in next ch-5 space, *ch 7, skip next Cl and ch-3 space, tr2tog-over-space, ch 7, skip next ch-3 space, dc4tog, [ch 5, sc in next ch-5 space] 4 times, ch 5, dc4tog, ch 7, skip next ch-3 space, tr2tog-over-space, ch 7, skip next ch-3 space and Cl, sc in next ch-5 space, ch 7, (sc, ch 11, sc) in corner ch-5 space, ch 7 **; repeat from * if needed ending last repeat at **; join with slip st in first sc. Fasten off.

Edging
-
Round 1 (right side): With right side facing, join B with sc in first ch-7 space immediately following any corner ch-11 space, [*ch 5, sc in next ch-space, ch 5, hdc in next tr2tog, [ch 5, sc in next ch-space] 7 times, ch 5, hdc in next tr2tog, [ch 5, sc in next ch-space] twice **, ch 5, sc in next corner chain-space, ch 5, skip seam between squares, sc in corner chain-space of next square, ch 5, sc in next ch-space; repeat from * 2 more times, ending last repeat at **, ch 5, (sc, [ch 5, sc] twice) in corner ch-11 space ***, ch 5, sc in next ch-space] 4 times ending last repeat at ***; ch 3, dc in first sc to join (last ch-3 and joining dc count as last ch-5 space).
-
Round 2 (wrong side): Ch 1, turn, sc in first space (the space formed by the ch-3 and joining dc), *ch 5, sc in next ch-5 space; repeat from * around; ch 3, dc in first sc to join (last ch-3 and joining dc count as last ch-5 space).
-
Round 3 (right side): Ch 3 (counts as first dc), turn, 2 dc in first space, *ch 1, 3 dc in next ch-5 space; repeat from * around working (3 dc, [ch 1, 3 dc] 3 times) in each corner ch-5 space; join with slip st in top of beginning ch.
-
Round 4 (right side): (Slip st, ch 1, sc, ch 3, sc) in next dc, do not turn, *ch 2, (sc, ch 3, sc) in center dc of next 3-dc group; repeat from * around, ch 2; join with slip st in first sc. Fasten off.
-
Finishing: Weave in ends.
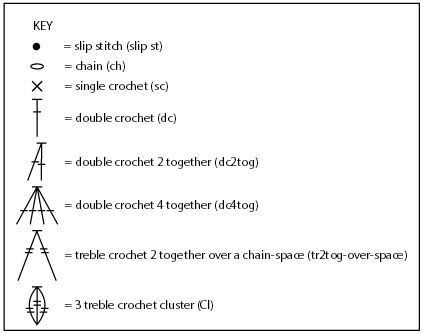
Abbreviations
- Cl (3 treble crochet cluster)
- *[Yarn over] twice, insert hook in indicated stitch, yarn over and draw up a loop, [yarn over and draw through 2 loops on hook] twice; repeat from * 2 more times, yarn over and draw through all 4 loops on hook.
- dc2tog (double crochet 2 stitches together)
- [Yarn over, insert hook in next stitch, yarn over and pull up loop, yarn over, draw through 2 loops] twice, yarn over, draw through all 3 loops on hook.
- dc4tog (double crochet 4 stitches together)
- [Yarn over, insert hook in next stitch, yarn over and pull up loop, yarn over, draw through 2 loops] 4 times, yarn over, draw through all 5 loops on hook.
- tr2tog-over-space (treble crochet 2 stitches together over a chain-space)
- *[Yarn over] twice, insert hook in next st, yarn over and pull up a loop, [yarn over and draw through 2 loops on hook] twice**, skip next chain-space; repeat from * to **, yarn over and draw through all 3 loops on hook.
Read NextTunisian Entrelac Throw


Thanks for your comment. Don't forget to share!
joycecawley 478317 5
Sep 24, 2018
I am having a difficult time joining the squares, do you have picture tutorials?
Hippie Chick
Aug 16, 2018
A very well presented free pattern for this beautiful throw that is very worthy of its name. I like that it includes a joining diagram and a stitch diagram. The pattern within this throw is a bit fancy yet not too fancy that it cant be used for a sofa throw. If you want a little softer version of this throw I would go with a baby yarn instead of the regular acrylic.
Delphine Bryant
May 30, 2018
Here, here. I have to admit that this is a beautiful throw. It displays such elegant and grace that anyone that owns it would be more than happy to own it. I live motif patterns and this one is no exception. I have saved it for a future project and once I get the materials to make it I know just the person to give it to.
Morehouse17
May 29, 2018
Beautiful! It is hard to believe that this is made from squares sewn together. Nine of them to be exact. I like the neutral color, but can't you see this throw in a more vibrant color like red or orange to accent the flower? No matter if you elect to change the color selection or keep the designers choice, this will be a family favorite.
Tricia108
May 24, 2018
This is such a lovely throw. I love the colors shown as well. It is elegant looking. The instructions are easy to read and it also has a chart to follow. This is a throw that will go with everything. Thank you for the pattern.
mulberrygalprinces s
May 17, 2018
This is a very pretty afghan. I read the directions and they are not difficult to follow. It will make up in no time at all. I don't think I will make it into an afghan or throw. I am thinking either a wall hanging or a table cloth. Thank you for sharing this wonderful project.
kstarz 6708861
Sep 27, 2017
The best way to explain the borders is that you are not connecting the "squares", you are connecting one square with the BORDER of the other square. When you make a "join", you are dropping your stitch and reconnecting through the open space in the border. All those chains you made in the first border are actually the center between two squares. Hope this helps.
Hippie Chick
Sep 19, 2017
Very detailed pattern that is given in full on this page instead of taking you to an outside blog. The instructions include a joining diagram and a stitch diagram for those that prefer not to crochet using written words. I am more of a visual crocheter myself because there is less room for error unlike written patterns.
ducky2970 5263021
Sep 18, 2017
I love the Long live the queen throw....finished all the squares but for the life of me I am stumped on how to do borders help please
Sterling Trinity
Jun 27, 2017
Love this pattern, perfect for wedding gifts and other occasions. Thanks
shirley01940 12764 56
Apr 03, 2017
I am having a problem understanding the directions for the borders, could you please simplify them for me
Hippie Chick
Feb 10, 2017
Long live the Queen indeed. This is a beautiful throw and anyone should appreciate receiving it as a wedding gift or housewarming gift. I see there are/were a lot of questions about the borders around each of the squares/sections. Hopefully everyone got the help they needed. Looks like there were a lot of helpful answers provided.
margiekins22
Feb 01, 2017
This is such a gorgeous pattern! The step-out pictures really help me to understand what I'm doing!
Zeemer
Aug 26, 2016
This Long Live the Queen Throw is so beautiful. Perfect for personal use to display on the couch or sofa or as a gift to a special relative. Thanks for the free pattern which is clearly presented on this same page complete with diagrams, and special instructions.
lilfooty 3397789
Aug 06, 2016
Someone please HELP! I know this will be beautiful if I can get some help with the borders. If anyone has anything that will help please let me know, just put in the comments.
AFC Editor Julia
Aug 08, 2016
Hi there! If you're looking for some more guidance, I suggest posting to the wall of our Facebook group: https://www.facebook.com/AllFreeCrochet/. We have a great community of kind crocheters, and I'm sure one of them can help you out! Julia, editor for AllFreeCrochet
NCRaspa 7441651
Aug 28, 2016
What you do is complete the border around one square as instructed. You then begin to crochet the border along a side of another square (lets call this side the East side), when you reach the end of the first side (East Side) you then begin joining the square to the first square by using the chain loop instructions. You are now crocheting along the North side of the square matching the loops to each square. As you continue around to the West side of the square, if you are mating with another square you join using the join loops if you are not mating with another square, you continue with the border instruction around the square continue to the South side of the square using the same theory. Hope this helps
johnlillie789 1413 246
Aug 02, 2016
I tried to include a photo of the afghan, but it didn't load. ??
johnlillie789 1413 246
Aug 02, 2016
I finished this afghan over the weekend. I did have contact Red Heart for clarification on joining squares 2-12. I made the afghan 3 across and 4 down. It's a wedding gift for my niece.
NCRaspa 7441651
Aug 21, 2016
Reference Long Live the Queen Throw. I am seeking some advice. I have completed all 9 squares and interpreted that only square one is to have a border crochet as indicated by First Square Border Round instructions and the other 8 squares are to be joined without a border. I am sure I am interpreting this incorrectly but the directions do not specify to crochet a border around all nine squares. I am floundering. I hope you can steer me in a helpful direction. Nick NCRaspa@msn.com
NCRaspa 7441651
Aug 22, 2016
I have joined squares 1 2 per instructions. I am confused as to how to join square 2 to 3 or even other squares once all four sides of square B has a square attached. What am I not doing and/or understanding? See attached photo. TIA
lilfooty 3397789
Jul 29, 2016
I am also having problems with the border. What does or how do you crochet "over a space"? I have never come across a pattern with in it. Thank you!
NCRaspa 7441651
Aug 28, 2016
What you do is complete the border around one square as instructed. You then begin to crochet the border along a side of another square (lets call this side the East side), when you reach the end of the first side (East Side) you then begin joining the square to the first square by using the chain loop instructions. You are now crocheting along the North side of the square matching the loops to each square. As you continue around to the West side of the square, if you are mating with another square you join using the join loops if you are not mating with another square, you continue with the border instruction around the square continue to the South side of the square using the same theory. Hope this helps
trishclark529
Jul 19, 2016
This is a great pattern! I loved making this! I used a lilac for the squares and a dark purple for the join and border. This is absolutely beautiful! The picture definitely doesn't do it justice. You have to see this one to believe it!
NCRaspa 7441651
Aug 21, 2016
Reference Long Live the Queen Throw. I am seeking some advice. I have completed all 9 squares and interpreted that only square one is to have a border crochet as indicated by First Square Border Round instructions and the other 8 squares are to be joined without a border. I am sure I am interpreting this incorrectly but the directions do not specify to crochet a border around all nine squares. I am floundering. I hope you can steer me in a helpful direction. Nick Ncraspa@msn.com
NCRaspa 7441651
Aug 22, 2016
I have joined squares 1 2 per instructions. I am confused as to how to join square 2 to 3 or even other squares once all four sides of square B has a square attached. What am I not doing and/or understanding? See attached photo. TIA
fcholmes free4all
Jun 15, 2016
I am stuck on the borders....HELP! I can't figure this part out for the life of me. Why do the directions say 'first square' and then 'second - ninth square' if all of the squares are to have a border around them? And then I don't think according to the pic of the afghan that the joining of the squares are solid. The in-between square borders are lacy and it doesn't give an idea of fastening off each square as it is ended. I enjoyed making the squares, but need to understand how to do the bordering in-between the squares. Can you explain it to me so that I might be able to complete this project. It will be a gift which I hoped to finish very soon! Thank you!
johnlillie789 1413 246
Jun 23, 2016
did you ever receive some help with the border? I completed the border for first square, but the instructions for the 2-9 are something to be desired. It needs better clarification. I did send and email to Red Heart asking for the technical service associate to respond. Either that or the designer of the pattern.
joanna2 0280296
Jul 11, 2016
I have the squares made but can't figure out how to put them together. This was to be a gift but the way I am going, it will never be finished. As stated, a video would help or a diagram like the one to crochet the squares. Please help!!!! Thanks
rachshari 7273733
Jul 09, 2016
You aren't alone! The best way that I can explain it is Do the first square as directed for Square#1. Take square#2 and align the sides so they match and follow joining instructions making sure your joking in appropriate spaces. The biggest loops going in the largest spaces. You are working back and forth between the two sides, kind of like weaving and forming the borders as you join. Essentially square #1 has 3/4 of its border done and you add to it one square at a time. You might have to play with it awhile for it to make sense. This is one where a video would be helpful.
johnlillie789 1413 246
Jul 28, 2016
I contacted Redheart technical advisors regarding the border for squares 2-9. They sent a diagram and written clarification for that and it helped a great deal. I am now on the edging. Same issue. The instructions for rnd 1 after coming to the end of the first side is incomplete and incorrect. Since the squares and the border is the same on all 4 sides the edging should be the same on all 4 sides. In fact, it doesn't say to complete the remaining sides where it says to turn and start rnd 2. Again, I've contacted Redheart regarding the instructions. Hopefully someone there crochets and can provide better instructions that goes all around before starting rnd 2
NCRaspa 7441651
Aug 28, 2016
What you do is complete the border around one square as instructed. You then begin to crochet the border along a side of another square (lets call this side the East side), when you reach the end of the first side (East Side) you then begin joining the square to the first square by using the chain loop instructions. You are now crocheting along the North side of the square matching the loops to each square. As you continue around to the West side of the square, if you are mating with another square you join using the join loops if you are not mating with another square, you continue with the border instruction around the square continue to the South side of the square using the same theory. Hope this helps
Zeemer
Jun 12, 2016
This is so lovely. Very appropriately named because it is very regal. It helps that the pattern is right in front of the page.
oquitit
Nov 05, 2015
The "round 1" written pattern instructions do not match the diagram pattern instructions. The diagram shows 3 doubles with 2 chains in between, and the written says to do 24 doubles with no chains between. Which is correct? I had no trouble following the pattern, I was just curious why the instructions were so different.
Member 358
Aug 23, 2015
ordered this yarn through this site downloaded and printed out pattern. First time trying this. I used Daffodil and Lettuce colors. Found it quick and easy. Picture doesn't do it justice. Easy to add more panels if you want to larger. It is so pretty, just love it.
Report Inappropriate Comment
Are you sure you would like to report this comment? It will be flagged for our moderators to take action.
Thank you for taking the time to improve the content on our site.