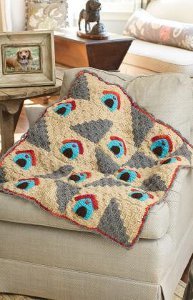
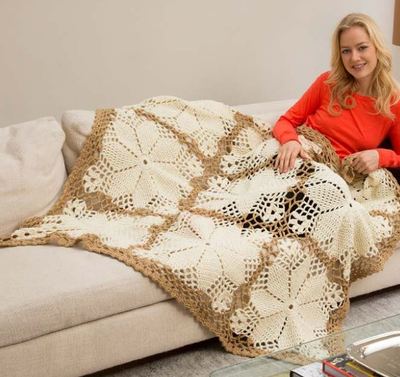
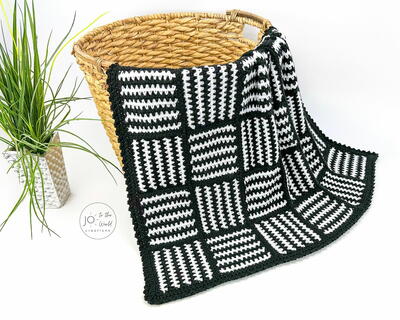
Pretty Posey Throw

Spring is right around the corner. It's the perfect time to work up free colorful crochet patterns. Create a field of flowers with the Pretty Posey Throw. This free crochet afghan pattern will look lovely draped over your sofa. It's a quick way to transform the look of any room in your house. It's impossible not to smile when you have such a bright and beautiful crochet afghan in your home. Red Heart Super Saver yarn is used to complete this crocheted afghan.

Crochet HookH/8 or 5 mm hook
Yarn Weight(4) Medium Weight/Worsted Weight and Aran (16-20 stitches to 4 inches)
MATERIALS:
- Red Heart® “Super Saver®” (Art. E300) Solid 7 oz (198 g), 364 yd (333 m); Multi, Fleck and Print 5 oz (141 g), 244 yd (223 m) skeins:
- 1 skein 656 Real Teal A
- 2 skeins 512 Turqua B
- 2 skeins 316 Soft While C
- 1 skein each 579 Pale Plum D
- 356 Amethyst E
- 373 Petal Pink F
- 718 Shocking Pink G
- 668 Honeydew H
- 624 Tea Leaf I
- 885 Delft Blue J
- 381 Light Blue K
- 322 Pale Yellow L
- Crochet Hook: 5mm [US H-8]
- Yarn needle
- Stitch marker
GAUGE: Rounds 1–4 (flower center) = 2½”; 7 petal rows = 3”. CHECK YOUR GAUGE. Use any size hook to obtain the gauge.
ABBREVIATIONS: A, B, C, D, etc. = Color A, B, C, D, etc.; ch = chain; dc = double crochet; hdc = half double crochet; sc = single crochet; st(s) = stitch(es); [ ] = work directions in brackets the number of times specified; ( ) = work directions in parentheses into same st.; * = repeat whatever follows the * as indicated.
Special Stitch
hdc2tog = [Yarn over, insert hook in next stitch, yarn over and pull up loop] twice, yarn over and draw through all 5 loops on hook
Special Technique
Adjustable ring: Holding the yarn a few inches from the end, wrap around your finger. Do not remove wrap from finger, insert hook into the wrap and draw up a loop of working yarn. Chain one to secure the loop, and remove ring from finger. Work stitches of first round in the ring. Pull gently, but firmly, on tail to tighten ring.
NOTES
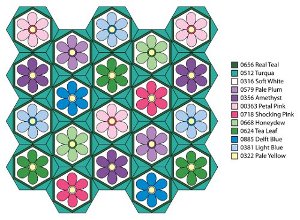
1. Throw is made from 20 flower motifs, 2 each in color combinations #1, #2, #3 and #4, and 3 each in combinations #5, #6, #7, and #8.
2. Arrange motifs as shown in Assembly Diagram on page 51 and single crochet them together.
Color Combinations
Work flower center with L for all flower motifs.
Color Combination #1 (make 2): Work petals with G, work center trim with F.
Color Combination #2 (make 2): Work petals with J, work center trim with K.
Color Combination #3 (make 2): Work petals with D, work center trim with E.
Color Combination #4 (make 2): Work petals with H, work center trim with I.
Color Combination #5 (make 3): Work petals with I, work center trim with H.
Color Combination #6 (make 3): Work petals with E, work center trim with D.
Color Combination #7 (make 3): Work petals with K, work center trim with J.
Color Combination #8 (make 3): Work petals with F, work center trim with G.
INSTRUCTIONS:
Flower Motif (make 20 as indicated in color combinations)
Center
With L, make an adjustable ring.
Round 1 (Right Side): Work 6 sc in ring; do not join, work in continuous rounds—6 sc. Place marker for beginning of round, move marker up as work progresses.
Round 2: 2 sc in each sc around—12 sc.
Round 3: [Sc in next sc, 2 sc in next sc] 6 times— 18 sc.
Round 4: [Sc in next 2 sc, 2 sc in next sc] 6 times—24 sc—24 sc. Fasten off.
First Petal
Row 1 (Right Side): With Right Side facing and working in back loops only, join petal color with slip st in first sc of last round of flower center, ch 2 (counts as hdc), hdc in same sc as join, 2 hdc in each of next 3 sc, turn—8 hdc.
Row 2: Ch 2 (counts as hdc), hdc in first hdc, hdc in each hdc across, 2 hdc in top of turning ch, turn—10 hdc.
Note: In remaining rows of petal, begin each row by working into the first hdc, and do not work into the turning ch at the end of the row. This reduces the gap that can appear at the beginning of a row when the ch-2 turning ch is counted as a stitch.
Rows 3 and 4: Ch 2, hdc in first hdc, hdc in each hdc across, turn.
Rows 5 and 6: Ch 2, hdc2tog, hdc in each hdc across to last 2 hdc, hdc2tog, turn—6 hdc.
Row 7: Repeat Row 5, but do not turn at the end of the row—4 hdc.
Side Edging: Working across side of petal, [ch 2, sc between next 2 rows] 6 times, ch 2, sc in same back loop as last hdc of Row 1. Do not fasten off.
Second–Sixth Petal
Row 1 (Right Side): Working in back loops of flower center, slip st in next sc, ch 2 (counts as hdc), hdc in same sc, 2 hdc in each of next 3 sc, turn—8 hdc.
Rows 2–7: Work same as Rows 2–7 of first petal.
Side Edging: Work same as side edging of first petal. Fasten off at the end of sixth petal.
Center Trim
With Right Side facing, and working in front loops of last round of flower center, join center trim color with sc in first sc, ch 3, *sc in next sc, ch 3; repeat from * around; join with slip st in first sc. Fasten off.
Edging
Round 1 (Right Side): With Right Side facing, join C with sc in first hdc2tog of Row 7 of any petal, 3 sc in next hdc, sc in next hdc, [ch 7, dc in side of Row 3 of same petal, dc in side of Row 3 of next petal, ch 7, sc in first hdc2tog of Row 7 of same petal, 3 sc in next hdc, sc in next hdc] 5 times, ch 7, dc in side of Row 3 of same petal, dc in side of Row 3 of next petal, ch 7; join with slip st in first sc—30 sc, 12 dc, and 12 ch-7 spaces.
Round 2: Ch 2, hdc in next sc, *(hdc, ch 2, hdc) in next sc, hdc in next 2 sc; 7 hdc in next ch-7 space, hdc2tog, 7 hdc in next ch-7 space **, hdc in next 2 sc; repeat from * around ending last repeat at **; join with slip st in top of beginning ch-2—126 hdc and 6 ch-2 spaces (at tips of petals). Fasten off.
Round 3: With Right Side facing, join A with slip st in same st as join, ch 2, hdc in next 2 hdc, (hdc, ch 2, hdc) in next ch-2 space, hdc in next 10 hdc, hdc2tog, *hdc in next 9 hdc, (hdc, ch 2, hdc) in next ch-2 space, hdc in next 10 hdc, hdc2tog; repeat from * around to last 6 hdc, hdc in last 6 hdc; join with slip st in top of beginning ch-2. Fasten off.
Round 4: With Right Side facing, join B with slip st in same st as join, ch 2, hdc in next 3 hdc, (hdc, ch 2, hdc) in next ch-2 space, hdc in next 11 hdc, hdc2tog, *hdc in next 9 hdc, (hdc, ch 2, hdc) in next ch-space, hdc in next 11 hdc, hdc2tog; repeat from * around to last 5 hdc, hdc in last 5 hdc; join with slip st in top of beginning ch-2. Fasten off.
FINISHING
Arrange flower motifs as shown in Assembly Diagram. Sc edges of flower motifs together as follows: Working through both thicknesses, join B with sc in corner ch-2 space, working in back loops of last row, sc across to next ch-2 space, sc in ch-2 space. Fasten off. Note: Designer recommends joining motifs together into strips, 4 motifs long, then joining the strips together, matching corner stitches as you go.
Border
Round 1 (Right Side): With Right Side facing, join C with slip st in any corner ch-2 space, ch 2 (counts as hdc), 2 hdc in same corner ch-2 space, hdc in each st around, working 3 hdc in each corner ch-2 space, and hdc2tog over 2 ch-2 spaces where two motifs are joined; join with slip st in top of beginning ch-2. Fasten off.
Round 2: With Right Side facing, join A with slip st in same st as join, ch 2 (counts as hdc), 3 hdc in next hdc (corner), hdc in each hdc around, working 3 hdc in each corner st; join with slip st in top of beginning ch. Fasten off.
Round 3: With Right Side facing, join B with slip st in same st as join, ch 2 (counts as hdc), hdc in next hdc, 3 hdc in next hdc, hdc in each hdc around, working 3 hdc in each corner st; join with slip st in top of beginning ch.
Round 4: Ch 1, work reverse sc in each hdc around; join with slip st in beginning ch. Fasten off.
Weave in ends. Block lightly, if desired.
Find this fun pattern and more like it in 12 Crochet Flower Patterns and Accessories for Spring!
Read Next"Long Live the Queen" Throw
Your Recently Viewed Projects
Thanks for your comment. Don't forget to share!
Delphine Bryant
Nov 14, 2018
There are not a lot of projects that take my breath away. This is one of the few. I see that I am not the first. The colors are perfect and the finishing edging makes all the difference in the world. Even though this is not my choice of colors I would not alter this in any way. The finished design is flawless.
Morehouse17
Oct 29, 2018
Wow! What else can I say? This is so petty. The finished project is so colorful and I typically do not go for the really colorful projects. There is not a thing I would change with this pretty posey throw pattern. Making my list and checking it twice and waiting for the next sale on yarn.
Zeemer
Oct 06, 2018
I'm speechless with this Pretty Posey Throw. It is so beautiful. It doesn't look like this is a crochet project. I'm amazed how the colors were chosen. It was so carefullly done. I'm amazed.
Zeemer
Oct 06, 2018
I'm speechless with this Pretty Posey Throw. It is so beautiful. It doesn't look like this is a crochet project. I'm amazed how the colors were chosen. It was so carefullly done. I'm amazed.
cboykin2 2687785
May 24, 2013
why does the picture with the lady in it at the begining of the instructions not match the diagram of the placement of the flowers at the end of the instructions??
lynetteinch
Apr 18, 2012
I absolutely LOVE this but can not understan how to read this pattern completely and was also wondering if a video has been done on this??? Thank you :)
Sweet Linda
May 22, 2012
Lynetteinch Don't know if you've managed to make this lovely afghan yet or not. Just wanted to let you know one thing with a pattern that seems to help me read and work one row only at one time. I know most of the pattern directions say to read thru the entire pattern, but I find that very confusing so I read and work one row at a time. Linda
Report Inappropriate Comment
Are you sure you would like to report this comment? It will be flagged for our moderators to take action.
Thank you for taking the time to improve the content on our site.