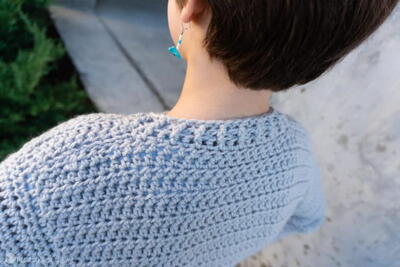
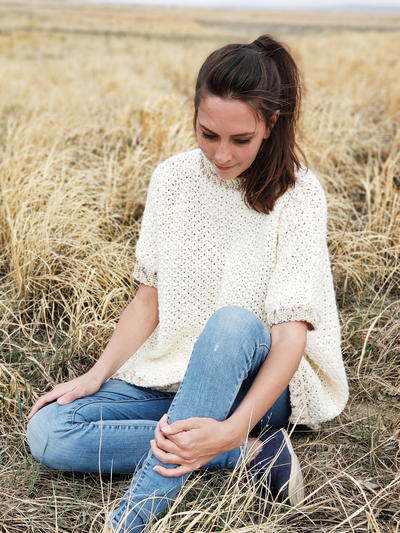
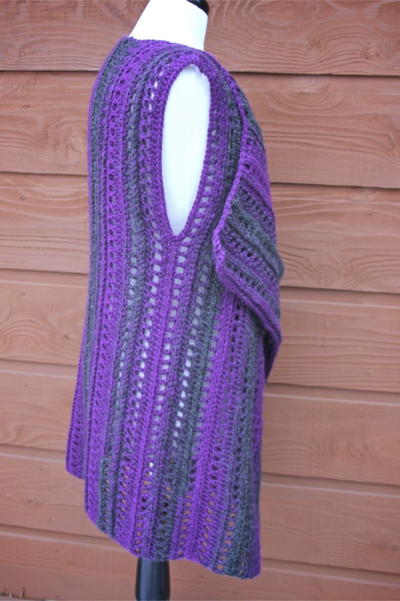
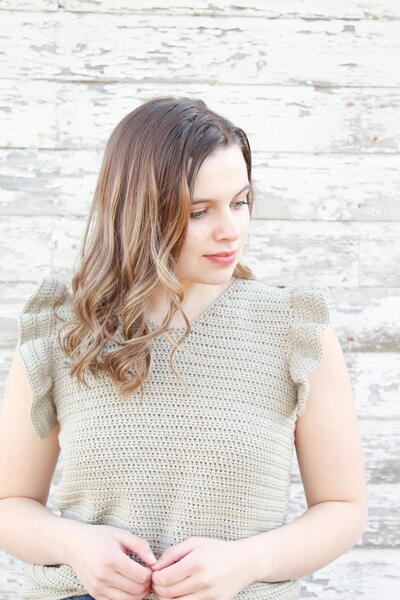
Autumn Afternoon Tunic

Welcome fall with this beautiful Autumn Afternoon Tunic. Lightweight cotton makes this one of the most comfortable crochet designs ever. It falls at your hip and features a flattering scoop neck, which makes it a great piece to wear on any casual, fall day. The multicolored granny square motifs along the bottom will add a nice pop of color to any outfit. Tunics are fun to wear because there are so many different ways to wear them. They can be dressed up or down depending on your jewelry, shoes, and other accessories.

Crochet HookG/6 or 4 mm hook
Yarn Weight(3) Light/DK (21-24 stitches to 4 inches)
SIZES:
Small (Medium, Large, XL)
MATERIALS
-
7 (8, 9, 10) skeins Tahki Yarns
COTTON CLASSIC LITE 100% mercerized cotton; (1.75 oz/50g;146 yd/ 135m) in color #4336 bittersweet chocolate (MC) - 1 skein EACH in colors #4912 redviolet (A), #4807 dark turquoise (B), #4702 chartreuse (C)
- G-6 (4mm) crochet hook OR SIZE TO OBTAIN GAUGE
- Split ring or safety pin stitch markers
- Yarn needle
- Chart
FINISHED MEASUREMENTS
Bust 33 (38, 42, 47)”/84 (96.5, 106.5, 119.5) cm
Length 22½ (23½, 24½, 25½)”/57 (59.5, 62, 65) cm
GAUGE
1 Motif = 4”/10 cm square 16 sts and 7 rows in tr = 4”/10 cm
TAKE TIME TO CHECK GAUGES
SPECIAL TERMS AND ABBREVIATIONS
5-dc popcorn: Work 5 dc in next st, drop lp from hook, insert hook from front to back in first dc of 5dc group and in dropped lp, draw lp through lp on hook, ch 1 (tightly) to secure.
BPtr: Yo (twice), insert hook from back to front to back again around the post of next st, [yo, draw yarn through 2 lps on hook] 3 times.
FPTR: Yo (twice), insert hook from front to back to front again around the post of next st, [yo, draw yarn through 2 lps on hook] 3 times.
FPTR3tog: [Yo (twice), insert hook from front to back to front again around the post of next st, yo, draw yarn through 2 lps on hook (twice)] 3 times, yo, draw yarn through 4 lps on hook.
Picot: Ch 3, slip st in 3rd ch from hook.
TUNIC
MOTIF (make 10 [11, 12, 13], randomly using 2 colors from A, B and C for colors CC1 and CC2 as described on each Motif (please refer to color photo).
With CC1, ch 5, join with a slip st to form a ring.
Rnd 1 Ch 3 (counts as dc), work 15 dc in ring, slip st in 3rd ch of beg ch – 16 dc. Fasten off CC1.
Rnd 2 With RS facing join CC2 with slip st to any st,
* ch 3, 5-dc popcorn in next st, ch 3, slip st in next st; rep from * 7 more times, slip st in first slip st to join – 8 popcorns. Fasten off CC2.
NOTE: Rnds 3 and 4 are always worked in MC.
Rnd 3 With RS facing, join MC with slip st in ch-3 sp to the left of any popcorn, ch 3 (counts as dc), work 2 more dc in same sp, 3 dc in each of next 3 ch-3 sps, ch 3, *3 dc in each of next 4 ch-3 sps, ch 3, rep from * twice, slip st in 3rd ch of beg ch – 4 ch-3 corners. Rnd 4 Ch 3 (counts as dc), dc in each of next 11 sts, *(3 dc, ch 3, 3 dc) in next ch-3 sp**, dc in each of next 12 sts, rep from * twice, rep from * to ** once, slip st in 3rd ch of beg ch – 4 ch-3 corners. Fasten off MC. Sew MOTIFS tog to form a ring.
Body
Rnd 1 With RS facing, join MC in any st on top edge of MOTIF ring, ch 5 (counts as tr, ch 1), *skip 1 st, tr in next st, ch 1, rep from * around, skipping all ch-3 corner spaces, slip st in 4th ch of beg ch-5 – 90 (100, 108, 118) tr.
Rnd 2 Ch 4 (does not count as a st here and throughout unless indicated), FPTR around the post of beg ch-4, ch 1, [FPTR, ch 1] in each tr around, slip st in first FPTR to join.
Rnds 3-9 Ch 4, FPTR around the post of beg ch-4 and first FPTR, ch 1, [FPTR, ch 1] in each FPTR around, slip st in first FPTR to join. Place a marker in 7th FPTR to the right of beg ch-4. Skip next 44 (49, 53, 58) sts, place marker in next st. Move markers up as work progresses.
Rnd 10 Ch 4, FPTR around the post of beg ch-4 and first FPTR, ch 1, *[FPTR, ch 1] in each FPTR across to 1 st before next marker, ** FPTR3tog in next 3 sts; rep from * once, rep from * to ** to beg of rnd, slip st in slip st in first FPTR at beg of rnd – 86 (96, 104, 114) FPTR.
Rnd 11 Rep Rnd 2.
Rnds 12-20 Rep Rnds 10-11 (4 times), then rep Rnd 10 once – 66 (76, 84, 94) FPTR at end of last rnd. Fasten off.
Back
Row 1 With RS facing, skip 2 FPTR to the left of either FPTR3tog, join MC in next FPTR, ch 5 (counts as FPTR, ch 1), FPTR in next FPTR, [ch 1, FPTR] in each of next 26 (31, 35, 40) FPTR, turn, leaving rem sts unworked – 28 (33, 37, 42) FPTR.
Row 2 Ch 5 (counts as BPtr, ch 1), BPtr in next FPTR, [ch 1, BPtr] in each of next 26 (31, 35, 40) FPTR, turn.
Row 3 Ch 5 (counts as FPTR, ch 1), FPTR in next BPtr, [ch 1, FPTR] in each of next 26 (31, 35, 40) BPtr, turn.
Rows 4-12 (14, 16, 18) Rep Rows 2-3 (4 [5, 6, 7] times); rep Row 2 once. Fasten off.
Front
Row 1 With RS facing, skip 5 FPTR to the left of last st made in Row 1 of Back, join MC in next st in Rnd 20, ch 5 (counts as FPTR, ch 1), FPTR in next FPTR, [ch 1, FPTR] in each of next 26 (31, 35, 40) FPTR, turn, leaving rem sts unworked – 28 (33, 37, 42) FPTR.
Row 2 Ch 5 (counts as BPtr, ch 1), BPtr in next FPTR, [ch 1, BPtr] in each of next 26 (31, 35, 40) FPTR, turn.
Row 3 Ch 5 (counts as FPTR, ch 1), FPTR in next BPtr, [ch 1, FPTR] in each of next 26 (31, 35, 40) BPtr, turn.
Rows 4-6 (8, 10, 12) Rep Rows 2-3 (1 [2, 3, 4] time(s); rep Row 2 once.
Right Front
Row 1 Ch 5 (counts as FPTR, ch 1), FPTR in next BPtr, [ch 1, FPTR] in each of next 4 (6, 8, 10) BPtr, turn, leaving rem sts unworked – 6 (8, 10, 12) FPTR.
Row 2 Ch 5 (counts as BPtr, ch 1), BPtr in next FPTR, [ch 1, BPtr] in each FPTR across, turn.
Row 3 Ch 5 (counts as FPTR, ch 1), FPTR in next BPtr, [ch 1, FPTR] in each BPtr across, turn.
Rows 4-6 Rep Rows 2-3 once; rep Row 2 once. Fasten off.
Left Front
Row 1 With RS facing, skip next 16 (17, 17, 18) BPtr, join MC in next BPtr, ch 5 (counts as FPTR, ch 1), FPTR in next BPtr, [ch 1, FPTR] in each of next 4 (6, 8, 10) BPtr, turn – 6 (8, 10, 12) FPTR.
Rows 2-6 Rep Rows 2-6 of Right Front. Fasten off. Sew shoulder seams.
Neck Edging
Row 1 With RS facing, join MC to ch-1 sp at center of Back neck, ch 3 (counts as dc), dc in same sp, 2 dc in each ch-1 sp across to inside edge of Left Front, work 3 dc in each row-end st, working dc3tog at next corner at Neck opening, work 2 dc in each ch-1 sp across Front neck edge, work dc3tog at next corner, work 3 dc in each row-end st along inside edge of Right Front, work 2 dc in each ch-1 sp across Back neck to beg, slip st in 3rd ch of beg ch to join.
Rnd 2 Ch 3 (counts as dc), *dc in each st across to 1 st before next corner, dc3tog in next 3 sts; rep from * 3 times, dc in each st to beg, slip st in 3rd ch of beg ch to join.
Rnd 3 Ch 3 (counts as dc), dc in each of next 4 sts, picot, *dc in each of next 5 sts, picot; rep from * around, working dc3tog in each Front corner, slip st in 3rd ch of beg ch to join. Fasten off.
Right Sleeve
With RS facing, join MC, join with slip st to the 4th (6th, 8th, 10th) row-end st below shoulder seam on right armhole. Row 1 Ch 3 (counts as dc), 2 dc in same row-end st, 3 dc in each of next 7 (11, 15, 19) row-end sts, (hdc, sc, slip st) in next row-end st, turn – 27 (39, 51, 63) sts.
Row 2: Ch 3, dc in each st across, 3 dc in each of next 2 row-end sts of armhole, (hdc, sc, slip st) in next row-end st, turn – 36 (48, 60, 72) sts.
Rows 3-5 Rep Row 2 – 63 (75, 87, 99) sts.
Row 6: Ch 3, dc in each st across, 3 dc in each of next 2 row-end sts of armhole, (hdc, sc, slip st) in next ch-1 sp on underarm, turn – 72 (84, 96, 108) sts.
Row 7: Ch 3, dc in each st across, 3 dc in next row-end st of armhole, (hdc, sc, slip st) in next ch-1 sp on underarm, turn – 78 (90, 102, 114) sts.
Row 8: Ch 3, dc in each st across, 3 dc in next ch-1 sp of underarm, (hdc, sc, slip st) in next ch-1 sp, turn – 84 (96, 108, 120) sts.
NOTE: Next row will be joined at the end to form a rnd.
Rnd 9: Ch 3, dc in each of next 4 sts, picot, *dc in each of next 5 sts, picot; rep from * around, ending with dc in each of last 4 (6, 3, 5) sts, picot, slip st in 3rd ch of beg ch – 84 (96, 108, 120) sts. Fasten off.
Left Sleeve
With RS facing, join MC in 4th (6th, 8th, 10th) row-end st below shoulder seam on left armhole. Work as for Right Sleeve in Right armhole opening.
FINISHING
Block TUNIC to finished measurements. Weave in ends.
ABBREVIATIONS
beg begin(ning)
ch(s) chain(s)
dc double crochet
dc3tog double crochet 3 sts together
hdc half double crochet
LH left-hand
lp(s) loop(s)
rep repeat(ed)(s)(ing)
rnd(s) round(s)
RS right side
sc single crochet
sp(s) space(s)
st(s) stitch(es)
tog together
tr treble crochet
WS wrong side
yo yarn over
Read NextKeke Lace Dress
Your Recently Viewed Projects
Thanks for your comment. Don't forget to share!
Zeemer
Sep 24, 2018
This is so sexy. I like the hemline of the crochet top, it's so sexy. The chemise that is longer than the blouse is beautiful, too.
Delphine Bryant
May 22, 2017
This tunic is very attractive and the design is written in multiple sizes which is always a plus. However when I read of the pattern directions, I have to say I am very intimidated with the use of so many new crochet stitches. If you have taken on the project, can you provide feedback?
Lynn K
May 19, 2017
Not mad about the color (for me) but that is a small point because the design is really lovely and do you not just LOVE the retro Granny square look finishing off the bottom of the tunic? The mesh look of the design is fabulous and wonderful to wear over whatever color under top you like. It is also ageless which is always good.
princess6860504
May 19, 2017
What a pretty tunic with vintage inspired granny squares for the bottom trim and the scalloped edging. Make this in many separate pieces and then join it all together at the end. I am loving the chocolate brown color. It has a slight purplish undertone to it. Should be really beautiful on all skin tones.
ChaCha Rizzo
Jan 18, 2017
My daughter loves to wear tunics to work, I think this would be just lovely for her. It looks easy to work up, thanks for the free crochet tunic pattern. Can't wait to show you the finished project.
Cheryl Y
May 01, 2016
I just love this Autumn Afternoon Tunic pattern. It reads easily and looks great. I'm not a big fan of the motifs so I'll leave them out and just add more rows to the front and back. I really like the neck line design. Thank you so much for this free pattern.
Report Inappropriate Comment
Are you sure you would like to report this comment? It will be flagged for our moderators to take action.
Thank you for taking the time to improve the content on our site.