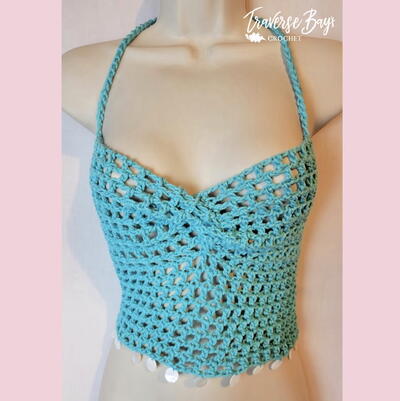
White Spider Lace Jacket

Even if you've never heard of spider lace crochet, you should check out this White Spider Lace Jacket. It's fun, versatile, and light enough for every season. This is definitely your next favorite crochet wearable because it'll match everything you own to wear to work, to dinner, and more. You don't even have to make it in white if that's not your color - any color would make this lace crochet jacket pattern work! Just take a look at the unique pattern this spider lace crochet makes and you'll be wanting more.
NotesNote:
1. Pattern is designed to be worn open in front and can be stretched to pin closed at top of bust. Fronts do not meet at center front. Pattern is worked in 3 panels that are joined together and then sleeves are worked directly onto sleeve openings.

Crochet HookD/3 or 3.25 mm hook
Yarn Weight(2) Fine (23-26 stitches to 4 inches)
Crochet GaugeRows 2-11 in side panel pattern = 5 (12.5 cm) wide x 4 (11.5 cm) deep; 20 sts sts and 10= rows in ldc = 4 (10 cm).
Finished SizeDirections are for size Small (S). Changes for sizes Medium (M), Large (L), X-Large (XL), 2X-Large (2X), and 3X-Large (3X) are in parentheses. To Fit Bust: 35 (37, 39, 41, 43, 45), [89 (94, 99, 104, 109, 114.5) cm].
Materials List
- RED HEART Luster Sheen: 4 (5, 5, 6, 6, 6) balls 7 Vanilla
- Susan Bates Crochet Hook: 3.25mm [US-D-3]
- Yarn needle
Special Stitches
-
Linked double crochet (ldc):
First ldc of row: Ch 3, insert hook in the 2nd chain from hook, yo and pull through loop, (2 loops on hook), insert hook in next st in row below, yo and pull through stitch (3 loops on hook), yo and pull through 2 loops (2 loops on hook), yo and pull through last 2 loops on hook.
Each Remaining ldc: Insert hook in horizontal bar on last ldc, yo and pull through loop, (2 loops on hook), insert hook in next st in row below, yo and pull through st (3 loops on hook), yo and pull through 2 loops (2 loops on hook), yo and pull through last 2 loops on hook. -
Front post single crochet (fpsc): Insert hook from front to back to front again, around the post of next st, yo, pull through st, yo and draw through 2 loops on hook.
-
Back post single crochet (bpsc): Insert hook from back to front to back again, around the post of next st, yo, pull through st, yo and draw through 2 loops on hook.
-
Shell: 3 dc in same st.
Side Panel (make 2)
-
Starting at bottom edge of fronts, ch 27.
-
Row 1 (right side): Shell in 6th ch from hook, (beginning ch 5 counts as first dc and 2 skipped ch sts], [skip next 2 ch, shell in next ch] twice, ch 13, skip next 5 ch sts, [shell in next ch, skip next 2 ch] 3 times, dc in last st, turn--2 dc; 6 shells; 1 ch-13 loop.
-
Row 2: Ch 3, (counts as dc here and throughout), dc in same st, [skip next shell, shell in space before next shell] twice, ch 6, sc in next ch-13 space, ch 6, skip next shell, [shell in space before next shell, skip next shell] twice, 2 dc in top of beginning ch-3, turn--4 dc; 4 shells; 1 sc; 2 ch-6 loops.
-
Row 3: Ch 3, skip next dc, shell in space before next shell, skip next shell, shell in space before next shell, ch 6, sc in next ch-6 space, sc in next sc, sc in next ch-6 space, ch 6, skip next shell, shell in space before next shell, skip next shell, shell in space before last 2 sts, dc in top of beginning ch-3, turn. 2 dc, 4 shells, 3 sc
-
Row 4: Ch 3, dc in same st, skip next shell, shell in space before next shell, ch 6, sc in next ch-6 space, sc in each of next 3 sts, sc in next ch-6 space, ch 6, skip next shell, shell in space before next shell, 2 dc in top of beginning ch-3, turn--4 dc; 2 shells; 5 sc; 2 ch-6 loops.
-
Row 5: Ch 3, skip next dc, shell in space before next shell, ch 6, sc in next ch-6 space, sc in each of next 5 sc, sc in next ch-6 space, ch 6, skip next shell, shell in space before last 2 sts, dc in top of beginning ch-3, turn--2 dc; 2 shells; 7 sc; 2 ch-6 loops.
-
Row 6: Ch 3, dc in same st, ch 6, sc in next ch-6 space, sc in each of next 7 sc, sc in next ch-6 space, ch 6, 2 dc in top of beginning ch- 3, turn-4 dc; 9 sc; 2 ch-6 loops.
-
Row 7: Ch 3, shell in next ch-6 space, ch 6, skip next sc, sc in each of next 7 sc, ch 6, shell in next ch-6 space, dc in top of beginning ch-3, turn--2 dc; 2 shells; 7 sc; 2 ch-6 loops.
-
Row 8: Ch 3, dc in same st, shell in next ch-6 space, ch 6, skip next sc, sc in each of next 5 sc, ch 6, shell in next ch-6 space, 2 dc in top of beginning ch-3, turn--4 dc; 2 shells; 5 sc; 2 ch-6 loops.
-
Row 9: Ch 3, skip next dc, shell in space before next shell, skip next shell, shell in next ch-6 space, ch 6, skip next sc, sc in each of next 3 sc, ch 6, shell in next ch-6 space, skip next shell, shell in space before last 2 sts, dc in top of beginning ch-3, turn--2 dc; 4 shells; 3 sc; 2 ch-6 loops.
-
Row 10: Ch 3, dc in same st, skip next shell, shell in space before next shell, shell in next ch-6 space, ch 6, skip next sc, sc in next sc, ch 6, shell in next ch-6 space, skip next shell, shell in space before next shell, 2 dc in top of beginning ch-3, turn--4 dc; 4 shells; 1 sc; 2 ch-6 loops.
-
Row 11: Ch 3, skip next dc, [shell in space before next shell, skip next shell] twice, shell in next ch-6 space, ch 13, shell in next ch-6 space, skip next shell, shell in space before next shell, skip next shell, shell in space before last 2 sts, dc in top of beginning ch-3, turn--2 dc; 6 shells; 1 ch-13 loop.
-
Rows 12-91: Repeat Rows 2-11 eight times.
-
Rows 92-100: Repeat Rows 2-10.
-
Row 101: Ch 3, skip next dc, [shell in space before next shell, skip next shell] twice, shell in next ch-6 space, ch 6, shell in next ch-6 space, skip next shell, shell in space before next shell, skip next shell, shell in space before last 2 sts, dc in top of beginning ch- 3--2 dc; 6 shell; 1 ch-6 loop. Fasten off.
Underarm Panel
-
Place a marker at each end of rows 35 and 66 on each panel. With right side facing, join in bottom right-hand corner of one Side Panel to begin Underarm Panel.
-
Row 1 (right side): Ch 3 (counts as first ldc), work 69 ldc evenly spaced across to next marker, turn--70 ldc.
-
Rows 2-8 (10, 12, 14, 16, 20): Ch 3, ldc in each st across, turn. Fasten off. Repeat Underarm Panel across right side edge of other Side Panel.
Center Back Panel
-
Starting at back bottom edge, ch 27. Work same as Side Panel through row 40.
-
Row 41: Repeat Row 101 of Side Panel. Do not fasten off.
Side Edging
-
Row 1 (right side): Ch 3, work 84 ldc evenly spaced across side edge of Back Panel, turn--85 ldc. Fasten off size S only.
-
Sizes M (L, XL, 2X and 3X) only
Rows 2 (2-3, 2-3, 2-4, 2-4): Ch 3, ldc in each st across, turn. Fasten off.
Assembly
Fold each side panel in half. Whipstitch last row of Underarm Panel to corresponding rows of top half of same Side Panel. Repeat on other Side Panel. With bottom edges aligned, whipstitch Center Back Panel to inside edges of Side Panels.
Sleeve
-
Round 1 (right side): With right side facing, join yarn with sc in center bottom of armhole (on top edge of Underarm Panel), ch 3, *skip space of one st, sc in edge of armhole opening, ch 3; repeat 24 (24, 25, 26, 28, 30) times evenly spaced around entire armhole opening, do not join. Work in a spiral, marking beginning of each round, moving marker up as work progresses.
-
Rounds 2-20: [Ch 3, sc] in each ch-3 space around.
-
Round 21: Work 72 (72, 76, 80, 84, 92) sc evenly spaced around.
-
Rounds 22-24: *fpsc around each of next 2 sc, bpsc around each of next 2 sc; repeat from * around. At end of last round, slip st in next fpsc to join. Fasten off.
Sweater Trim
-
With wrong side facing, join yarn in bottom left-hand corner of left front edge.
-
Row 1 (wrong side): Ch 3, work 244 ldc evenly spaced across left front, across back neck and down right front edges to bottom right-hand corner st on right front, turn.
-
Row 2: Ch 3, 2 dc in first st, *skip next 3 sts, shell in next st; repeat from * across, turn--62 shells.
-
Row 3: Ch 1, sc in each st across, turn. Do not fasten off. Work now progresses in rounds.
Ribbing
-
Round 1 (right side): Ch 1, 2 sc in each of first 2 sts, sc in each st across to within 2 sts of next corner, 2 sc in each of first 2 sts, work 251 (257, 265, 273, 281, 289) sc evenly spaced across bottom edge, do not join--500 [506, 514, 522, 526, 534] sc. Work in a spiral, marking beginning of each round, moving marker up as work progresses.
-
Round 2-4: *Fpsc around each of next 2 sc, bpsc around each of next 2 sc; repeat from * around. At end of last round, slip st in next fpsc to join. Fasten off
-
Weave in ends.
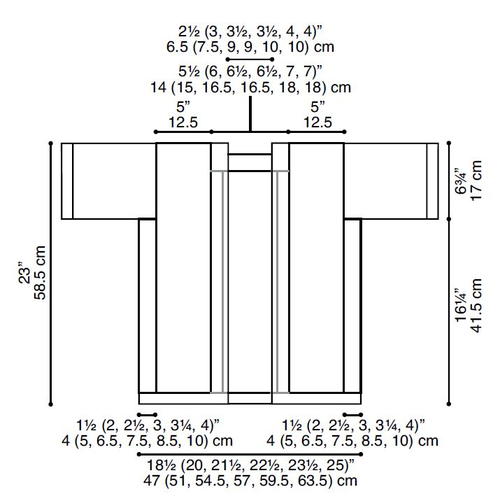
Project Diagram
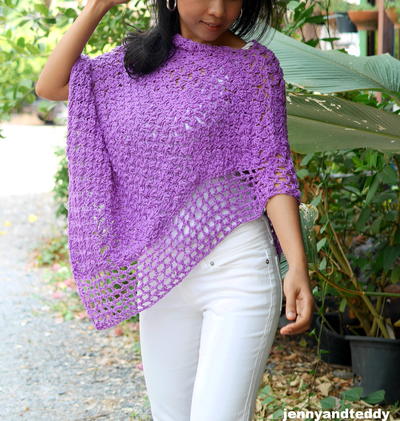
Can't get enough of this lacy cardigan? Try this perfect lacy summer top next!
Your Recently Viewed Projects
Thanks for your comment. Don't forget to share!
eldalton2 7874587
Aug 22, 2022
Your page keeps on refreshing that I can't even read the blog post. When I thought I'd finally be able to read the whole thing, it refreshed again
traceyq 8437354
May 21, 2022
Why can't I save patterns? I hit the "save" button and all it does is open the pattern again in a new tab.
dhill2014
May 27, 2022
Right click on pattern page and chose "Print" Selecting the printer PDF option, and save it that way )
EditorLP
Jun 01, 2022
Hi traceyq2002 843735 4, I'm sorry you're having trouble saving patterns. Are you already logged into your user account when you try to save patterns? If not, it may help to log in first. We have a helpful guide on how to save patterns using the "My Crochet Patterns" feature on our site here: https://www.allfreecrochet.com/index.php/hct/How-to-Use-Your-Crochet-Patterns-Box. I hope this helps! - Laura, editor of AllFreeCrochet
elocin1104 2800379
Nov 24, 2018
This is really a lovely looking sweater pattern. I have made one sweater in my career, and it was complicated. I think I will have to make some more that are less complicate before I try something like this. I think this would be a great pattern for the spring and summer months, since it looks lightweight and has holes in it.
Tricia108
Oct 10, 2018
The instructions are a bit confusing and you have to read ahead. You can put the markers on the ends when you arr crocheting the rows indicated. This is a pattern you have to pay attention to and take your timed. It is an unique piece that you won't see replicated. It is perfect for the milder weather here in the south. I love anything with a lacey look and this is perfect. Thank you.
natandplaul2012 43 65510
Aug 24, 2020
I have crocheted all my life, (70 years) abut can't understand the second part of this sweater underarm panels?? Can you explain it more detailed then the instructions. I already have the front panels made. HELPNatalie Burton
mulberrygalprinces s
Aug 25, 2018
This is really pretty. And yes it's clearly not for a beginner. But if you save it now, you will have it for later when your skill and confidence level rise. I think I may make it for my sister in law for Christmas. She loves hand made items because they are one of a kind.
Morehouse17
Dec 30, 2017
I really like this spider lace jacket by Red Heart. My question is to any one that has made this are the pattern sizes true to size? I suppose I could start out with the large but I would hate to have to frog to make it the next size up.
Delphine Bryant
Nov 29, 2017
Spiders are no friend of mine but the creation of this spider lace jacket is beautiful. I like the way it looks but I would love to have this in a warmer color. At any rate, not matter the yarn hue selected, it will be a beautiful piece to add to anyone wardrobe.
Daughter of Light
Oct 01, 2017
You know I'm not at the intermediate level....yet...but I hope to be there someday. Until then patterns that are beautiful like this one I will save as motivation to keep on keepin' on. The spider lace is soooo delicate. I also love the edging and the open diamond pattern. Thanks for the free pattern!
achumley0003 31706 34
Sep 01, 2017
I can understand why some may think this looks a little dated, but I myself love retro looking things , especially if they are mixed with current style. And this is more fitted than the old fashioned cardigans tended to be. It would look great in any color and I love the spider lace.
Hippie Chick
Aug 30, 2017
Gorgeous jacket to make and have. The project diagram is a little confusing to me with so many sizes and numbers thrown into this one diagram. I love working with a stitch diagram pattern because they are usually more accurate than written patterns. I am curious to see how this works with two different color strands of a cotton thread.
second chance
Mar 01, 2017
I'm a little confused with the underarm panel. are the 69 doc worked to marker 35 or the 66 marker. Also if starting at bottom right corner How is this underarm?
AFC Editor Julia
Mar 02, 2017
Hi second chance, For specific pattern questions for this project, I would contact Red Heart's customer service since it's their project. They can probably give you the best suggestions for how to work the underarm panel. I hope that helps! Julia, editor for AllFreeCrochet
Hippie Chick
Feb 24, 2017
I have never heard of spider lace, but I love the look of this sweater jacket made with this stitching. Love the retro/classic look. The perfect accessory to carry around with you for when you go into restaurants or stores that are always on the chilly side. Small enough to carry around over your purse.
Linda
Jan 13, 2017
Gorgeous jacket I shall crochet in one peice to dispose of seams. The spider pattern stitch is one I am familar with and the project will take at one day to crochet.
lakshmij95 4482809
Jul 06, 2016
where can i get the tutorial for white spider lace jacket i want to make it for my daughter
AFC Editor Julia
Jul 06, 2016
Hi Lakshmi, The pattern for this project is right on this page. If you scroll down a little past the main project photo, you'll see all the written out instructions and diagrams. Thank you! Julia, editor for AllFreeCrochet
brandi4883 7197631
Mar 04, 2016
I'm not sure about this one. It seems a little dated. This is what I would think of when I think about patterns my grandma made. Is this coming back in style? They say everything comes back around. Maybe in a different color. It needs something to give it a younger, more updated look.
wogdoggy 2832175
Sep 10, 2016
A lot of crocheted garments look dated to me. This one, by contrast, looks youthful.
Report Inappropriate Comment
Are you sure you would like to report this comment? It will be flagged for our moderators to take action.
Thank you for taking the time to improve the content on our site.