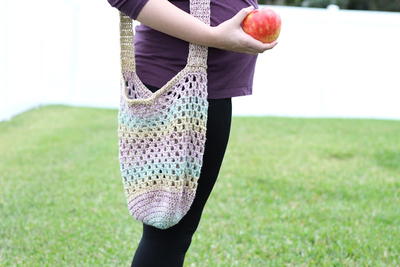
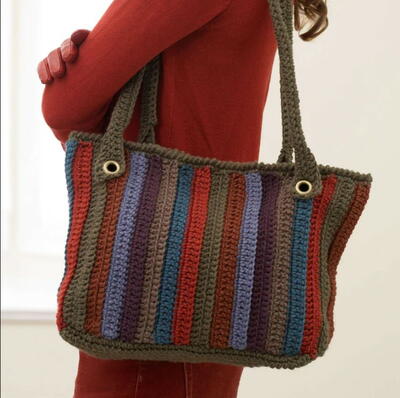
Twilight Woods Tote

With shades of autumn, this Twilight Woods Tote is the right bag for any fall outing. Whether you're going to a fall festival or walking in the woods to see the colors change, this crochet bag pattern is the right size for all of your essentials. You can fit a folded scarf and gloves inside, too! It's simple, fashionable, and comfortable to carry with a long strap. Bring this crochet tote along on your next twilight walk.
NotesStripe Pat: Work 2 rows of each color in the following sequence: A, B, C, D, E, F, MC.
These 14 rows form Stripe Pat.

Crochet HookH/8 or 5 mm hook
Yarn Weight(4) Medium Weight/Worsted Weight and Aran (16-20 stitches to 4 inches)
Crochet Gauge14 sc and 15 rows = 4 ins [10 cm]
Finished SizeApprox 12 x 10 x 4 ins [30.5 x 25.5 x 10 cm]
Materials List
- Super Value yarn Main Color: Moss Heather 1 ball, plus 6 balls in other shades
- Size 5 mm (U.S. H or 8) crochet hook or size needed to obtain gauge. 2 snap fasteners. Optional: 4 grommets 7/8 inch [11 mm]
This video tutorial will show you how to work up a Trendy Crochet Tote - make your own today!
Pattern
Base of Tote
-
With MC, ch 43.
-
1st row:(RS). 1 sc in 2nd ch from hook. 1 sc in each ch to end of ch. Turn. 42 sc.
-
2nd row:Ch 1. 1 sc in each sc to end of row. Turn.
-
Rep last row until work from beg measures 4 ins [10 cm], ending with a WS row. Fasten off.
Body
-
To change color, work to last 2 loops on hook. Draw loop of next color through 2 loops on hook to complete st and proceed in next color.
-
With MC, ch 36.
-
1st row:(RS). 1 sc in 2nd ch from hook. 1 sc in each ch to end of ch. Join A. Turn. 35 sc.
-
2nd row: With A, ch 3 (counts as dc). Working in back loops only, 1 dc in each sc to end of row. Turn.
-
3rd row: Ch 1. Working in front loops only, 1 sc in each dc to end of row. Join B. Turn.
-
4th row: With B, ch 1. Working in back loops only, 1 sc in each sc to end of row. Turn.
-
5th row: Ch 3 (counts as dc). Working in front loops only, 1 dc in each sc to end of row.
-
Join C. Turn.
-
6th row: With C, as 3rd row.
-
7th row: As 2nd row.
First 6 rows of Stripe Pat are complete. -
Keeping cont of Stripe Pat, rep 2nd to 7th rows until work from beg measures 32 ins [81.5 cm], ending with a WS row. Join MC.
-
Next row: With MC, as 2nd row. Fasten off.
Handles (make 2)
-
With MC, ch 80.
-
1st row:(RS). 1 dc in 4th ch from hook. 1 dc in each ch to end of ch. Turn. 78 dc.
-
2nd row: Ch 3 (counts as dc). 1 dc in each dc to end of row. Turn. Fold piece in half lengthwise and working through both thicknesses, work 1 row of sc along side of Handle.
-
Fasten off.
Finishing
-
Sew side seam of Body. Sew Body to Base. Join MC with sl st to upper edge of Tote. Ch 1.
-
Work 1 rnd of sc evenly around upper edge. Join with sl st to first sc.
-
2nd rnd: Working from left to right instead of right to left as usual, work 1 reverse sc in each sc around. Join with sl st to first sc. Fasten off.
-
Sew snap fasteners to upper edge of Tote. Sew Handles to Tote 2 ins [5 cm] in from sides.
-
Optional: Apply grommets to attach Handles to Tote, following manufacturer’s instructions.
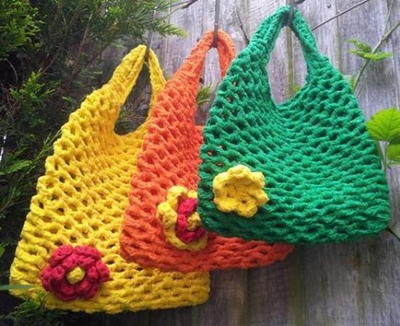
Read NextColorful Squares Bag Crochet Pattern
Your Recently Viewed Projects
Thanks for your comment. Don't forget to share!
JaneEK
May 05, 2018
This roomy tote is very appealing. Using grommets to attach the strap is very unusual, but the hardware ads to the look of the bag. Rather than try to copy the pattern above, I went directly to the Bernat site to find it. Its much easier for me to deal with patterns at the original site if at all possible. The free downloadable pattern for this bag can be found here http//www.yarnspirations.com/bernat-striped-tote/B == RC0103-003538V.html
Morehouse17
Dec 30, 2017
This is the first crochet bag that I have seen with grommets added. I suppose it is to add additional strength to the the straps for use. I think that it adds an added dimension of style. I can visualize this in other shades of seasons as well.
Delphine Bryant
Nov 28, 2017
This is a beautiful tote. The bag looks very study with the addition of the grommets. The addition of the grommets will not allow the fabric of the piece to stretch out with daily use. I even like the colors the designer selected to crochet this tote in.
Hippie Chick
Nov 03, 2017
Bernat Yarns still offers this free pattern on their website. It is listed as just Striped Tote under their free crochet patterns section. You can download and save or print the pattern from there. Here is the direct link to it. http//www.yarnspirations.com/patterns/striped-tote == .html?id=186829 If you dont have all the materials you need to make this, you can also order it from there. The total cost is around $37 plus shipping.
Tricia108
Nov 03, 2017
This looks like a lovely and easy tote to make. You can never have too many totes. This is a good scrap yarn pattern as well. I love it! I am always looking for totes since I am always on a bus and/or train and I need something to put things in, better than a plastic bag. Thank you.
Zeemer
Nov 02, 2017
Wow. What a beautiful tote. This Twilight Woods Tote used earth colors that can blend with most color of clothes. The colors are well chosen, very subdued, very laid back. You may use pastels or vibrant colors if you want.
mulberrygalprinces s
Sep 04, 2017
This is very pretty and I agree with the ratings as being easy. It's very easy, well written and right there in front of you. You can make it in the colors shown or you can make it for the spring by using pastels in blue, pink, yellows and lavender. This pattern is great for any color.
princess6860504
Aug 11, 2017
I am loving the spice tones used in this striped tote. Spice tones plus autumn eggplant- such a great combination for the season! Just do your stitches in alternating front loops and back loops and you will achieve the effect shown. I like the grommets for added strength and durability.
NancyHanks
Jun 02, 2016
Can't find how to print this pattern.help!
AFC Editor Julia
Jun 03, 2016
Hi Nancy, if you go to the top of the page, under the ratings graphic (with the stars), you'll see a handful of icons. If you hover over the "P", to the right of the envelope icon, you'll be able to print. Likewise, you can hit File and Print on your browser, or simply ctrl-P on your keyboard. Hope this helps! Julia, editor for AllFreeCrochet
Report Inappropriate Comment
Are you sure you would like to report this comment? It will be flagged for our moderators to take action.
Thank you for taking the time to improve the content on our site.