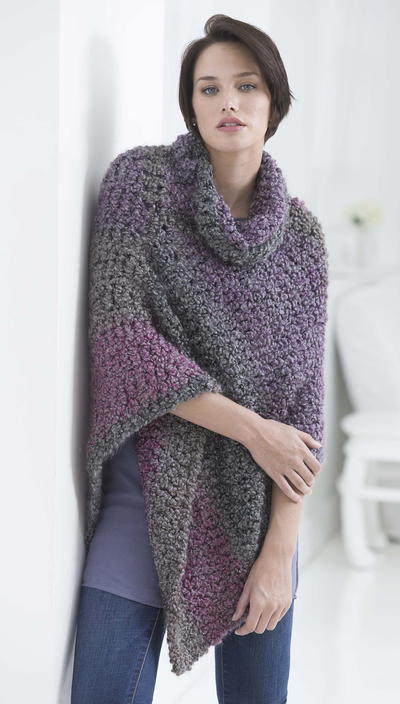
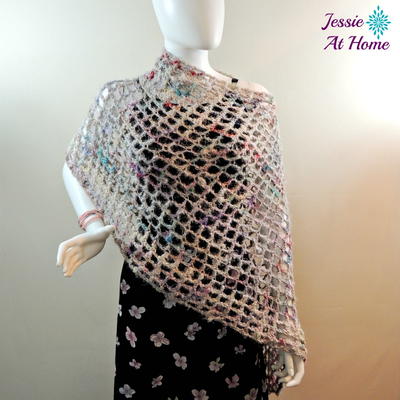
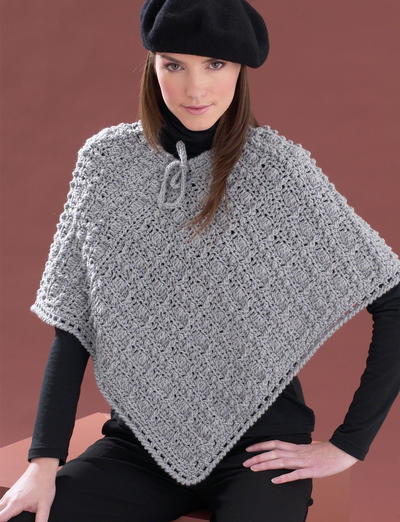
Cozy Tweed Crochet Poncho

Throw on something irresistibly warm with the Cozy Tweed Crochet Poncho. You can pull this poncho over just about anything: a t-shirt, long sleeve shirt, a lightweight sweater, or whatever you desire. The buttons that divide the outsides into armholes make this poncho almost like a sweater and the cowl neck makes it fall and winter friendly. What we do know about this crochet pattern is that you'll be warm in all your layers!

Crochet HookL/11 or 8 mm hook, N/15 or 10 mm hook
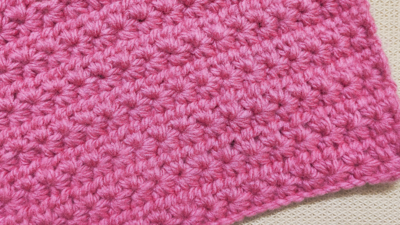
Yarn Weight(5) Bulky/Chunky (12-15 stitches for 4 inches)
Crochet Gauge9 sts and 11 rows = 4" [10 cm] in Texture Pat with smaller hook
Finished SizeTo fit bust measurement: Extra-Small/Medium 28-38" [71-96.5 cm]; Large/2 Extra-Large 40-48" [101.5-122 cm]; 3/5 Extra-Large 52-62" [132-157.5 cm]
Materials List
- Patons® Colorwul™ (3 oz/85 g; 90 yds /81 m) - Bramble (90013) - XS/M - 20 balls, L/2XL - 22 balls, 3XL/5XL - 25 balls
- Hook size: U.S. L/11 (8 mm)
- Hook size: U.S. N/13 (9 mm) size needed to obtain gauge
- Stitch markers
- Two 1" [2.5 cm] buttons
Need a Quick Refresher on Stitch Markers?
This video tutorial will give you some of the best tips to working with stitch markers - check it out!
Pattern
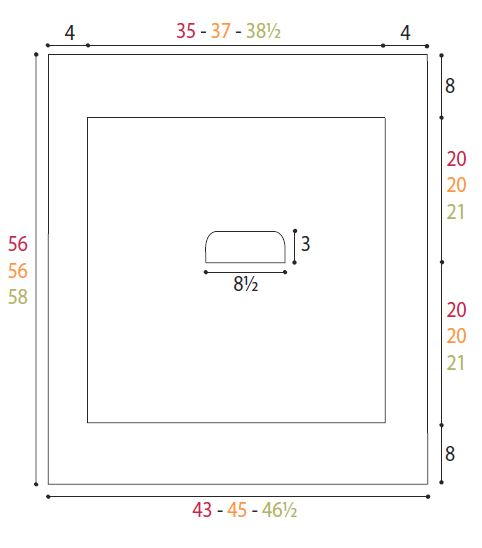
Diagram
-
Click to enlarge
Begin Pattern
-
With smaller hook, beg at lower Back edge, ch 103 (107-111).
-
1st row: (WS). 1 dc in 4th ch from hook (counts as 2 dc). 1 dc in each ch to end of chain. Turn. 101 (105-107) dc.
-
2nd row: Ch 2. 1 hdc in first dc. *1 dcfp around post of next st. 1 hdc in next st. Rep from * to end of row, working last hdc in top of turning ch 3. Turn.
-
3rd row: Ch 2. 1 hdc in first hdc. *1 dcbp around post of next dcfp. 1 hdc in next hdc. Rep from * to end of row. Turn.
-
4th row: Ch 2. 1 hdc in first hdc. *1 dcfp around post of next dcbp. 1 hdc in next hdc. Rep from * to end of row. Turn.
-
Rep 3rd and 4th rows for rib pat until work from beg measures 8" [20.5 cm], ending on a WS row. Fasten off.
Note: When working Texture Pat below, take care to not work sl sts too tightly. -
Next row: (RS). Skip first 11 sts. Join yarn with sl st to next st. Ch 2. 1 hdc in same sp as last sl st. *Sl st in next st. 1 hdc in next st. Rep from * to last 11 sts. Turn. Leave rem sts unworked.
-
Cont on 79 (83-87) sts as follows:
Next row: Ch 1. Sl st in first hdc. *1 hdc in next sl st. Sl st in next hdc. Rep from * to end of row. Turn.
Next row: Ch 2. 1 hdc in first sl st. *Sl st in next hdc. 1 hdc in next sl st. Rep from * to end of row. Turn. -
Rep last 2 rows for Texture Pat until work from beg measures 28 (28-29)" [71 (71-73.5) cm], ending on a WS row.
Shape Neck
-
Right Side:
1st row: (RS). Ch 2. 1 hdc in first sl st. (Sl st in next hdc. 1 hdc in next sl st) 14 (15-16) times (neck edge). Sl st in next hdc. Turn. Leave rem sts unworked.
2nd row: Ch 1. Sc2tog. Pat to end of row. Turn. 29 (31- 33) sts. PM at end of row for shoulder.
3rd to 6th rows: Work even in pat.
7th row: (RS). Pat to last st. (1 hdc. Sl st) in last st. Turn.
8th row: Ch 1. (Sl st. 1 hdc) in first sl st. Pat to end for row. 31 (33-35) sts. Do not fasten off. Leave safety pin or pull long loop on last st to prevent unraveling. -
Left Side:
1st row: (RS). Skip center back 19 sts. Join 2nd ball of yarn (taking care to match color section of striping repeat in ball) with sl st to next hdc. *1 hdc in next sl st. Sl st in next hdc. Rep from * to last st. 1 hdc in last sl st. Turn.
2nd row: Pat to last 2 sts. Sc2tog. Turn. 29 (31-33) sts. PM at beg of row for shoulder.
3rd to 6th rows: Work even in pat.
7th row: (RS). Ch 1. (1 hdc. Sl st) in first st. Pat to end of row. Turn.
8th row: Pat to last st. (Sl st. 1 hdc) in last st. 31 (33-35) sts. Ch 17 for center front neck. Fasten off. -
Join Sides:
Next row: (RS). Return loop from first ball of Right Side back onto hook. Ch 2. 1 hdc in first sl st. (Sl st in next hdc. 1 hdc in next sl st) 15 (16-17) times. (Sl st in next ch. 1 hdc in next ch) 8 times. Sl st in next ch. Pat across Left Side. Turn. 79 (83-87) sts.
Cont even in Texture Pat until work from shoulder markers measures 20 (20-21)" [51 (51-53.5) cm], ending on a WS row. Fasten off.
Rib Edging
-
1st row: (RS). Join yarn with sl st to first skipped st at right back edge. Ch 2. 1 hdc in same sp as last sl st. (1 dcfp around post of next dcbp. 1 hdc in next hdc) 5 times. Turn. 11 sts.
-
2nd row: Ch 2. 1 hdc in first hdc. (1 dcbp around post of next dcfp. 1 hdc in next hdc) 5 times. Turn.
-
Rep last 2 rows until Rib Edging measures length to fit along side edge of Poncho (when slightly stretched), ending on a WS row. Do not fasten off. Leave safety pin or pull long loop on last st to prevent unraveling.
-
Left Rib Edging: With 2nd ball of yarn work as for Right Rib Edging along left side. Fasten off.
Sew Right and Left Rib Edgings into position up sides of Poncho.
Lower Front Edging: 1st row: (RS). Return loop from first ball of Right Rib Edging back onto hook. Ch 2. 1 hdc in first hdc. (1 dcfp around post of next dcbp. 1 hdc in next hdc) 5 times. *1 dcfp around post of next hdc. 1 hdc in next sl st. Rep from * across lower edge of Front of Poncho to last st. 1 dcfp around post of last hdc.
Working across Left Rib Edging: (1 hdc in next hdc. 1 dcfp around post of next dcbp) 5 times. 1 hdc in last hdc. Turn. 101 (105-109) sts.
Cont in rib pat for 8" [20.5 cm] to match Back, ending on a WS row. Fasten off.
Collar
-
1st rnd: (RS). With larger hook, join yarn with sl st in center st of back neck edge. Ch 2. Work 60 hdc evenly around neck edge. Join with sl st to first hdc.
-
2nd rnd: Ch 2. 1 hdc in same st as last sl st. *1 dcfp around post of next hdc. 1 hdc in next hdc. Rep from * to last hdc. 1 dcfp around post of last hdc. Join with sl st to first hdc.
-
3rd rnd: Ch 2. 1 hdc in same st as last sl st. *1 dcfp around post of next dcfp. 1 hdc in next hdc. Rep from * to last dcfp. 1 dcfp around post of last dcfp. Join with sl st to first hdc.
-
Rep last rnd until Collar measures 9" [23 cm]. Fasten off.
-
FINISHING: Try on Poncho and mark position for buttons at each side edge. Sew buttons through all thicknesses.
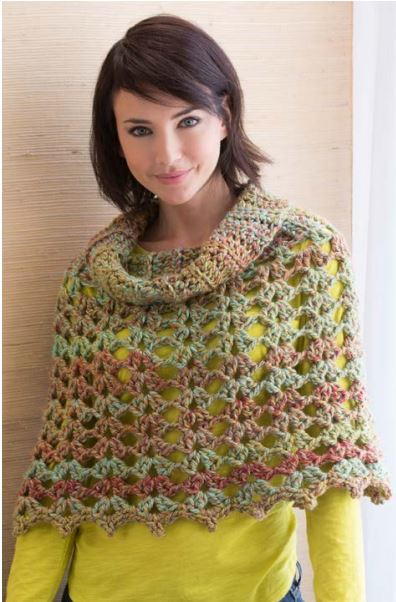
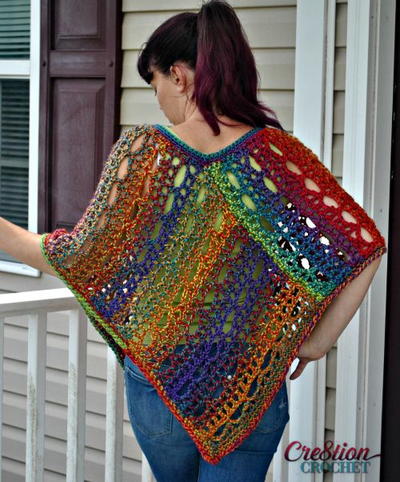
Read NextRainbow Lace Crochet Poncho
Your Recently Viewed Projects
Thanks for your comment. Don't forget to share!
mondestin48 251971 4
Sep 03, 2022
I am having problem with the Rib edging after working shape neck and join sides it seems that there is step missing as I do not have ribbing pattern for the back.
mondestin48 251971 4
Sep 03, 2022
I am having problem with the Rib edging after working shape neck and join sides it seems that there is step missing as I do not have ribbing pattern for the back.
mondestin48 251971 4
Sep 03, 2022
I am having problem with the Rib edging after working shape neck and join sides it seems that there is step missing as I do not have ribbing pattern for the back.
mondestin48 251971 4
Sep 03, 2022
I am having problem with the Rib edging after working shape neck and join sides it seems that there is step missing as I do not have ribbing pattern for the back.
mondestin48 251971 4
Sep 03, 2022
I am having problem with the Rib edging after working shape neck and join sides it seems that there is step missing as I do not have ribbing pattern for the back.
mondestin48 251971 4
Sep 03, 2022
I am having problem with the Rib edging after working shape neck and join sides it seems that there is step missing as I do not have ribbing pattern for the back.
princess6860504
Oct 31, 2018
Well, well, well, it turns out that I think I have found my ultimate warm and plush/cozy poncho to make for my aunt for Christmas. It is suitable for her to wear in the house, as she keeps her place pretty chilly- I don't know why! I cannot stomach having to buy 20-23 skeins of yarn for this, though. They are only 90 yards each! I'd probably buy a different but similar yarn.
elocin1104 2800379
Sep 19, 2018
This poncho looks warm and comfortable, but I am leery because some of the comments have bad reviews. First, if it is too heavy, why not switch the yarn you are using? Second, if it is not working up to size, I guess you can measure and adjust where necessary.
mulberrygalprinces s
Sep 19, 2018
This is just right for me to make right now. I am heading North for at least a month during the Winter holidays and since I live in florida i don't have any food weather clothing. This is a very easy project, so it will make up easily and quickly. Thanks!
Zeemer
Jun 20, 2018
I've started making this Cozy Tweed Crochet Poncho but stopped because actually I could not find a pattern. Thank goodness the pattern's finally here. I can start making this again in the near future after my current projects. Thanks for the pattern. It's the oversized sleeves and the collar that I like about this poncho.
Hippie Chick
Mar 21, 2018
That crochet poncho looks so warm. I love that yarn used because the coloring gives this such a textured look. I am not sure if I would like the high cowled neckline because I dont like items so tight around that area. Has anyone else made one of these and if so how did you make your neckline?
Cheryl Y
Dec 03, 2017
I have been looking for a poncho pattern to make for my Grandson. Yes my Grandson wants a poncho that doesn't look girlley.. This Cozy Tweed Crochet Poncho looks like something he has been wanting. After reading the written pattern here on this page, it looks easy enough. Then I read the comments and it sounds like this pattern has some problems, or it had some. ? I'm going to give it a try and sure hope it works out. Has anyone made this as written this year (2017) ? How did it turn out? Please let me know.. Thank you so much for sharing this free crochet poncho pattern.
lcarr
Sep 19, 2017
This poncho looks like it will be a nice warm one for cool autumn days. The pattern calls for bulky yarn and large hooks, so it should be quick to make too. I love it has a variety of sizes. The 52 to 62 inch size is nice to see. My grandmother always had such a hard time finding clothing that was loose enough to not cause her pain, so I take notice when I see people have included the larger sizes in their work.
Hippie Chick
Jun 05, 2017
Ponchos are the perfect all-season accessory item. The bulky yarn by Patons that this poncho is made with makes it a perfect winter accessory. I like that the pattern is available in several different sizes. Patons Colorwul yarn is a higher end yarn and costs quite a bit more than others so it would be wise to shop around for the best bargain.
Lynn K
Mar 30, 2017
This Cozy Tweed Crochet Poncho looks like a great mix between a really warm poncho and a wonderful blanket to snuggle under on the sofa, lol! My job means I am outdoors a lot even in winter so this is going to be a wonderful option for those extra chilly days when I am sure the cowl neck is going to come in really handy.
JaneEK
Jan 14, 2017
This pattern is described as Easy, but it is much more complicated than anything for a Beginner. There are several challenging stitches, and with the exception of the line drawing illustrating the flat project, there arent any helpful photos or video tutorials. It also looks like a yarn hog, too. Not sure if I want to invest that much yarn or time into this project.
jamiprado 6575447
Nov 29, 2016
I just finished making this and it turned out great but I had to make a lot of adjustments along the way First of all I did a swatch and my gauge was right Then when I had finished the first few rows the measurement ended up being instead of This was so frustrating because I recounted my stitches and remeasured of them to check the gauge and everything checked out I ended up unraveling the whole thing and chaining to which ended up being chain stitches I went with that and ended up having to alter everything else about the pattern to fit a total of stitches instead of So for the middle section it was stitches and then each of the shoulders were stitches with stitches in the middle for the neck One other thing I did differently is I joined the side ribbed sections as I went instead…Read More of waiting until the end and sewing them on I think that worked out a lot better Anyway I am very pleased with my finished product but it was a nightmare to figure it out and also to try to interpret some of the wording in the pattern Also I used Yarn Bee Fireside yarn and it took me skeins The texture of the yarn made it really hard to see my stitches while working on it but it turned out nice looking soft and not too heavy
Do It Just Do It
Nov 04, 2018
Thanks for the helpful information. Only comments I read are those from people that have actually made the pattern. Thank you for letting us know how it really works.
smithpamelas 50289 42
May 07, 2016
I started this poncho pattern and quit when I could see how large it was going to be. Still looking for a nice crochet poncho pattern to use all the yarn I bought!
sstio 3964115
Feb 15, 2016
I just finished this and sadly can't say anything good about it--in fact I'm going to rip it out. First, it's huge, second, it's extremely heavy to wear--did I say it's huge? It was easy enough to make, but very disappointed in the result.
LifeisRosie
Dec 02, 2015
I'm currently working this pattern I'm making it with Lion Brand Scarfie and will require two one more ball than suggested When the author states work even in pattern I believe she is referring to the chain and turn to the next row beginning with a HDC on every row This is what creates the texture of the middle panels The side panels are meant to be free until you sew on the button under each arm when finished This is what creates the arm holes I recommend studying the diagram first then begin with the pattern It is like one big square with a neck hole then folded over to create the poncho It's really big Take note that the pattern begins with an section then you go on to the textured section which is the body of the pattern The measurement is meant to be all together by the…Read More time you get to the neck area
beannienova 454611 9
Nov 11, 2015
I'm trying so hard to make this pattern ... It is written in a very Confusing way... I really don't understand what your supposed to do with the ribbing on the sides... Sew it to the body of the poncho instead of tacking it down as you go.?
DRYCREEK51 9777720
Nov 05, 2015
Also, another thing one end is 35" across and the other is 43" across for small/medium? doesn't make sense to me.
wtbt4028 2635715
Nov 05, 2015
not looked real hard at it yet but if you add the 4" it shows on each side of the front measurement then the 8" will make it equal the bottom measurement
DRYCREEK51 9777720
Nov 05, 2015
I haven't made this yet, it looks cute.But a lot of yardage for a small/medium,1800 yds? Is something wrong with the pattern? Would like to know as this would cost a bundle to make. Thanks
Report Inappropriate Comment
Are you sure you would like to report this comment? It will be flagged for our moderators to take action.
Thank you for taking the time to improve the content on our site.