This project was submitted by one of our readers, just like you.
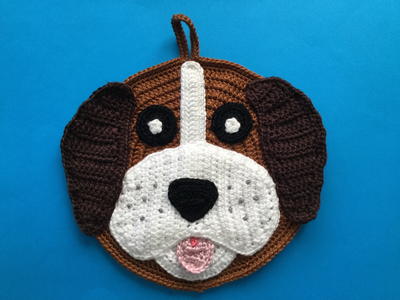
Crochet Dog Potholder

Crochet Dog Potholder
"Here is a crochet dog potholder pattern. I used 8 ply wool, which is light worsted in the US. Be careful not to use synthetic wool as it would melt. I used brown, and darker brown for the ears, pink for the tongue and white and black. I used a 2.5mm crochet hook but you could use what you're most comfortable with. You will also need scissors, thread, a sewing needle and a darning needle. There's also a free video tutorial for this pattern available as well."

Crochet HookB/1 or 2.25 mm hook
Yarn Weight(3) Light/DK (21-24 stitches to 4 inches)
Finished Size22 cm x 24 cm (8 1/2 " x 9 1/2 ")
Materials List
- Brown for the dog’s head (darker brown wool for the ears if desired), pink for the tongue, white and black cotton or wool, I used 8 ply wool which is light worsted in the US and double knitting in the UK. (Don’t use synthetic wool as it would melt).
- A crochet hook, I used a 2.5mm hook.
- Scissors.
- Thread to sew together.
- Sewing needle.
- Darning needle to weave in ends.
- Grey embroidery cotton to sew on the dots.
- Darker pink cotton or wool for the tongue marking if desired.
Instructions
Head Make a magic loop. Row 1: 3 ch. Work 14 dc into circle and pull circle tight. Join with a sl st in 3rd ch. Row 2: 3 ch. 1 dc in same place as ch. Work 2 dc into each st around. Join with a sl st in 3rd ch. Row 3: 3 ch. Work 1 dc in same place as ch (1 dc in each of next 2 sts and 2 dc in following st) repeat to end, sl st in 3rd ch. Row 4: 3 ch. Work 1 dc in same place as ch (1 dc in each of next 2 sts and 2 dc in following st) repeat to end, sl st in 3rd ch. Row 5: 3 ch. Work 1 dc in same place as ch (1 dc in each of next 3 sts and 2 dc in following st) repeat to end, sl st in 3rd ch. Row 6: 3 ch. Work 1 dc in same place as ch (1 dc in each of next 4 sts and 2 dc in following st) repeat to end, sl st in 3rd ch. Row 7: 3 ch. Work 1 dc in same place as ch (1 dc in each of next 5 sts and 2 dc in following st) repeat to end, sl st in 3rd ch. Row 8: 3 ch. Work 1 dc in same place as ch (1 dc in each of next 6 sts and 2 dc in following st) repeat to end, sl st in 3rd ch. Row 9: 3 ch. Work 1 dc in same place as ch (1 dc in each of next 7 sts and 2 dc in following st) repeat to end, sl st in 3rd ch. Row 10: 3 ch. Work 1 dc in same place as ch (1 dc in each of next 8 sts and 2 dc in following st) repeat to end, sl st in 3rd ch. Row 11: 1 ch. Work 1 sc in each st to halfway, 25 ch, 1 sc in same place as last sc, 1 sc in each st to end. Join with a sl st in 1st ch. Row 12: 1 ch. Work 1 sc in each st to end. Join with a sl st in 1st ch. Fasten off. Muzzle 17 ch. Row 1: Miss 2 ch, work 1 hdc in each st to end. Turn. Row 2: 2 ch, work 2 hdc in 1st st, 1 hdc in each st to end. Turn. Row 3: 2 ch, work a joined hdc over 1st 2 sts, 1 hdc in each st to last st, 2 hdc in last st. Turn. Row 4: 2 ch, work 2 hdc in 1st st, 1 hdc in each st to end. Turn. Row 5: 2 ch, work a joined hdc over 1st 2 sts, 1 hdc in each st to last st, 2 hdc in last st. Turn. Row 6: 2 ch, work 2 hdc in 1st st, 1 hdc in each st to end. Turn. Row 7: 2 ch, work a joined hdc over 1st 2 sts, 1 hdc in each st to last st, 2 hdc in last st. Turn. Rows 8-9: 2 ch, work a joined hdc over 1st 2 sts, 1 hdc in each st to last 2 sts, a joined hdc over last 2 sts. Turn. Row 10: 2 ch, work 2 joined hdc over 1st 4 sts, 1 hdc in each st to last 4 sts, 2 joined hdc over last 4 sts. Turn. Row 11: 2 ch, work 2 joined hdc over 1st 4 sts, 1 hdc in each st to last 4 sts, 2 joined hdc over last 4 sts. Fasten off. Other Side of Muzzle Join cotton to beginning ch where tail is, as shown and work in back of ch. Row 1: 2 ch, work 1 hdc in each st to end. Turn. Row 2: 2 ch, work 1 hdc in each st to last st, 2 hdc in last st. Turn. Row 3: 2 ch, work 2 hdc in 1st st, 1 hdc in each st to last 2 sts, a joined hdc over last 2 sts. Turn. Row 4: 2 ch, work 1 hdc in each st to last st, 2 hdc in last st. Turn. Row 5: 2 ch, work 2 hdc in 1st st, 1 hdc in each st to last 2 sts, a joined hdc over last 2 sts. Turn. Row 6: 2 ch, work 1 hdc in each st to last st, 2 hdc in last st. Turn. Row 7: 2 ch, work 2 hdc in 1st st, 1 hdc in each st to last 2 sts, a joined hdc over last 2 sts. Turn. Rows 8-9: 2 ch, work a joined hdc over 1st 2 sts, 1 hdc in each st to last 2 sts, a joined hdc over last 2 sts. Turn. Row 10: 2 ch, work 2 joined hdc over 1st 4 sts, 1 hdc in each st to last 4 sts, 2 joined hdc over last 4 sts. Turn. Row 11: 2 ch, work 2 joined hdc over 1st 4 sts, 1 hdc in each st to last 4 sts, 2 joined hdc over last 4 sts. Don’t fasten off. Neatening Row 1 ch, work 1 sc in each st around whole muzzle. Fasten off. Chin Make a magic loop. Row 1: 2 ch, 5 hdc in circle, pull circle tight but don’t join. Turn. Row 2: 2 ch, work 1 hdc in same place as ch, 2 hdc in each st to end. Turn. Rows 3-5: 2 ch, work 1 hdc in same place as ch, (1 hdc in next st and 2 hdc in following st) repeat to end. Turn. Row 6: 2 ch, work 1 hdc in same place as ch, (1 hdc in next st and 2 hdc in following st) repeat to end. Fasten off. Nose 9 ch. Row 1: Miss 2 ch, work 1 hdc in each st to end. Turn. Rows 2-3: 2 ch, work 1 joined hdc over 1st 2 sts, 1 hdc in each st to last 2 sts, 1 joined hdc over last 2 sts. Turn. Row 4: 2 ch, work a hdc cluster over all sts. Don’t fasten off. Neatening Row 1 ch, work 1 sc in each st around nose. Fasten off. Outer Eye (Make 2) Make a magic loop. Row 1: 3 ch, work 14 dc into circle and pull circle tight. Sl st into 3rd ch. Row 2: 1 ch, work 2 sc in each st around to end. Join with a sl st in ch. Fasten off. Inner Eye (Make 2) Make a magic loop. 1 ch, work 5 sc into circle. Pull circle tight and join with a sl st in ch. Fasten off. Top Face Marking 30 ch. Row 1: Miss 3 ch, work 1 dc in each st to end. Row 2: 1 ch, work 1 sc in each st right around both sides. Sl st in ch. Fasten off. Tongue Make a magic loop. Row 1: 2 ch, 3 hdc in circle. Pull circle tight but don’t join. Turn. Rows 2-3: 2 ch, 1 hdc in each st and in top of ch. Turn. Row 4: 2 ch, 1 hdc in each st to end. Turn. Row 5: 2 ch, work a hdc cluster over all sts. Don’t fasten off. Neatening Row 1 ch, work 1 sc in each st around, join with a sl st in ch. Fasten off. Tongue Marking 6 ch. Fasten off. Ears (Make 2) Make a magic loop. Row 1: 3 ch, 2 dc in circle. Pull circle tight but don’t join. Turn. Row 2: 3 ch, 2 dc in 1st st, 1 dc in next st, 1 dc in top of ch. Turn. Row 3: 3 ch, 1 dc in each st to last st, 2 dc in last st. Turn. Row 4: 3 ch, 2 dc in 1st st, 1 dc in each st to end. Turn. Row 5: 3 ch, 1 dc in each st to last st, 2 dc in last st. Turn. Row 6: 3 ch, 2 dc in 1st st, 1 dc in each st to end. Turn. Row 7: 3 ch, 1 dc in each st to last st, 2 dc in last st. Turn. Row 8: 3 ch, 2 dc in 1st st, 1 dc in each st to end. Turn. Row 9: 2 ch, joined hdc over 1st 2 sts, 1 dc in each st to end. Turn. Row 10: 3 ch, joined dc over 1st 2 sts, 1 dc in each st to last 2 sts, 1 hdc in each of last 2 sts. Turn. Row 11: 2 ch, joined hdc over 1st 2 sts, 1 dc in each st to end. Turn. Row 12: 3 ch, joined dc over 1st 2 sts, 1 dc in each st to last 2 sts, 1 hdc in each of last 2 sts. Turn. Row 13: 2 ch, joined hdc over 1st 2 sts, 1 dc in each st to end. Turn. Row 14: 3 ch, joined dc over 1st 2 sts, 1 dc in each st to last 2 sts, 1 hdc in each of last 2 sts. Turn. Row 15: 3 ch, work a dc cluster over all sts. Don’t fasten off. Neatening Row For the 2nd ear turn the ear over before working the neatening row, so the ears point in different directions. 2 ch, work hdc around the ear, working 2 hdc in a st when needed to keep the ear flat. Sl st in top of 2 ch. Fasten off.
Assembly
Weave in ends. Stitch inner eye to outer eye. Stitch nose onto muzzle. Embroider six dots to each side of muzzle. Sew the tongue marking onto the tongue. Attach the tongue to the chin stitching just along the top. Sew the face marking onto the head. Attach the chin to the head near the bottom of the head. Sew the muzzle onto the head over the top of the face marking and chin. Stitch the eyes to the head where shown. Attach the ears to the head. And there’s the finished crochet dog potholder. I hope that you’ve enjoyed making it.

Read NextLemon Cup Cozy
Your Recently Viewed Projects
Thanks for your comment. Don't forget to share!
Zeemer
Oct 21, 2018
Truly a labor of love if you make this Dog Potholder. Usually potholders are simply square and done in very simple stitches but this dog will require time and effort.
Cheryl Y
Oct 20, 2018
This Crochet Dog Potholder is so cute! I like that it is done in cotton yarn. The written pattern would be much easy to read if it was spaced out somewhat. It all runs together, making it a little hard to read. Other then that it sounds like it will turn out nicely. Love the little tongue. Thank you for sharing this free crochet potholder pattern.
JaneEK
Oct 08, 2018
Wow, this is just so clever! Weve had a few dogs that look like this Potholder Pup. The best thing about this project is that even a guy wouldnt shy away from having it in his kitchen. Id love to see this project in different dog breedstheyd make a cute collection to hang on the wall even if theyre never used as actual kitchen accessories.
Report Inappropriate Comment
Are you sure you would like to report this comment? It will be flagged for our moderators to take action.
Thank you for taking the time to improve the content on our site.