Little Lindy’s Aviator Hat
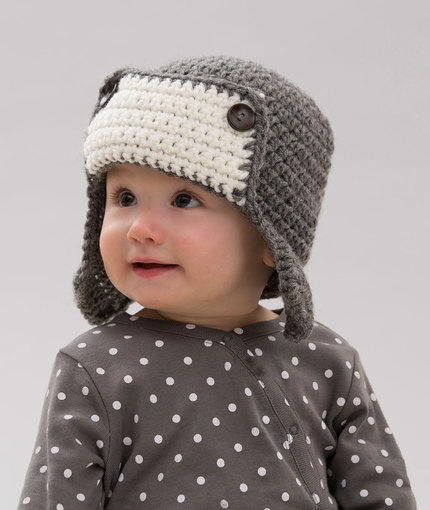
Your baby's next visit to the playground will become an adventure with the Little Lindy's Aviator Hat. Ear flaps and a stylish front combine to make this crochet baby hat a unique addition to your little one's wardrobe. This crochet hat will be the perfect accessory to wear any time the temperature dips even just a little. When the hat's not in use, you can easily fold it up and tuck it into a coat sleeve or diaper bag. You'll also love how easy this crochet pattern is to make, so consider making duplicates using yarn in different colors.
NotesNotes:
-Hat is worked in joined rounds beginning at center top of hat. Rounds are worked with right side facing at all times.
-Earflaps and forehead flap are worked back and forth in rows over a portion of the stitches in the last round of the hat.
-Directions are for size Baby. Changes for sizes Toddler and Child are in parentheses

Crochet HookI/9 or 5.5 mm hook
Yarn Weight(4) Medium Weight/Worsted Weight and Aran (16-20 stitches to 4 inches)
Crochet Gauge12 sts = 4” (10 cm); 9 rounds = 4” (10 cm) in half double crochet (hdc). CHECK YOUR GAUGE. Use any size hook to obtain the gauge.
Finished SizeCircumference: 16½ (18, 20)” (42 (45.5, 51) cm) Height: 6 (7, 8)” (15 (18, 20.5) cm), not including earflaps
Materials List
- RED HEART Super Saver yarn: 1 skein each 400 Grey Heather A, and 316 Soft White B
- Susan Bates Crochet Hook: 5.5mm [US I-9]
- Stitch markers
- Two ¾–1” (19–25 mm) buttons
- Yarn needle
Special Technique
Wrap yarn into a ring, ensuring that the tail falls behind the working yarn. Grip ring and tail between middle finger and thumb. Insert hook through center of ring, yarn over (with working yarn) and draw up a loop. Work stitches of first round in the ring. After the first round of stitches is worked, pull gently on tail to tighten ring.
Hat
-
With A, make an adjustable ring.
-
Round 1 (right side): Ch 1 (does not count as a st here and throughout), 10 hdc in ring; join with slip st in first hdc—10 hdc
-
Round 2: Ch 1, 2 hdc in each st around; join with slip st in first hdc—20 hdc
-
Round 3: Ch 1, [2 hdc in next st, hdc in next st] 10 times; join with slip st in first hdc— 30 hdc
-
Round 4: Ch 1, [2 hdc in next st, hdc in next 2 sts] 10 times; join with slip st in first hdc— 40 hdc
-
Round 5: Ch 1, [2 hdc in next st, hdc in next 3 sts] 10 times; join with slip st in first hdc— 50 hdc
Size Toddler Only: Ch 1, [2 hdc in next st, hdc in next 9 sts] 5 times; join with slip st in first hdc—55 hdc.
Size Child Only: Ch 1, [2 hdc in next st, hdc in next 4 sts] 10 times; join with slip st in first hdc—60 hdc. -
All Sizes
Next 8 (9, 11) Rounds: Ch 1, hdc in each st around; join with slip st in first hdc. Do not fasten off.
First Earflap
-
Row 1 (right side): Ch 2 (does not count as a st here and throughout), hdc in next 6 (8, 10) sts; leave remaining sts unworked—6 (8, 10) hdc
-
Rows 2–3 (4, 4): Ch 2, turn, hdc in each st across
-
Fasten off.
Forehead Flap
-
With right side facing, skip 3 unworked sts following last st of Row 1 of first earflap, draw up a loop of B in the next unworked st
-
Row 1 (right side): Ch 1, working in front loops only, sc in same st as joining, sc in next 15 (16, 17) sts; leave remaining sts unworked—16 (17, 18) sc.
-
Rows 2–8 (9, 10): Ch 1, turn, sc in each st across.
-
Fasten off.
Second Earflap
-
With right side facing, skip 3 unwokred sts following last st of Row 1 of forehead flap, draw up a loop of A in the next unworked sts
-
Rows 1–3 (4, 4): Work same as Rows 1–3 (4, 4) of first earflap.
-
Fasten off
Finishing
-
Border: With wrong side (inside) of hat facing, join A with sc in st at center back of hat (between the two earflaps), work sc all the way around the edges of hat, earflaps, and forehead flap, working 1 sc in each st, 2 sc in end of each hdc row (on sides of earflaps), and 1 sc in end of each sc row (on sides of forehead flap); join with slip st in first sc.
-
Fasten off.
-
Fold forehead flap up. Sewing through flap and hat, sew one button to each upper corner of flap to hold in place.
-
Weave in ends.
Abbreviations
- ch
- chain
- hdc
- half double crochet
- sc
- single crochet
- st(s)
- stitch(es)
- [ ]
- work directions in brackets the number of times specified
- *
- repeat whatever follows the * as indicated
Read NextAspen Dreams Slouchy Beanie
Your Recently Viewed Projects
JaneEK
Jun 18, 2018
My eldest granddaughter will earn her wings this summer and finally be a fully accredited pilot. She still collects teddy bears, so Im going to work up this hat for a special aviator bear Im making to celebrate her accomplishment. The original Red Heart pattern is available as a free download and can be found here http//www.redheart.com/free-patterns/little-lindys == -aviator-hat
AFC Editor Annalis a
Mar 10, 2017
I love the unique look of this hat! This is definitely one of the most adorable baby hats I've ever seen.
Report Inappropriate Comment
Are you sure you would like to report this comment? It will be flagged for our moderators to take action.
Thank you for taking the time to improve the content on our site.


