Wrapped in Crochet Holiday Tins
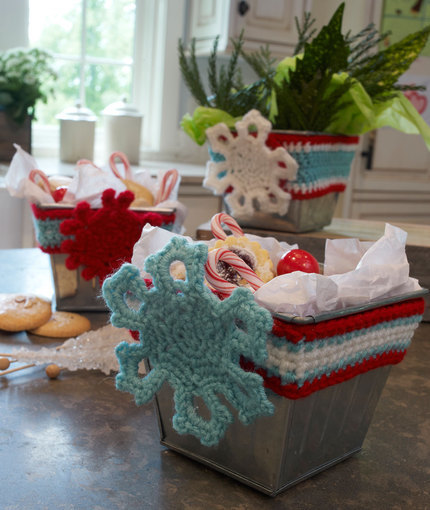
This Wrapped in Crochet Holiday Tins well be a cute little addition to your holiday decor this year. In fact, you don't even need to wrap tins with this fun crochet design. You can wrap potted plants, baskets, Christmas gifts, ornaments... You name it! This holiday is all about what you want you homemade Christmas decor to be. You have so much leeway with this crochet project, which is what makes it so fun. You have the opportunity to make some snowflakes and bands, but then use them to your liking. Happy Holidays and have fun!

Crochet HookG/6 or 4 mm hook
Yarn Weight(4) Medium Weight/Worsted Weight and Aran (16-20 stitches to 4 inches)
Crochet Gauge8 sts and 7 rows sc = 2 (5 cm). Snowflake Motif Version 1 = 4 (10 cm) in diameter, Snowflake Motif Version 2 = 3 (9 cm) in diameter.
Finished SizeFinished measurements Directions are given for Wrappers to fit a container with a 17 (44.5 cm) circumference. Wrappers can be adjusted based on size of gift container. Snowflake Motif 1 = 4 (10 cm) in diameter, Snowflake Motif 2 = 3 (9 cm) in diameter.
Materials List
- RED HEART Super Saver: 1 skein each of 505 Aruba Sea A, 316 Soft White B, 319 Cherry Red C.
- Susan Bates Crochet Hook: 4 mm [US G-6].
- Tapestry Needle
- 4 (10 cm) tin
- Stitch Marker
- Spray starch (optional)
Notes
This snowflake inspired gift wrapper is a fast & easy project designed to be used as both a decorative embellishment & a securing strap for food containers as well as jars.
Shown on 4 high x 3 wide (10 x 8.9 cm) decorative tins.
Snowflake motifs and strap band widths and color designs can be mixed and matched in a variety of ways. Furthermore, snowflakes can be made easily removable for use as a tree decoration by simply tying the motif onto the band, rather than sewing. Or leave the snowflake motif off entirely.
To get a custom fit, plan your design using the dimension of your container & a gauge swatch. Using a tape measure wrapped all the way around the box or jar to be used record the measurement and subtract 1 - 2 (2.5 x 5.1 cm) to allow for negative ease. This will insure a tight fit. Determine the number of starting chains required based upon your gauge swatch & number of sts per inch compared to the container dimensions. Straps are worked in rows & overlapped about (12.7 mm) (or more as needed) and seamed together. Add or subtract chain stitches and rows as necessary to fit own container. Band should fit tightly around the container to prevent slipping off.
Snowflake Motifs
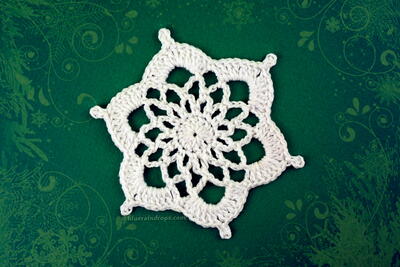
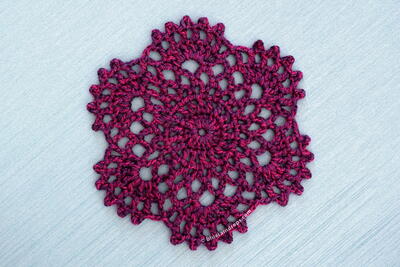
Snowflake Motifs 1 (looped spokes)
With desired color, make an adjustable ring.
Round 1: Ch 1, 6 sc in ring; join with a slip st in first sc6 sc.
Round 2: Ch 1, 2 sc in each st around; join with a slip st in first sc12 sc.
Round 3: Ch 1, sc in first st, 2 sc in next st, ch 2, *sc in next st, 2 sc in next st, ch 2; repeat from * around; join with a slip st in first sc6 ch-2 spaces.
Round 4: Ch 1, sc in first st, skip next st, sc in next st, (sc, ch 2, sc) in next ch-2 space, *skip next st, sc in each of next 2 sts, (sc, ch 2, sc) in next ch-2 space; repeat from * around; join with a slip st in first sc6 ch-2 spaces.
Round 5: Ch 1, sc in first st, sc in each of next 2 sts, (slip st, ch 7, slip st) in next ch-2 space, skip next sc, *sc in Round of next 3 sts, (slip st, ch 7, slip st) in next ch-2 space, skip next st, sc in each of next 3 sts; repeat from * around; join with a slip st in first sc6 ch-7 loops.
Round 6: Ch 1, slip st in first st, slip st in each of next 2 sts, ([3 sc, ch 3] 3 times, 3 sc) in next ch-7 space, *slip st in each of next 3 sc, ([3 sc, ch 3] 3 times, 3 sc) in next ch-7 space; repeat from * around; join with a slip st in first sc18 ch-3 spaces. Fasten off. Weave in ends.
Repeat using colors A, B and C for desired number of snowflake motifs.
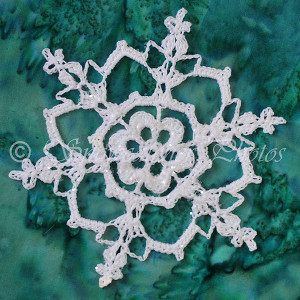
Snowflake Motif 2
Round 4: Ch 1, sc in first st, sc in next st, skip next st, (sc, ch 3, sc) in next ch-3 space, *skip st, sc in each of next 2 sts, (sc, ch 3, sc) in next ch-3 space; repeat from * around; join with a slip st in first sc6 ch-3 spaces.
Round 5: Ch 1, sc in first st, sc in each of next 2 sts, (slip st, [ch 4, hdc in 2nd ch from hook, hdc in Round of next 2 ch, slip st in ch-3 space] twice in next ch-3 space, *skip next st, sc in each of next next 3 sts, (slip st, [ch 4, hdc in 2nd ch from hook, hdc in Round of next 2 ch, slip st in ch-3 space] twice in next ch-3 space; repeat from * around; join with a slip st in first sc.
Fasten off. Weave in ends.
Snowflake Motif Finishing
Wet finished motif, flatten & straighten snowflake spokes, allow to dry. For extra flattening, cover damp motif with waxed paper and place heavy book on top until motif is dry.
Optional: Spray with laundry starch to stiffen as desired.
Wrapping Bands
Wrapper Band (wide version):
Directions are given for a container with a 17 (44.5 cm) in circumference. Adjust size to fit own container as indicated in the pattern notes. Specific color patterns of samples are found after pattern directions.
With Row 1 color, ch 62.
Row 1: Sc in 2nd ch from hook, sc in each ch across61 sc.
Row 2: Rotate to work across end of Row 1, ch 1, work 3 sc in row-end sc; rotate to work across opposite side of foundation ch, sc in each ch across, turn64 sc.
Row 3: Ch 2 (does not count as a st here and throughout), hdc in first 61 sts, working around the end, 2 sc in each of next 3 sts, hdc in each of last 61 sts, turn128 sts.
Row 4: With designated color, ch 2, hdc in each of first 61 sts, 2 hdc in each of next 2 sts, hdc in each of next 2 sts, 2 hdc in each of next 2 sts, hdc in each of last 61 sts132 hdc. Fasten off.
Row 5: With right side facing, join Row 5 color with a slip st in first st or Row 4, ch 1, sc in each of first 63 sts, [2 sc in next st, sc in next st] 3 times, sc in each of last 63 sts135 sc. Fasten off. Weave in ends.
Wide Wrapper Band Color Sequences: Wide Version A
Rows 1-3: A.
Row 4: B.
Row 5: C. Pictured with Snowflake Motif 1 in B.
Wide Version B
Row 1-4: B.
Row 5: A.
Middle Accent: Two strands of C held together as one. Pictured with Snowflake Motif 1 in C.
Wide Version C
Row 1-4: C.
Row 5: A.
Middle Accent: Two strands of B held together as one. Pictured with Snowflake Motif 2 in A.
Narrow Wrapper Band Direction are given for a container with a 17 (44.5 cm) in circumference. Adjust size to fit own container as indicated in the pattern notes. Specific color patterns of samples are found after pattern directions. With Row 1 color, ch 66.
Row 1: Sc in 2nd ch from hook, sc in each ch across65 sc.
Row 2: Rotate to work across end of Row 1, ch 1, work 3 sc in row-end sc; rotate to work across opposite side of foundation ch, sc in each ch across, turn68 sc.
Row 3: With designated color, ch 1, sc in each of first 65 sts, 2 sc in next st, sc in next st, 2 sc in next st, sc in each of last 65 sts, turn 135 sc. Fasten off. Join Row 4 color.
Row 4: With Row 4 color, ch 1, sc in each of first 66 sts, 2 sc in next st, sc in next st, 2 sc in next st, sc in each of last 66 sts. Fasten off. Weave in ends.
Narrow Version A
Row 1-2: B.
Row 3: A.
Row 4: C. Pictured with Snowflake Motif 1 in A.
Narrow Version B
Row 1-3: C.
Row 4: B. Pictured with Snowflake Motif 2 in B.
Narrow Version C
Row 1-3: A.
Row 4: C.
Middle Accent: Two strands of B held together as one. Pictured with Snowflake Motif 2 in C.
Finishing Middle Accent (optional) Thread 2 strands of designated yarn onto yarn needle, weave through the holes created by working both sides of the starting ch, in the center of the finished band. Secure the yarn ends neatly on wrong side of band. Wrap band tightly around gift container and pin ends, overlapping the rounded edge about (1.3 cm) or more as needed. Sew through both layers neatly around the curved end to prevent puckers when band is stretched. Likewise, turn the band inside out and sew the loose opposite end to the underneath side of the band. Weave in ends. With matching color yarn, sew snowflake over the overlapped portion of the band or thread yarn through the band and the centered snowflake and tie on with a bow for easy removal for use as tree decoration. Alternatively, leave motif off, weave yarn along center and tie in small yarn bow.
Read NextGorgeous Round Motif