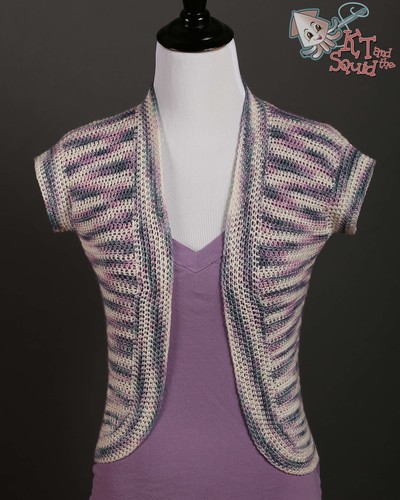
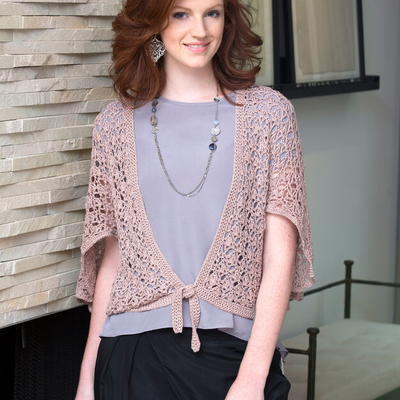
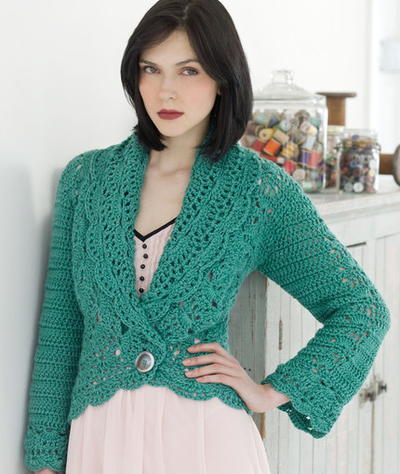
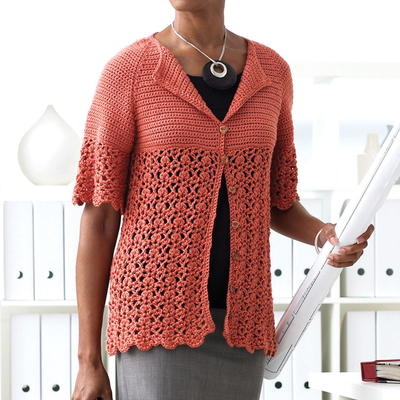
Lovely Lace Vest

Looking for some new free crochet patterns? The Lovely Lace Vest is a great item to add to your closet. Perfect for a summer work outfit, wear it over anything!

Crochet HookD/3 or 3.25 mm hook, F/5 or 3.75 mm hook, H/8 or 5 mm hook
Yarn Weight(4) Medium Weight/Worsted Weight and Aran (16-20 stitches to 4 inches)
Materials:
- AUNT LYDIA’S® “Iced Bamboo™, Size 3”: 9 (12, 15, 18) balls 3585 Lilac Ice.
- .25mm [US D-3], 3.75mm [US F-5], 5mm [US H-8]. Note: For size Small and Large, 3.25mm and 3.75mm hooks are needed. For sizes Medium and X-Large, 3.75mm and 5mm hooks are needed. Yarn needle, stitch markers (optional), 11 (11, 14, 14) buttons that match thread color (the buttons will not be visible).
- Assembly Diagram
GAUGE: 1 square = 4½ x 4½” (point to point) with 3.75mm [US F-5] hook for Small and Large sizes; 1 square = 5½ x 5½” (point to point) with 5mm [US H-8] hook for Mediium and X-Large sizes.
Steps:
VEST
Use 3.75mm [US F-5] hook for sizes Small and Large. Use 5mm [US H-8] hook for size Medium and X-Large.
First Full Motif
Round 1 (Right Side): Make an adjustable ring, work 12 sc in ring; join with slip st in first sc; do not turn.
Round 2: Ch 4 (counts as dc, ch 1), *dc in next sc, ch 1; repeat from * around; join with slip st in 3rd ch of beginning ch-4—12 dc and 12 ch-1 spaces.
Round 3: Ch 5 (counts as dc, ch 2), dc in same ch as joining (first V-st made), V-st in each remaining dc around; join with slip st in 3rd ch of beginning ch-5—12 V-sts.
Round 4: Ch 1, 5 sc in ch-2 space of each V-st around; join with slip st in first sc—60 sc.
Round 5: Slip st in next sc (2nd sc of first 5-sc group), ch 1, *sc in next sc (3rd sc of 5-sc group), ch 5, skip next 4 sc; repeat from * around; join with slip st in first sc—12 sc and 12 ch-5 spaces.
Round 6: Slip st in first ch-5 space, ch 3 (counts as dc), 4 dc in same ch-5 space (first shell made), ch 3, shell in same ch-5 space (corner made), sc in next ch-5 space, ch 6, sc in next ch-5 space, *(shell, ch 3, shell) in next ch-5 space (corner made), sc in next ch-5 space, ch 6, sc in next ch-5 space; repeat from * around; join with slip stin top of beginning ch-3—4 corners and a ch-6 space on each side (between corners). Fasten off.
Next Full Motif (make and join 22 (22, 41, 41)) Work same as first full motif through Round 5.
1. Before working Round 6, refer to assembly diagram for placement of current motif.
2. The current motif will be joined to one corner of each neighboring motif.
3. To join at a corner, a slip stitch is worked into the corner ch-3 space of the neighboring motif.
4. You may wish to place a stitch marker in the appropriate corner ch-3 space of each neighboring motif.
5. Hold motifs with Right Sides facing you and Wrong Sides of motifs together.
Round 6 (joining round): Slip st in first ch-5 space, ch 3 (counts as dc), (4 dc, ch 3, shell) in same ch-5 space (corner made), sc in next ch-5 space, ch 6, *(shell, ch 1, slip st in corner ch-3 space of neighboring motif, ch 1,shell) in next ch-5 space (corner made), sc in next ch-5 space, ch 6, sc in next ch-5 space; if there is another neighboring motif, repeat from * once more; **(shell, ch 3, shell) in next ch-5 space (corner made), sc in next ch-5 space, ch 6, sc in next ch-5 space; repeat from **around; join with slip st in top of beginning ch-3. Fasten off.
Half Motif (make and join 3 (3, 4, 4))
Round 1 (Right Side): Make an adjustable ring, work 6 sc in ring; join with slip st in first sc; do not turn.
Row 2 (Right Side): Ch 4 (counts as dc, ch 1), *dc in next sc, ch 1; repeat from * around to last sc, dc in last sc, TURN—6 dc and 5 ch-1 spaces.
Row 3 (Wrong Side): Ch 5 (counts as dc, ch 2), dc in firs dc (first V-st made), V-st in each remaining dc across, V-st in 3rd ch of turning ch-4, turn—6 V-sts.
Row 4: Ch 1, 5 sc in ch-2 space of each V-st across, turn—30 sc.
Row 5: Ch 6 (counts as dc, ch 3), skip first 2 sc, sc in next sc, *ch 5, skip next 4 sc, sc in next sc; repeat from *across to last 2 sc, ch 3, skip next sc, dc in last sc, turn—7 ch-spaces.
Row 6 (joining row): Ch 3, if there is a neighboring motif, slip st in ch-3 space of neighboring motif, 5 dc in first ch-3 space, sc in next ch-5 space, ch 6, sc in next ch-5 space, (shell, ch 1, if there is a neighboring motif, slip st in ch-3 space of neighboring motif, ch 1, shell) in next ch-5 space (corner made), sc in next ch-5 space, ch 6, sc in next ch-5 space, 5 dc in last ch-3 space, if there is a neighboring motif, slip st in ch-3 space of neighboring motif, dc in 3rd ch of turning ch. Fasten off. Filler Motifs (make and join 14 (14, 30, 30))
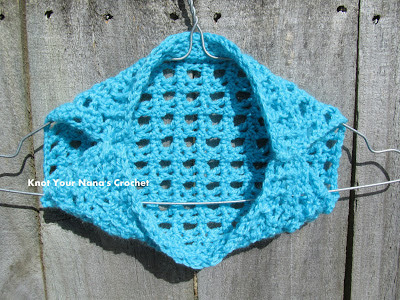
Filler Motifs (make and join 14 (14, 30, 30))
Note: Filler motifs are worked into the 4 ch-6 spaces around the large opening between motifs. Refer to assembly diagram for placement of filler motifs. Filler motifs can be made and joined in any order.
Round 1 (Right Side): Join thread in any ch-6 space, ch 3, (4 dc, ch 3, shell) in same ch-6 space, [(shell, ch 3, shell) in ch-6 space of next motif] 3 times; join with slip st in top of beginning ch-3; do not turn—8 shells.
Round 2: Slip st in each st to first ch-3 space, ch 1, sc in each ch-3 space around; join with slip st in first sc. Fasten off.
COLLAR
Work collar in same manner as vest, following collar
assembly diagram for desired size.
FINISHING
Armhole Edging
Use 3.25mm [US D-3] hook for sizes Small and Large. Use 3.75 [US F-5] hook for size Medium and X-Large.
Round 1 (Right Side): With Right Side facing, join thread in corner ch-3 space of full motif at lower edge of armhole, to work up side edge of armhole, ch 1, sc in same ch-3 space as join, *ch 3, skip next 5 dc, (shell, ch 3, shell) in next ch-6 space, ch 2, (shell, ch 3, shell) in next ch-6 space (of next motif), ch 3, skip next 5 dc, sc in next ch-3 space; repeat from * around to half motif; working in ends of rows across half motif, ch 4, skip next row, sc in end of next row, ch 4, skip next 2 rows, sc in end of next row, ch 4, skip center of motif, sc in end of next row, ch 4, skip next 2 rows, sc in end of next row, ch 4, skip last row; join with slip st in first sc.
Round 2: Ch 1, sc in same sc as join, 3 sc in next ch-3 space, *sc in next 5 dc, sc in next ch-3 space, ch 3, sc in next ch-3 space (skipping the 5 dc, ch 2, 5 dc), sc in next 5 dc, 3 sc in next ch-3 space, sc in next sc, 3 sc in next ch-3 space; repeat from * around to ch-4 spaces across underarm, 4 sc in each ch-4 space to end of round; join with slip st in first sc.
Round 3: Ch 1, sc in each sc around, work 3 sc in each ch-3 space; join with slip st in first sc. Fasten off. Repeat around 2nd armhole.
Collar Edging
With Right Side facing, join thread in lower corner, to work up front edge.
Round 1: With Right Side facing, join thread in a ch-3 space near center back of piece. Work in same manner as Round 1 of armhole edging, working all the way around all edges of collar, and working 3 sc in each outer corner ch-3 space (instead of a single sc).
Round 2: Working in back loops only, work in same manner as Round 2 of armhole edging, work 3 sc in center sc of each 3-sc corner. Place a stitch marker across from the point of each motif along both front edges, and 3 (3, 4, 4) stitch markers evenly spaced across back neck edge.
Round 3 (buttonhole row): Ch 1, working in back loops only, sc in each sc to first marker, *ch 2 (for buttonhole), sc in each sc to next marker; repeat from * around, working 3 sc in each ch-3 space and 3 sc in center sc of each 3-sc corner; join with slip st in first sc.
Round 4: Ch 1, sc in each sc around, working 2 sc in each ch-2 buttonhole. Fasten off.
Vest Edging: Work same as collar edging, omitting buttonholes.
Tie (optional): Work a chain about 24” long. Slip st in 2nd ch from hook and in each ch across. Fasten off.
Weave in ends. With Wrong Side facing, sew buttons to vest in same locations as buttonholes on collar. Thread tie through spaces of front edges at bust height. Tie a bow to close vest. To wear vest with collar, place collar on top of vest, matching motifs, fold edge of collar under edge of vest and button in place.
Your Recently Viewed Projects
Thanks for your comment. Don't forget to share!
mccandlessquilts
Feb 11, 2018
What happened to the save button? I have been through a dozen patterns, no save button?
AFC Editor Julia
Feb 12, 2018
Hi mccandlessquilts, The save button is still there! It's now below the pattern text - it's a grey button with a + sign (and the word Save), located near the other social sharing buttons. Thanks! Julia, AFC editor
Hippie Chick
Apr 14, 2017
I really love the look of this vest. That shade of lavender is beautiful. I am making a pdf of it now so that I can make it as soon as I can decide on a color and get the yarn. Is there a picture of how the vest looks from the front? Just curious to get a quick peek at that before I make it. Also, are the sizes standard American sizes?
Hippie Chick
Apr 14, 2017
After I posted my comment I saw that there is a picture of the front of the vest included in the diagram assembly PDF
Linda
Feb 16, 2017
Crocheted in squares! Lovely Lacey cardigan with collar. Which I believe is a plus for this project.
andrealuxton 00859 53
Jan 26, 2017
Oh this is so beautifully feminine and classy. This is my very next "bigger" project. This could even be the bodice of dresses in a wedding party, the brides and the bridesmaids. I think it would look gorgeous worked up in antique cream. Just imagine it forming the bodices on the dresses of little girl bridesmaids?
IncurableRomantici st
Mar 14, 2015
I think it's pretty bad to make the diagram unsavable. I probably won't make the project, because the pattern won't download as a PDF, and the diagram isn't in doc format. Thanks a lot.
Hippie Chick
Apr 14, 2017
Did you try printing it as a PDF instead of saving it as a PDF? Just asking because I had no problem at all with making a PDF of this pattern.
dora70
Apr 07, 2013
love it! love it! love it! just beautiful. like to see more patterns in extra sizes--please!
j4jong 5518314
Mar 04, 2013
Hi...this is a beautiful pattern, but I'm still new with crocheting so I'm still poor in understanding written patterns...do you have any video for this? I would really love to learn how to do this! Thanks!
ptpthompson36 8751 469
Mar 02, 2013
This is an ideal pattern - I have a friend who likes this type of style her birthday is coming in in APRIL nowI know what to make and give to her I know she will appreciate it
CreativityGoddess
Jul 18, 2011
Hi all- We have just updated the pattern to include a link to the assembly diagram. Please click on the link in the Materials List and it will allow you to download the diagram as a PDF. -The editors of AllFreeCrochet
fraugerm
Jul 18, 2011
Yay! I found the assembly diagrams (and also front views) at the Coats website by searching for the pattern on Ravelry. Here is the link: http://www.coatsandclark.com/Crafts/Crochet/Projects/Accessories/LC2536+Lovely+Lace+Vest.htm Now to try my first advanced project!
Report Inappropriate Comment
Are you sure you would like to report this comment? It will be flagged for our moderators to take action.
Thank you for taking the time to improve the content on our site.