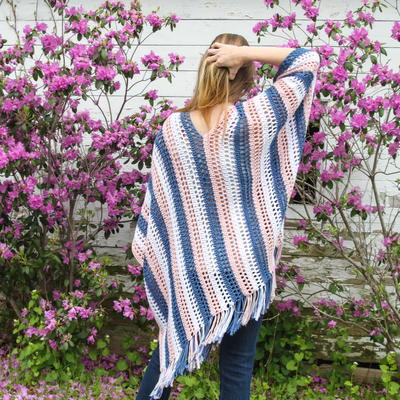
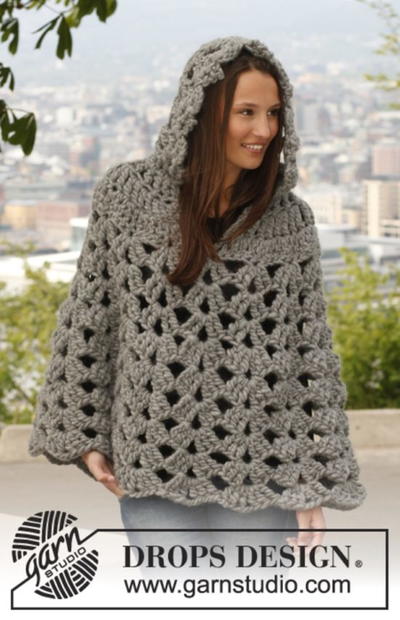
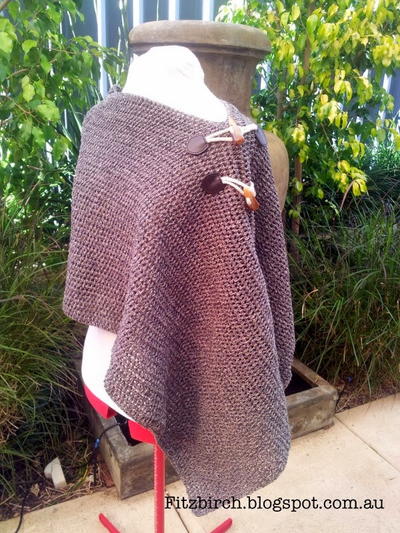
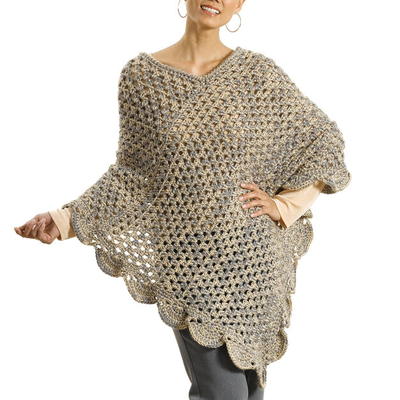
Oversized Lean Poncho

Keep the warmth going all year long with this Oversized Lean Poncho crochet pattern. With a crochet wearable that is good for any season, there is no reason not to work up this poncho pattern. The length gives you a lean and flattering style to complement any look and complete your wardrobe. There are even different sizes if you want it to fit just a little bit shorter or longer. Ponchos are a great way to add just a little bit of both warmth and style when you're on the go, at work, or curling up on the couch at home.
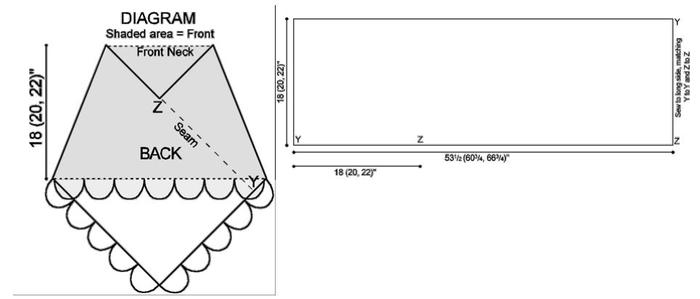
NotesPoncho is worked from the lower edge to upper edge as a large rectangle; the Scalloped edging is worked after Poncho is sewn together. There is actually no Back or Front to this Poncho – it may be worn with the pointed end in Back or in Front for 2 entirely different looks. References to Back and Front are for clarification of the instructions only.

Crochet HookK/10.5 or 6.5 mm hook
Yarn Weight(4) Medium Weight/Worsted Weight and Aran (16-20 stitches to 4 inches)
Crochet GaugeUsing hook, in St patt: 10 sts and 6 rows = 4"/10cm; Scallops measure approx 4" wide x 3" deep
Finished SizeFinished Length: XS/S 18 in, M 20 in, L/XL 22 in Finished Lower Edge: XS/S 72 in, M 80 in. L/XL 88 in
Materials List
- Caron Simply Soft yarn in 2 colors: 3 skeins each; use 1 strand of each held together throughout
- Crochet Hook: 6.5mm [K/10.5 US]
- Tapestry Needle (tn)
- Stitch Markers (optional)
- Diagram
Pattern
Special Stitches
-
2 x 1 Cluster Stitch: (multiple of 3 sts +2; 2-row repeat)
Row 1: Ch 4 (counts as dc, ch 1), * skip next 2 dc, work 2 dc in next ch-1 space (cluster made), ch 1; repeat from* across, end dc in top of beginning ch, turn.
Row 2: Ch 3 (counts as dc), dc in ch-1 space, * ch 1, skip next 2 dc, work 2 dc in next ch-1 space; repeat from *across, turn. -
Fan Pattern (multiple of 10 sts; 3-rows)
Foundation Row: Beginning approx 2" from center Back point (corner of short edge and long edge which hangs down), join yarn with a sl st, ch 1, work 5 sc to corner, ch 1, then working into corner st a second time, sc around, join with a sl st to beginning ch; work 133 (150, 166) sc along long edge of original piece, work 26 (29, 33) sts total along short end—160 (180, 200) sts, with the ch-1 at corner being the center of the first fan.
Row 1: Ch 1, skip first sc, sc in next 3 sc, ch 1, skip 1 sc, work 5 dc in corner ch-1 (fan made), * ch 1, skip 1 sc,sc in next 7 sc, ch 1, skip 1 sc, work 5 dc in next sc (fan); repeat from * around, end ch 1, skip 1 sc, sc to beginning of rnd, join with sl st to beginning ch.
Row 2: Ch 1, skip first sc, sc in next sc, * ch 2, skip next [2 sc, ch-1], work 2 dc in each dc of fan, ch 2, skip next[ch-1, 2 sc], sc in next 3 sc; repeat from * around, end last repeat ch 2, skip next [ch-1, 2 sc], join with a sl st to beginning ch.
Row 3: Ch 3, skip next [sc, ch-2], * in fan, work [* 2 dc in next dc, dc in next dc; repeat from * around fan], ch 3, skip next [ch-2, sc], sc in next sc, ch 3, skip next [sc, ch-2]; repeat from * around, end last repeat ch 3, sl st in beginning ch.
Fasten off.
Poncho Pattern
Note: Pattern is worked using one strand of each skein held together throughout.
-
With two strands of yarn held together, loosely ch 136 (154, 169).
-
Foundation Row: Beginning in 4th ch from hook, dc in next ch, *ch 1, skip 1 ch, dc in next 2 ch; repeat from *across, end dc in last 2 ch—134 (152, 167) sts, turn.
-
Begin 2 x 1 Cluster Stitch; work even until piece measures 18 (20, 22)" from the beginning. Fasten off.
Finishing
-
Referring to schematic and Diagram, measure along lower edge 18 (20, 22)"; place a marker (pm). Fold piece,matching points Y to Y and Z to Z; neatly sew seam.
-
Neck Edging: Row 1: Beginning at lower edge of V-neck (center Back), join yarn, ch 1, work 1 row sc evenly around neck edge, join with a sl st to beginning ch. DO NOT TURN.
-
Row 2: Working from left to right, work 1 row rev sc evenly around neck. Fasten off.
-
Lower Edging: Work Foundation Row of Fan patt, working 160 (180, 200) sc around entire lower edge. Work Rows 1 – 3 of Fan patt once.
-
Fasten off. Weave in ends.
Up Next:
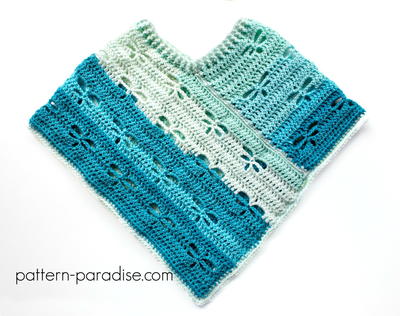
65+ Crochet Poncho Patterns
Read NextBoho Poncho
Your Recently Viewed Projects
Thanks for your comment. Don't forget to share!
ktautges 4352986
Jan 08, 2018
I am making this but I want to make the border in a different yarn. How much yarn should I allow just for the edging?
ktautges 4352986
Jan 10, 2018
Okay, no one answered my question so I used two balls (so for the two strands) and had a little less than half a ball of each left over. Love the way the poncho looks!
mflutter1921 84831 53
Sep 30, 2017
Correction on my question I started this pattern and the "Poncho Pattern foundation row has a missing asktrick . Could someone tell me where it goes? Thanking you in advance.
mflutter1921 84831 53
Sep 29, 2017
I started this pattern and the "Poncho Pattern" foundation Row has an missing. Could you tell me where it goes?
Gracie
Jun 21, 2017
The long length and drape of this poncho gives it the pretty, lean look. It looks so cute over pants. Personally, I think I would like it best without the scalloped edges, which makes this even faster and easier to make.
Cheryl Y
Mar 31, 2017
I love this Oversized Lean Poncho. I'm not a big fan of using 2 strands of yarn, but I'll do it. This pattern is so nice looking and the written directions are easy enough to follow as well. I like that there are directions for 3 different sizes and that it long enough to keep you warm. So saving this one and will be making it. Thank you so much for sharing this free crochet pattern.
Stephanie Hantz
Mar 31, 2017
This pattern looks beautiful. I especially like the contrasting pattern sides, even though I know it is all one piece. I just think it looks neat. Adding the edging makes it look a little dressier and I like how it is added after the sides are put together. A truly wonderful piece.
Hippie Chick
Mar 31, 2017
This looks very similar to the boho poncho but is an oversized version. This gives a new look on the classic poncho. The botton edging really sets this one apart from the others that have a fringe bottom. I have never seen a poncho made with a scalloped bottom like this. It looks awesome. Thanks for sharing.
Lynn K
Mar 30, 2017
Oooh, I want to make this poncho NOW! I love the slim fit, the colour and the stitch design. Everything, in fact, except the scalloped edging but that is just my taste and is going to be really easy to leave out. And it is rated Beginner so is going to be lovely and easy to crochet while spending time with the family or watching my favorite TV show, lol!
Zeemer
Feb 21, 2017
This Oversized Lean Poncho looks so elegant, dressy, and chic. Its large size adds to its appeal and class. This can be crafted in a bold or earth color or you can use a type of multicolored yarn of your choice. The scallop edging is the the stitch that enhanced the look of this laid back poncho which provided the drama and appeal to this piece of clothing.
maddockfamily 8188 802
Jan 18, 2017
OK...they should have clearly said that you use two strands of yarn together, and there is one punctuation missing in the foundation row (and before the first ch1). But once you get over these oversights, this is a beautiful and fairly easy pattern! I did the neck and border in one of the two colors I used for the body, and it gave nice contrast. I like that you can wear it either way (with the point in the front or back).
fourthstylist 4373 974
Dec 27, 2016
In the foundation row, it says to repeat from across. There is no . Very badly written.
mrsgthep
Sep 30, 2016
Is there a knit pattern of this poncho available to print in addition to this crocheted version?
AFC Editor Julia
Oct 03, 2016
Hi mrsgthep, You can check out our friends at AllFreeKnitting.com for a great variety of free knit patterns for you to work through! Thanks, Julia, editor for AllFreeCrochet
boulotte2005aok 50 24697
Mar 13, 2016
on http//www.yarnspirations.com/patterns/the-gift-pon == cho.html you can download the pattern as pdf. there she says 'use 1 strand of each held together throughout' 1 star for the look. i did not make the poncho yet.
janeensmith48 0044 832
Dec 10, 2015
glad I read these comments before starting the project. Since Caron didi not see fit to clarify, I will not be doing the patternn
Editor AllFreeCroc het
Dec 16, 2015
Please contact Caron through the Yarnspirations website for the answer. http://www.yarnspirations.com/contacts/ Happy hooking! - Editor of AllFreeCrochet
djhixson
Nov 08, 2015
I was wondering why you needed 2 different colors also. It does not say to hold 2 strands together, or anything about changing colors.Due to these instructions being left out or a mistake being made to purchase 2 different coors, I am rating this with only 1 star.
Editor AllFreeCroc het
Dec 16, 2015
Please contact Caron through the Yarnspirations website for the answer. http://www.yarnspirations.com/contacts/ Happy hooking! - Editor of AllFreeCrochet
galavon 4767069
Jun 24, 2015
I see it says to get two colors, but does not say it you are working with two strands at once. What did you guys do?
Editor AllFreeCroc het
Dec 16, 2015
Please contact Caron through the Yarnspirations website for the answer. http://www.yarnspirations.com/contacts/ Happy hooking! - Editor of AllFreeCrochet
RaShelle
Apr 30, 2015
Gorgeous poncho. Wondering whether to crochet with two colors together or change colors somewhere?
Editor AllFreeCroc het
Dec 16, 2015
Please contact Caron through the Yarnspirations website for the answer. http://www.yarnspirations.com/contacts/ Happy hooking! - Editor of AllFreeCrochet
mjorrie 9436241
Jan 23, 2015
I tried the pattern as called for, but when I tried to put it together, it just didn't work. So, I made two rectangles instead of one and put them together as called for in another pattern. On the edging, I worked the stitches in the multiples (I think it was 20). It turned out beautifully with points in both the front and the back.
firan952000 215527 0
Feb 13, 2015
I also tried to put the pattern together and it did look like the diagram. what pattern did mjorrie use to put two rectangles together?
mjorrie 9436241
Mar 09, 2015
I used the pattern as called for. Where it had you make one rectangle, I just made two of them and it worked out great.
kaw0218 0477762
Dec 16, 2015
Did you make the two rectangles the same size as the one called for in the original pattern?
rhawkins6 0061649
Jun 27, 2017
me too! can not figure out how to put this together, ticked off I wasted time and yarn making this rectangle!
gwen37 0851202
Jan 05, 2015
Is Caron going to help us? Clarification would be appreciated. Thank you.
JennyBee1
Dec 15, 2014
Hi everyone, Thanks for your comments. I am sorry to hear some of you have had questions about this particular crochet pattern. We contacted Caron, and will be sure to update this page with any pattern updates. Thanks! --editors of AllFreeCrochet
Maggie02151
Jan 22, 2018
Have you had any response from Caron for all the questions that have been asked?
misubradley 074124 1
Dec 13, 2014
Pattern calls for 2 colors, but doesn't clarify why. Would appreciate a response.
gwen37 0851202
Dec 10, 2014
would like to make it, however a clarification on instructions, and amount of yarn needed would be helpful. ????????
gwen37 0851202
Dec 08, 2014
I have been crocheting for over 60 yrs. just as confused as the rest. the instructions are scrambled, work 2 strands together? How can 3 skeins make this size poncho? Please respond.
SandraDian
Dec 06, 2014
I would love to make this, but where is the diagram? I have been crocheting for many years but I find these instructions confusing.
gwen37 0851202
Dec 08, 2014
look under list of materials. click on Diagram. I found it, unable to print however.
tinkerbell451
Feb 11, 2015
I have only be crocheting a couple of years and thought that it was just me that couldnt read this pattern, I just dont follow it at all.
Domenica
Dec 06, 2014
I like the looks of this, but can't even figure out the instructions. Wouldn't you start with the chain ? I don't know what 'Using hook, in St patt' means.
Domenica
Dec 06, 2014
I like the looks of this, but I can't even figure out the instructions. Wouldn't you start with the chain ? This is marked "beginner. I don't even know what Using hook, in St patt means.
tinadonnadio 65971 72
Nov 24, 2014
I was reading this pattern and it calls for 2 colors of yarn. But when i look at the pattern it never says to change colors. Do you work it with both yarns at the same time?
Report Inappropriate Comment
Are you sure you would like to report this comment? It will be flagged for our moderators to take action.
Thank you for taking the time to improve the content on our site.