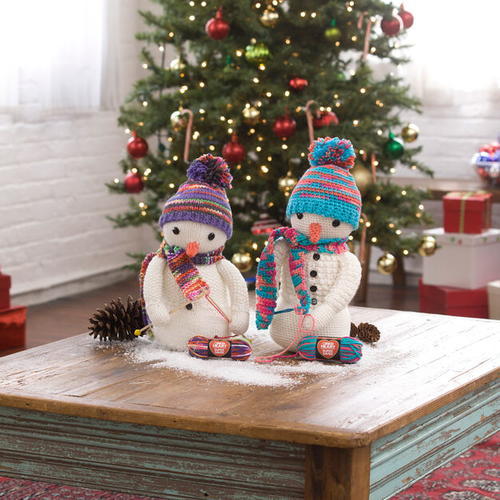
Crazy Cute Crocheting Snowman

This Crazy Cute Crocheting Snowman will have you wishing for a snowstorm. This sweet crochet snowman has a miniature skein of Red Heart yarn, as well as a tiny crochet hook, so the two of you can work up a pattern together. Talk about cuteness overload! You can display this cleverly designed snowman all winter long. With his winter hat and scarf, this little guy is certainly ready for blustery weather. Make this crochet snowman for yourself or give it to a friend who loves to decorate for the holidays. You can't go wrong when it comes to this jolly pattern.

Crochet HookG/6 or 4 mm hook, H/8 or 5 mm hook
Yarn Weight(4) Medium Weight/Worsted Weight and Aran (16-20 stitches to 4 inches)
Crochet Gauge20 sts = 4 (10 cm); 22 rows = 4 (10 cm) in single crochet with smaller hook. CHECK YOUR GAUGE. Use any size hook to obtain the gauge.
Materials
- RED HEART® Super Saver®: 1 skein each of
- 316 Soft White A
- 3942 Lagoon B
- 512 Turqua C
- 726 Coral D
- Susan Bates® Crochet Hooks: 4mm [US G-6], 5mm [US H-8] (for scarf and hat only)
- Stitch marker
- Four ½” (13mm) buttons (for sweater front)
- Two ¾” (19mm) black faceted sew on rounds (for eyes)
- Sewing needle and black sewing thread
- Yarn needle
- For stuffing: Polyester stuffing, knee high stocking, pellet stuffing (or other weighted stuffing)
- For snowman to hold: Susan Bates® crochet hook in any medium size (4mm [US G-6], 5mm [US H-8], 5.5mm [US I-9])
- For mini skein: Copy of mini Red Heart label, craft scissors and cellophane tape
Snowman measures about 13½” (34.5 cm) tall, not including pompom hat.
Special Stitches
psc (picot single crochet) = Insert hook in next st and draw up a loop (2 loops on hook), [yarn over and draw through 1 loop] twice (to make 2 ch), yarn over and draw through both loops on hook.
sc2tog = [Draw up a loop in next st] twice, yarn over and draw through all 3 loops on hook.
Special Technique
Adjustable-ring = Wrap yarn into a ring, ensuring that the tail falls behind the working yarn. Grip ring and tail between middle finger and thumb. Insert hook through center of ring, yarn over (with working yarn) and draw up a loop. Work stitches of first round in the ring. After the
first round of stitches is worked, pull gently on tail to tighten ring.
Notes
- Snowman is worked in one piece beginning at top of head.
- Head and bottom section are worked in rounds of single crochet. The mid-section, which resembles a cardigan sweater, is worked back and forth in rows of a pattern stitch, known as Granule stitch.
- Arms are worked separately and sewn to snowman.
- Snowman is stuffed using a knee-high stocking to maintain the roundness of the snowman sections.
- Gauge is not critical for this project. Work tightly so the pieces are firm and the stuffing does not show between stitches.
- To change color, work last stitch of old color to last yarn over. Yarn over with new color and draw through all loops on hook to complete stitch. Proceed with new color.
Snowman
Head
With smaller hook and A, make an adjustable ring.
Round 1 (right side): Ch 1, 6 sc in ring—6 sc. Do not join, work in continuous rounds (spiral). Pull gently on tail to tighten ring. Place a marker for beginning of round. Move marker up as each round is completed.
Round 2: Work 2 sc in each sc around—12 sc.
Round 3: [Sc in next sc, 2 sc in next sc] 6 times—18 sc.
Round 4: [Sc in next 2 sc, 2 sc in next sc] 6 times—24 sc.
Round 5: [Sc in next 3 sc, 2 sc in next sc] 6 times—30 sc.
Round 6: [Sc in next 4 sc, 2 sc in next sc] 6 times—36 sc.
Round 7: [Sc in next 5 sc, 2 sc in next sc] 6 times—42 sc.
Round 8: [Sc in next 6 sc, 2 sc in next sc] 6 times—48 sc.
Round 9: [Sc in next 7 sc, 2 sc in next sc] 6 times—54 sc.
Round 10: [Sc in next 8 sc, 2 sc in next sc] 6 times—60 sc.
Round 11: [Sc in next 9 sc, 2 sc in next sc] 6 times—66 sc.
Rounds 12-28: Sc in each sc around.
Round 29: [Sc in next 9 sc, sc2tog] 6 times—60 sc.
Round 30: [Sc in next 8 sc, sc2tog] 6 times—54 sc.
Round 31: [Sc in next 7 sc, sc2tog] 6 times—48 sc.
Round 32: [Sc in next 2 sc, sc2tog] 12 times—36 sc.
Rounds 33 and 34: Sc in each sc around.
Round 35: [Sc in next sc, 2 sc in next sc] 18 times—54 sc.
Stuff Head
Firmly stuff the toe of the knee-high stocking with polyester stuffing. Shape the toe it into a tight round ball. Insert ball into head to check for desired fullness. Adjust amount of stuffing, as needed. When satisfied with fullness and firmness, tie stocking in a knot close to the top of the ball. Insert ball into head. Leave the remaining part of the stocking unstuffed for mid-section and bottom section.
Mid-Section (Cardigan Sweater)
Note: Work now proceeds back and forth in rows.
Row 36 (wrong side): Ch 1, turn, sc in next sc, [psc in next sc, sc in next sc] 26 times, sc in last sc—54 sts.
Row 37: Ch 1, turn, sc in each sc across, pushing chains of psc to right side.
Row 38: Ch 1, turn, sc in next sc, [psc in next sc, sc in next sc] 26 times, sc in last sc.
Rows 39-54: Repeat last 2 rows 8 times.
Button Band (wrong side): Ch 2, do not turn, working in ends of rows 36-54, work 20 hdc evenly spaced along front edge of sweater. Fasten off, leaving a long tail for sewing front of sweater closed. Do not sew sweater closed until snowman is complete. You may use the opening to add additional stuffing as the bottom section is worked and completed.
Note: Work now resumes in rounds.
Round 55 (right side): With right side facing, leaving a long beginning tail to weave in later, join A with slip st in last sc of Row 54 immediately following the button band; working in back loops only, ch 1, sc in same sc as joining slip st, sc in each sc around (do not work in edge of button
band), pushing chains of psc to right side; join with slip st in first sc—54 sc.
Stuff Mid-Section
Stuff next section of knee-high stocking in same manner as for head and insert into mid-section. Leave the remaining part of the stocking unstuffed for bottom section.
Bottom Section
Round 56: [Sc in next 8 sc, 2 sc in next sc] 6 times—60 sc.
Round 57: [Sc in next 4 sc, 2 sc in next sc] 12 times—72 sc.
Rounds 58-72: Sc in each sc around.
Round 73: [Sc in next 10 sc, sc2tog] 6 times—66 sc.
Round 74: [Sc in next 9 sc, sc2tog] 6 times—60 sc.
Round 75: [Sc in next 8 sc, sc2tog] 6 times—54 sc.
Round 76: [Sc in next 7 sc, sc2tog] 6 times—48 sc.
Round 77: [Sc in next 6 sc, sc2tog] 6 times—42 sc.
Stuff Bottom Section
Fill last section of knee-high stocking with about 1 cup of pellets (weighted stuffing) and tie a secure knot in the end of the stocking. Plump out the snowman, around this weighted area using polyester stuffing as needed. Stuffing can be added through front sweater opening or through the bottom of the piece. Continue adding stuffing, as needed, while working the remaining rounds of this section.
Round 78: [Sc in next 5 sc, sc2tog] 6 times—36 sc.
Round 79: [Sc in next 4 sc, sc2tog] 6 times—30 sc.
Round 80: [Sc in next 3 sc, sc2tog] 6 times—24 sc.
Round 81: [Sc in next 2 sc, sc2tog] 6 times—18 sc.
Round 82: [Sc in next sc, sc2tog] 6 times—12 sc.
Round 83: [Sc2tog] 6 times—6 sc.
Fasten off, leaving a long tail. Finish stuffing snowman, then weave tail through stitches of last round and pull to close opening. Knot securely, weave in and trim tail. Use yarn tail attached to button band to sew front of sweater closed.
Arms (make 2)
With smaller hook and A, make anadjustable ring.
Round 1 (right side): Ch 1, 6 sc in ring—6 sc. Do not join, work in continuous rounds (spiral). Pull gently on tail to tighten ring. Place a marker for beginning of round. Move marker up as each round is completed.
Round 2: Work 2 sc in each sc around—12 sc.
Round 3: [Sc in next sc, 2 sc in next sc] 6 times—18 sc.
Rounds 4-10: Sc in each sc around.
Round 11: [Sc in next 7 sc, sc2tog] twice—16 sc.
Round 12: Working in back loops only, sc in each sc around.
Round 13: [Sc in next 7 sc, 2 sc in next sc] twice—18 sc.
Note: Work now proceeds back and forth in rows.
Row 14 (wrong side): Ch 1, turn, sc in next sc, [psc in next sc, sc in next sc] 8 times, sc in last sc.
Row 15: Ch 1, turn, sc in each sc across, pushing chains of psc to right side—18 sts.
Rows 16-35: Repeat last 2 rows 10 times.
Fasten off, leaving a long tail. Use tail to sew edges of Rows 14-35 together, stuffing arm moderately as you sew.

Looking for even more cute winter crochet patterns? Check out our collection of 100 Free Crochet Patterns for Winter: Free Crochet Hat Patterns, Scarves, Blankets and More!

Nose
With smaller hook and D, ch 8. Taking care not to twist ch, join with slip st in first ch to form a ring.
Round 1 (right side): Ch 1, sc in same ch as joining and in each ch around—8 sc. Do not join, work in continuous rounds (spiral). Place a marker for beginning of round. Move marker up as each round is completed.
Rounds 2 and 3: Sc in each sc around.
Round 4: [Sc2tog, sc in next 2 sc] twice—6 sc.
Round 5: Sc in each sc around.
Round 6: [Sc2tog] 5 times—3 sc.
Fasten off, leaving a long tail. Weave tail through stitches of last round and pull to close opening. Knot securely, then weave tail back through nose to beginning round, to be used later for sewing nose to snowman. Stuff nose with a small amount of same colored yarn.
Scarf
With larger hook and B, ch 7.
Row 1: Sc in 2nd ch from hook and in each ch across—6 sc.
Row 2: Ch 1, turn, sc in each sc across. Repeat last row until piece measures about 20” (51 cm) from beginning, or desired length. Fasten off, leaving a tail about 12” (30.5 cm) long for attaching to mini skein. Weave in and trim beginning yarn tail.
Hat
Ribbed Band
With larger hook and C, ch 4.
Row 1: Sc in 2nd ch from hook and in each ch across—3 sc.
Rows 2-45: Ch 1, turn, working in back loops only, sc in each sc across.
Do not fasten off.
Body
Note: Color is changed to form stripes. Do not cut colors not in use until instructed. Carry colors not in use carefully up inside of the hat when next needed.
Round 1: Ch 1, work 46 sc evenly spaced across long edge of band; join with slip st in first sc to begin working in rounds—46 sc.
Round 2: Ch 1, sc in same st as joining and in each sc around; join with slip st in first sc. Change to B.
Rounds 3 and 4: With B, ch 1, sc in same st as joining and in each sc around; join with slip st in first sc. Change to D.
Round 5: With D, ch 1, sc in same st as joining and in each sc around; join with slip st in first sc. Change to C.
Round 6: With C, ch 1, sc in same st as joining and in each sc around; join with slip st in first sc. Change to B.
Round 7: With B, ch 1, sc in same st as joining and in each sc around; join with slip st in first sc. Change to D.
Rounds 8-13: Repeat Rounds 5-7 twice.
Round 14: With D, ch 1, *[sc in next 2 sc, sc2tog] 5 times, sc in next 3 sc; repeat from * once more; join with slip st in first sc—36 sc. Change to B.
Round 15: With B, [sc in next 4 sc, sc2tog] 6 times—30 sc. Change to C.
Round 16: With C, [sc in next 3 sc, sc2tog] 6 times—24 sc. Change to D. Cut C.
Round 17: With D, [sc in next 2 sc, sc2tog] 6 times—18 sc. Change to B. Cut D.
Round 18: With B, [sc in next sc, sc2tog] 6 times—12 sc.
Round 19: With B, [sc2tog] 6 times—6 sc.
Fasten off, leaving a long tail. Weave tail through stitches of last round and pull to close opening. Knot securely, weave in and trim tail. With beginning tail of ribbed band, sew ends of band together. Weave in and trim tail.
Pompoms
Cut 12” (30.5 cm) length of any color yarn and set aside. Hold three fingers extended and close together. Wrap D around fingers 40 times, then wrap C around fingers 40 times, and finally wrap B around fingers 40 times, for a total of 120 wraps. While wraps are still on fingers, slip the 12” (30.5 cm) yarn length under the wraps and slip the wraps off your fingers. Tie 12” (30.5 cm) length tightly around wraps. Hold yarn wraps tightly in fist with 12” (30.5 cm) tie dangling from bottom of fist and the looped wraps extending over top of closed fist. Using sharp craft scissors, carefully trim loops to form pompom. Grasp pompom by 12” (30.5 cm) tie and shake to fluff out. Make another pompom identical to the first. With the 12” (30.5 cm) ties, tie the two pompoms together. Leaving ends of ties free, apply a moderate amount of craft glue to knot and let dry. With ties and yarn needle attach pompom to hat.
Mini Skein of Yarn
Cut two 12” (30.5 cm) lengths of any color yarn and set aside. Hold four fingers extended and slightly spread. Wrap yarn color of your choice around fingers 50 times. While wraps are still on fingers, slip one of the 12” (30.5 cm) length under the wraps and slip the wraps off your fingers. Knot 12” (30.5 cm) length tightly around wraps. Hold wraps by tie and smooth out yarn so that it hangs straight. Slip second tie through opposite end of wraps and knot around wraps tightly. Apply a moderate amount of craft glue to knots and let dry. Weave ends through skein and trim. Set aside.
Label
Make a copy of the mini Red Heart label. If needed, reduce image size to fit mini skein. Then print image on color printer. To reinforce label use clear cellophane tape placed carefully over image or image can be laminated. Trim label width and length to fit skein, wrap around middle of skein and tape securely.
Finishing
Note: Whenever possible, use yarn tails still attached to pieces to sew the pieces in place. Using photograph as a guide, sew arms to shoulders of snowman near beginning of cardigan sweater. Sew hat to head. Sew nose to lower portion of head. With sewing needle and black thread, sew eyes above nose, and sew four black buttons evenly spaced down the button band of the cardigan sweater.
Place crochet hook in palm of one hand. Sew hand closed around the hook. Place small amount of glue where hand grips the hook for extra security.
Tie scarf around neck, so that end of scarf with long yarn tail falls in front. Tack scarf in place using matching yarn, as desired. Insert plastic hook through a couple loops at end of scarf. Wrap the long yarn tail around throat of hook (as if making a yarn over) then tie the tail to one end of the mini skein and weave loose end into the skein. Glue the “stitches” wrapped around the hook in place using craft glue.
Weave in any remaining ends.
Abbreviations
A, B, C, and D = Color A, Color B, Color C, and Color D
ch = chain
hdc = half double crochet
sc = single crochet
st(s) = stitch(es)
[] = work directions in brackets the number of times specified
* = repeat whatever follows the * as indicated
Crazy cute!
-
For the knitting version of this snowman (shown on the left below), click here.
Read NextQuick and Easy Crochet Butterflies
Your Recently Viewed Projects
Thanks for your comment. Don't forget to share!
Delphine Bryant
Nov 03, 2018
It is really hard to believe that it has been five years since we were all introduced to our favorite snowman on Disney's Frozen. Of course this is not that snowman but any snowman that you can have in your home without melting is the perfect snowman. Thanks for sharing this crazy cute snowman project.
Morehouse17
Oct 29, 2018
Who would not find this little crazy cute snowman totally adorable? I really like the attention to the body of the snowman. It is almost like he or she is wearing a sweater. I have a little neighbor that would love to have one of these. I wouldn't mind having this as holiday decorations as well. Thanks for sharing this thoughtful pattern.
Daughter of Light
Dec 30, 2017
I love snowmen and this guy is no exception! I'm actually glad that this is larger snowmen. I want to use him on my mantle and if he's too small he'll get lost on there. I love that they've made his scarf and hat sooooo colorful and a cardigan besides! I have to admit I'm not generally a fan of pompoms but they're stinkin' cute on here and I might even add one on each end of the scarf to help pull it all together!
Hippie Chick
Nov 09, 2017
The crocheting crochet snowman is too cute. The perfect addition to my holiday dcor and for all of my friends that crochet too. I hope none of them see this pattern before Christmas because I would love to surprise them all with a gift of this from me for Christmas this year at our annual luncheon. This will definitely steal the show I think. I will be changing up my yarn choices and use a softer yarn because Red Heart Super Saver yarn has such a harsh and rough feel to it. I will be choosing a much softer yarn.
JaneEK
Dec 22, 2016
I appreciate the heads up from the previous commenter. What I usually do is copy paste the instructions into a document so I can make changes if necessary. Ill also try using the smaller hook. Im not exactly sure what she means about fewer stitches, but Ill figure that out when I get there. Shes right, it is a cute pattern, and its a shame that its not usable as it is.
mulberrygalprinces s
Nov 18, 2016
I used a much smaller hook and down sized the number of stitches. It finally worked out right. I wish I had written it all down as I went. I would like to make another one, but I am not going thru that again. Someone needs to fix this pattern because it really is cute.
elapiano 7630428
Dec 18, 2015
I didn't realize how large this snowman would be either. I though I was doing something wrong. I am half way done, hope I finish before Christmas. It is cute though.
dirlandaise 802829 3
Oct 16, 2015
My gauge ten rows is 6 cm and 20 st is 13.5 cm with a 4 mm hook and a 4 yarn.
sweet81corvette 43 09393
Oct 14, 2015
This is the cutest snowman ever!! I just picked up everything I need to start making him tonight )
readwithbarb3 8930 194
Oct 13, 2015
Is anyone else having trouble with the gauge. No matter what size hook I'm way off and this has hardly ever happened to me before.
jvangelbear2 86679 99
Oct 15, 2015
I don't know about you, but I have finished the head and it is the biggest snowman I have ever seen and I have done hundreds!!!
dirlandaise 802829 3
Oct 16, 2015
I agree... The head is very big, I am not expecting such a big snowman...
readwithbarb3 8930 194
Oct 16, 2015
They need to rewrite the pattern. It's such a darling idea. Do they actually crochet something before they submit the pattern or is it what "they" think it "should" be.
dweidman56 2231508
Oct 10, 2015
The Red Heart link for the crocheting snowman should read http//www.redheart.com/free-patterns/crocheti == ng-snowman
dweidman56 2231508
Oct 10, 2015
If you go to the red heart link - http//www.redheart.com/free-patterns/crocheting-sn == owman - it has the pattern with the mini label in the instructions. Red Heart also has a knitting snowman too right above the crocheting snowman. I found the PDF file for the crocheting snowman by putting in mini Red Heart yarn label in the search box. Hope this helps.
Report Inappropriate Comment
Are you sure you would like to report this comment? It will be flagged for our moderators to take action.
Thank you for taking the time to improve the content on our site.