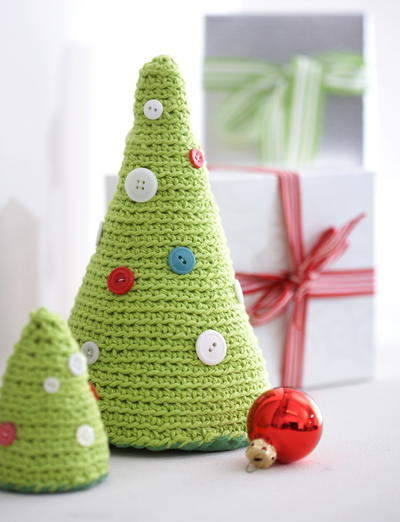
Tabletop Christmas Trees

Whether you don't have room for a big tree, or you want to add even more Christmas spirit around your home, these crocheted Tabletop Christmas Trees are a fun way to bring the holiday cheer to your home. This free crochet pattern by Bernat includes instructions on how to crochet two different size trees - small (about 3.5 inches tall) and large (about 9 inches tall). The adorable decorative buttons add a cute finishing touch.

Crochet HookG/6 or 4 mm hook
Yarn Weight(4) Medium Weight/Worsted Weight and Aran (16-20 stitches to 4 inches)
MATERIALS:
-
Lily® Sugar ‘n Cream® (Solids: 70 g/2.5 oz)
(01712 Hot Green) 1 ball makes Large and Small trees - Size 4 mm (U.S. G or 6) crochet hook or size needed to obtain gauge.
- Stuffing.
- Buttons for decorations.
- 12 ins [30.5 cm] felt for Base.
- Light cardboard for Base.
SIZE:
Large Version: Approx 9 ins [23 cm] high x 16 ins [40.5 cm] circumference.
Small Version: Approx 3½ ins [9 cm] high x 7 ½ ins [19 cm] circumference.
GAUGE: 20 sts and 26 rows = 4 ins [10 cm] in stocking stitch.
INSTRUCTIONS
Large Version
Note: Work all sts in back loops.
**Ch 2.
1st rnd: 6 sc in 2nd ch from hook. Join with sl st to first sc.
2nd rnd: Working in back loops, 2 sc in each sc around. Join with sl st to first sc. 12 sc.
3rd and 4th rnds: Ch 1. 1 sc in each sc around. Join with sl st to first sc.
5th rnd: Ch 1. *1 sc in next sc. 2 sc in next sc. Rep from * around. Join with sl st to first sc. 18 sc.
6th and 7th rnds: As 3rd and 4th rnds.
8th rnd: Ch 1. *1 sc in each of next 2 sc. 2 sc in next sc. Rep from * around. Join with sl st to first sc. 24 sc.
9th and 10th rnds: As 3rd and 4th rnds.
11th rnd: Ch 1. *1 sc in each of next 3 sc. 2 sc in next sc. Rep from * around. Join with sl st to first sc. 30 sc.
12th and 13th rnds: As 3rd and 4th rnds.
14th rnd: Ch 1. *1 sc in each of next 4 sc. 2 sc in next sc. Rep from * around. Join with sl st to first sc. 36 sc.
15th and 16th rnds: As 3rd and 4th rnds.**
Cont as established, inc 6 sts on next and every following 3rd rnd, until there are 66 sc.
Next 2 rnds: Ch 1. 1 sc in each sc around. Join with sl st to first sc. Fasten off at end of last rnd.
Small Version
Work from ** to ** as given for Large Version. Fasten off.
FINISHING
Cut 1 piece of felt and 1 piece of cardboard to fit circumference of bottom of tree. Stuff tree. Pin felt to bottom of tree, placing cardboard between felt and stuff. Sew felt in position. Sew buttons on tree as shown in picture.
Your Recently Viewed Projects
Thanks for your comment. Don't forget to share!
Hippie Chick
Aug 08, 2017
I was excited to see these table top trees and a little disappointed when I followed the link to here and see there is no picture of them. There is also no link to follow to get the pattern to see the picture there because the pattern is shown on this page. Editors, could we please get an update on this post with a picture or a link to the pattern?
Soapy
Aug 31, 2017
I have the same issue. I am a visual person and need to see stuff before I get a good grasp on the concept. Would appreciate some pictures. Thx
AFC Editor Julia
Sep 01, 2017
Hi Soapy, Thanks for letting us know about the image - it should be showing now. :) Julia, editor for AllFreeCrochet
AFC Editor Julia
Sep 01, 2017
Hi Hippie Chick, Thanks for letting us know about the image - it should be showing now. :) Julia, editor for AllFreeCrochet
flowergirl
Dec 18, 2016
I love this pattern. We don't have real Christmas trees in Kenya so I love the idea of making tonnes of these fun and easy Christmas tree decorations to represent the Christmas tree. What a way to get into the Christmas spirit especially if you use fun colors and get your glue gun and glitter in hand.
3cats2love
Dec 14, 2016
This is a really cute pattern. I like adding the cardboard circle and felt at the bottom so it will stand up nicely (have a flat bottom). I also like using the buttons for decorations - I have a lot of those! But I could also see crocheting a chain of shiny yarn or maybe red sock weight yarn to drape on the trees, just stitch it occasionally to hold it in place.
skippieelove
Nov 25, 2014
Adorable!!!! I did a row of sl st at the end before finishing off so the edges curl in a bit and the felt base isn't as noticeable. As a person who cannot afford to purchase lots of decorative holiday pieces, I was ecstatic to find this pattern. Lovely 3
Report Inappropriate Comment
Are you sure you would like to report this comment? It will be flagged for our moderators to take action.
Thank you for taking the time to improve the content on our site.