Quick and Easy Crochet Christmas Stocking
You're going to love this classic crochet Christmas stocking!
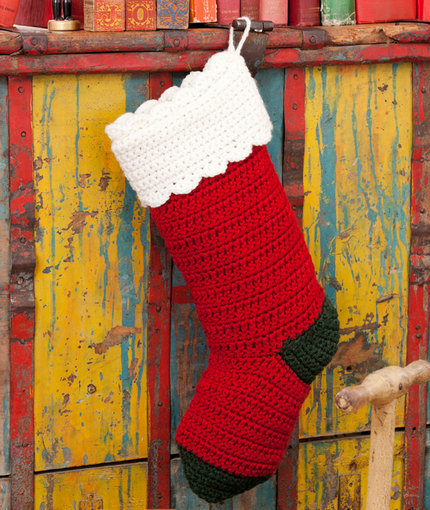
This Quick and Easy Crochet Christmas Stocking pattern is the perfect fun project for the holiday season.
If you have a lot of members in your family and you need a simple way to make personalized Christmas stockings, this would be the perfect way to do it.
This easy crochet stocking pattern is designed to work up quickly, easily, and totally hassle free. Maybe you just don't have a lot of time on your hands and Christmas is fast approaching.
Whatever the case may be, don't gloss over this great yet simple crochet Christmas stocking.
Sign Up for More Free Patterns!

Crochet HookG/6 or 4 mm hook, H/8 or 5 mm hook
Yarn Weight(4) Medium Weight/Worsted Weight and Aran (16-20 stitches to 4 inches)
Crochet Gauge14 sts = 4; 10 rows = 4 in pattern with larger hook
Finished SizeStocking measures 16 long.
Materials List
- RED HEART Super Saver: 1 skein each 332 Ranch Red A, 633 Dark Sage B, and 316 Soft White C
- Crochet Hooks: 4mm [US G-6], 5mm [US H-8]
- Yarn needle
Notes
Special Abbreviation Sc2tog = [draw up a loop in next st] twice, yo and draw through all 3 loops on hook.
Stocking
With larger hook and A, ch 43.
Row 1 (Right Side): Sc in 2nd ch from hook and in each ch across; turn 42 sc.
Row 2: Ch 3 (counts as dc), skip first sc, dc in next sc and in each sc across; turn.
Row 3: Ch 1, sc in each dc across, sc in top of ch-3; turn. Repeat Rows 2 and 3 for pattern until 10 from beginning, end by working Row 2. Fasten off.
Heel
With right side facing and larger hook, skip first 32 sts of last row, join B in next st; ch 1, sc in same st and in next 9 sts, bring other side of stocking around and sc in first 11 sts; turn 21 sts.
Shape Heel
Work short rows as follows:
Next Row: Ch 1, sc in first 14 sc; turn.
Next Row: Ch 1, sc in first 7 sc; turn.
Next Row: Ch 1, sc in first 7 sc, sc in next st of long row below; turn. 8 sc.
Next Row: Ch 1, sc in first 8 sc, sc in next st of long row below; turn 9 sc. Continue in this manner until all 21 heel sts are worked. Fasten off.
Foot
With right side facing and larger hook, skip first 10 sc of heel, join A in next sc; ch 1, sc in same sc and in next 10 sc of heel, skip next 2 sts of stocking, sc in next 17 sts of stocking, skip next 2 sts, sc in next 10 sts of heel; turn 38 sc.
Repeat pattern Rows 2 and 3 five more times, then Row 2 once more. Fasten off.
Toe
With right side facing and larger hook, join B in first st of foot; ** ch 1, sc2tog, sc in next 15 dc, sc2tog, turn 17 sc.
Continue in sc only and decrease 1 st each end of every row until 3 sts remain. Fasten off. ** With right side facing, join B in next st of last long row. Work same as first half of toe from ** to **.
Finishing
Sew toe, foot and back seams. Sew openings closed at corners of heel.
Cuff
With larger hook and C, ch 47. Work 11 rows of sc over 46 sts. Fasten off. Sew cuff seam.
Lower Cuff Edging
*** With right side facing and smaller hook, join C at back seam; ch 1, sc in first 2 sc, * skip next sc, (dc, [ch 1, dc] twice) all in next sc, skip next sc, sc in next sc; repeat from * around; join with a slip st in first sc. *** Fasten off.
Attach Cuff
With right side facing and smaller hook, join C at upper edge of back seam of cuff; ch 1, sc in first sc, place cuff over right side of stocking and beginning at first st after back seam of stocking, work 21 sc through both layers at same time, sc in next sc of cuff only, sc in next 21 sc through both layers, sc in last sc of cuff only; join. Fasten off.
Top Edging
Work same as Lower Edging from *** to ***, ch 12 for hanging loop, slip st in first sc again. Fasten off. Weave in all ends.
Up Next:
Your Recently Viewed Projects
youtous2 3467153
Nov 22, 2023
Didnt like the toe section finish, so I frogged it! Then did in the round, marked centre front and centre back stitch and decreased two stitches at each marker. Much neater finish
Perry72
Nov 28, 2018
Leave a comment...This is an adorable Christmas stocking. There is so much detail to the item. The colors are the traditional colors of Christmas and the designer took the time to include a different color heel and toe. The cuff is the pice de rsistance. The scalloped edge is the perfect detail added. Thanks for sharing this project.
Morehouse17
Nov 18, 2018
The title of this project is quick and easy. When I see that I always take a second look because I love some quick and easy projects. Looking at the picture I find it hard to believe that this would be anything quick or easy. I have my doubts about quick and easy.
princess6860504
Nov 15, 2017
Although I prefer stripes on my Christmas stockings, the simplistic look of this is drawing me in...I may just have to give this a try but with a little color blocking! I don't know what kind of trouble others have had in making this but I guess there's only one way for me to find out- make it for myself!
Cheryl E
Sep 30, 2017
I really like the homespun look of this Christmas stocking. After reading the instructions, I too am a little confused over the length and may attempt to shorten the length a bit so it fits just so when hanging from my mantel. Since all single crochet stitches are used it seems this pattern should be easy to follow, even the change in colors.
JaneEK
Jan 14, 2017
My senior crochet students have been clamoring for more Christmas projects, and this one may just fit the bill. They generally want straightforward stitches like single and double crochetthey can feel intimidated by some of the more tricky stitches, even though I keep reassuring them. This stocking is challenging enough for most of them as it also requires turning the heel.
gungirrl45 4844739
Dec 09, 2016
My mother and daughter both attempted to make this stocking by following the pattern and the pattern is incomplete. The stocking does not come out looking anything like the pattern.
lovecrochet65 5047 074
Dec 08, 2016
Could someone please help with this pattern? It's a bit confusing.....
lovecrochet65 5047 074
Dec 08, 2016
I'm a bit confused on the pattern, in the beginning it says to repeat rows 2 3 until 10 from the beginning ---- it doesn't seem like it means until you get to 10 rows, because it doesn't look near long enough -- could you please explain?
youtous2 3467153
Nov 22, 2023
I took the 10 to mean 10 inches, but found that to be too long! I am using DK and found 9 inches to be a better size for me personally.
AuntKarolyn
Dec 07, 2016
Quick and easy, that's my style. This basic Christmas stocking is just the thing to get the creative juices flowing. It truly is easy to make, and gives you plenty of leeway to add embellishments. I crocheted little holly leaves, and added them to the cuff. I know you will have as much fun with this pattern as I did.
Report Inappropriate Comment
Are you sure you would like to report this comment? It will be flagged for our moderators to take action.
Thank you for taking the time to improve the content on our site.

