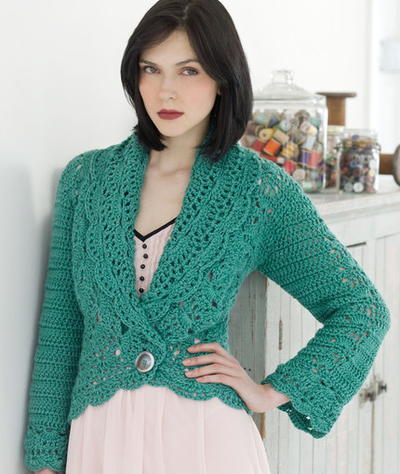
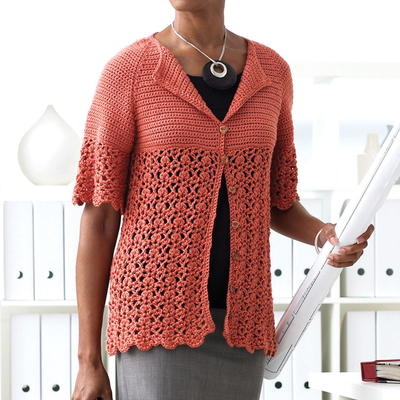
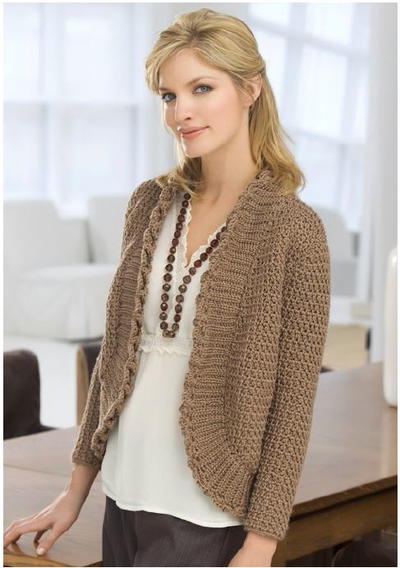
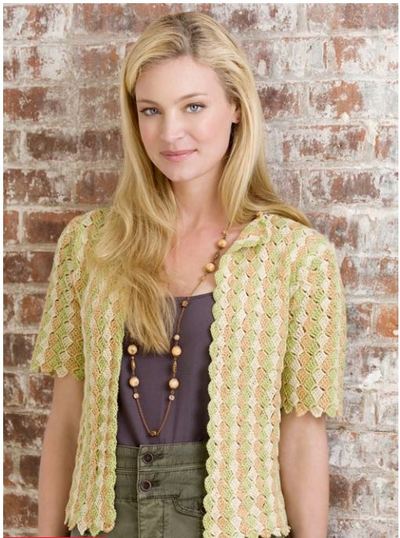
1941 Shell Stitch Crochet Cardigan Pattern

This crochet pattern will transport you back over 50 years in time! You'll go slack-jawed over the 1941 Shell Stitch Crochet Cardigan Pattern. You'll probably be too excited about this vintage pattern to even read anything on this page. Red Heart has updated this lovely cardigan from the time of World War II to fit the current style. We have to say that it's an easy breezy pattern that will fit right into your spring or summer wardrobe. Get your hooks ready to work up this amazing cardigan.
NotesNotes:
1. Body of cardigan is worked from side to side, in one piece, beginning with left front.
2. Color is changed every row.
3. Sleeves are worked separately and sewn into armholes.
4. Sleeves are worked from side to side.

Crochet HookF/5 or 3.75 mm hook
Yarn Weight(2) Fine (23-26 stitches to 4 inches)
Crochet Gauge3 shells = 3; 10 rows = 4 1/2 in pattern. CHECK YOUR GAUGE. Use any size hook to obtain the gauge.
Finished SizeSmall (Medium, Large, 1X, and 2X) to Fit Bust: 32 (36, 40, 44, 48)”; Finished Bust: 34 (38 ½, 41½, 46, 48½ )”; Finished Length: 19 (20, 22, 24, 25)”
Materials List
- RED HEART® “LusterSheen®”: 2 (2, 2, 3, 3) skeins each: 615 Tea Leaf A, 332 Tan B, and 805 Natural C.
- Crochet Hook: 3.75mm [US F-5]
- Yarn needle
Why not have a super cute shell stitch scarf pattern to match your new cardigan? Take a peek at this video to see how you can make it!
Left Front
-
With A, ch 118 (124, 136, 148, 154).
-
Row 1 (Right Side): Work 4 tr in 4th ch from hook (first shell made), *skip next 5 ch, (sc, ch 2, 4 tr) in next ch (shell made); repeat from * across to last 6 ch, skip next 5 ch, sc in last ch, turn—19 (20, 22, 24, 25) shells. Fasten off A.
-
Row 2 (Wrong Side): Join B with slip st in first ch-2 space, ch 1, shell in same space, shell in each remaining ch-space (including beginning ch-space) across, turn. Fasten off B.
-
Row 3 (Right Side): With C, repeat Row 2.
-
Rows 4–17 (19, 19, 21, 21): Continue to repeat Row 2, changing color every row, repeatedly working 1 row with A, 1 row with B, and 1 row with C.
Shape Armhole
-
Continue to change color every row.
-
Row 1 (Wrong Side): Skip first 7 (8, 9, 10, 11) shells, join next color with slip st in next ch-2 space, ch 1, shell in same space, shell in each remaining ch-space across, turn—12 (12, 13, 14, 14) shells. Fasten off.
-
Rows 2–7 (9, 11, 13, 15): Join next color with slip st in first ch-2 space, ch 1, shell in same space, shell in each remaining ch-space across, turn. Fasten off.
Back
-
Row 1 (Right Side): Join next color with slip st in first ch-2 space, ch 1, shell in same space, shell in each remaining ch-space across, DO NOT fasten off, [ch 4, 4 tr in back bar of 4th ch from hook (shell made)] 7 (8, 9, 10, 11) times, turn—19 (20, 22, 24, 25) shells. Fasten off.
-
Rows 2–28 (30, 32, 34, 36): Join next color with slip st in first ch-space, ch 1, shell in same space, shell in each remaining ch-space across, turn. Fasten off.
Shape Second Armhole
-
Row 1 (Right Side): Join next color with slip st in first ch-2 space, ch 1, shell in same space, shell in each of next 11 (11, 12, 13, 13) ch-2 spaces, turn; leave remaining chspaces unworked—12 (12, 13, 14, 14) shells. Fasten off.
-
Rows 2–7 (9, 11, 13, 15): Join next color with slip st in first ch-2 space, ch 1, shell in same space, shell in each remaining ch-space across, turn. Fasten off. DO NOT TURN at the end of the last row.
-
Row 8 (10, 12, 14, 16): With Right Side facing, join next color with slip st in last tr, ch 40 (46, 52, 58, 64), TURN, 4 tr in 4th ch from hook (first shell made), [skip next 5 ch, shell in next ch] 6 (7, 8, 9, 10) times, shell in each ch space across, turn—19 (20, 22, 24, 25) shells.
Right Front
-
Rows 1–16 (18, 18, 20, 20): Join next color with slip st in first ch-2 space, ch 1, shell in same space, shell in each remaining ch-space across, turn. Fasten off.
Sleeves (Make 2)
-
Beginning at side of sleeve, with A, ch 34 (34, 40, 46, 46).
-
Row 1 (Right Side): Work 4 tr in 4th ch from hook (first shell made), *skip next 5 ch, shell in next ch; repeat from * across to last 6 ch, skip next 5 ch, sc in last ch, DO NOT TURN—5 (5, 6, 7, 7) shells. Fasten off A.
-
Row 2: With Right Side facing, join B with slip st in last tr, ch 4, TURN, 4 tr in 4th ch from hook (first shell made), shell in each ch-space across, turn—6 (6, 7, 8, 8) shells. Fasten off B.
-
Row 3 (Right Side): Join C with slip st in first ch-2 space, ch 1, shell in same space, shell in each remaining chspace across, DO NOT fasten off, ch 4, 4 tr in back bar of 4th ch from hook (shell made), DO NOT TURN—7 (7, 8, 9, 9) shells. Fasten off C.
-
Row 4: With A, repeat Row 2—8 (8, 9, 10, 10) shells.
-
Row 5: With B, repeat Row 3, TURN—9 (9, 10, 11, 11) shells. Continue to change color every row.
-
Rows 6–21 (23, 25, 27, 29): Join next color with slip st in first ch-space, ch 1, shell in same space, shell in each remaining ch- space across, turn. Fasten off.
-
Next Row (Wrong Side): Skip first ch-2 space, join next color with slip st in next ch-2 space, ch 1, shell in same space, shell in each remaining ch-space across, turn—8 (8, 9, 10, 10) shells. Fasten off.
-
Next Row: Join next color with slip st in first ch-2 space, ch 1, shell in same space, shell in each remaining chspace across to last ch-space, turn; leave last ch-space unworked—7 (7, 8, 9, 9) shells. Fasten off.
-
Next 2 Rows: Repeat last 2 rows—5 (5, 6, 7, 7) shells
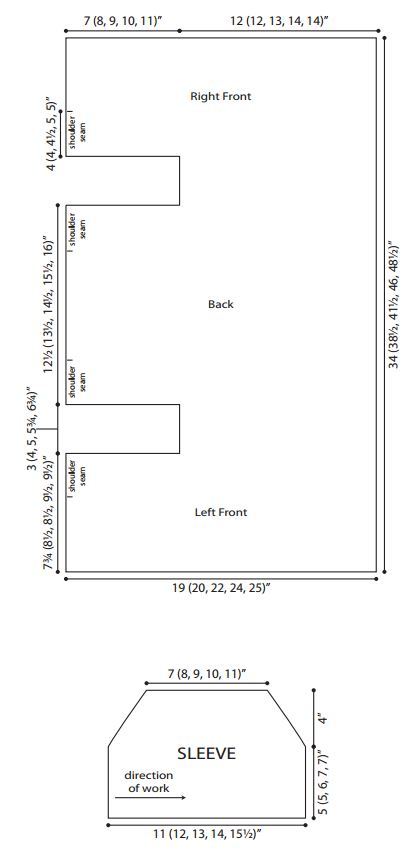
Finishing and Diagrams
Beginning at armhole edge, sew shoulder seams together for 4 (4, 4½, 5, 5)”. Sew in sleeves. Sew sleeve seams. Weave in ends.
-
Diagrams
Read NextReading Room Crochet Sweater
Your Recently Viewed Projects
Thanks for your comment. Don't forget to share!
margbj 6166732
Mar 25, 2023
I crocheted the body of this cardigan in 2015. The arm hole measurements were much larger than the measurements of the finished sleeves. Impossible to attach. I recently took this unfinished project out and tried again to get the sleeves to fit. Not happening with this written pattern. Wasted time and materials. I'll have to settle for a 1941 crochet vest. A video tutorial might have been helpful.
Janet CK
Feb 13, 2020
Interesting how Luster sheen and these colors don't show up on web site /
margo29 2215919
Apr 23, 2018
I would like to make the sleeves to hide my elbows - 3/4 legnth sleeves. Couldyou explain how i would go aboutthis please. Thank you
Hippie Chick
Dec 11, 2017
A very pretty cardigan. I see that the main body part of this cardigan is worked in one piece and then the sleeves are made separately and then attached later. This pattern also says the pieces will all be worked vertically instead of horizontally which gives this an entirely different look. The downside is that you have to change colors on each row.
Morehouse17
Oct 31, 2017
This shell stitch crochet cardigan is so feminine and classic. I just love the colors that the designer has selected to use. It is amazing to me that the skill level is showing a easy. I see that there is also a video tutorial. I can appreciate that there are different sizes provided.
Zeemer
Oct 21, 2017
I remember my grandma and some aunts wearing a cardigan similar to this 1941 Shell Stitch Crochet Cardigan Pattern. It is so vintage looking, very demure, very laid back. This is the type of cardigan that is appropriate to wear to church, or to a formal gathering. This will probably look great, too in a different color, something more vibrant or deep colored yarns.
karenaz4 7005067
Oct 20, 2017
I have made the cardigan and I am at the point of sewing in the sleeves. I wish there was more information and directions because the sleeves do not fit and the size for the armhole and the sleeves are correct according to the drawing. How can I get more detailed instructions or see a video? Maybe the original 1941 instructions would have the directions. I am stuck. Has anyone already made this and knows how to sew in the sleeves?
Delphine Bryant
Sep 30, 2017
I think that the directions for this are written well. I have a little crochet experience under my belt and I believe the most difficult thing to do will be the color changes. The end result is beautiful with the colors the designer selected. I think I am leaning toward some pastels in pinks/peaches.
monkeyhanger
Jul 25, 2017
I have tried to find this yarn but understand from the website that they have discontinued it and as I only seem to be able to get it in black or white could you either advise where I could get it (UK preferably) or advise an alternative Thank you.
4jlrcr21lr7 478514 3
Apr 19, 2017
The patterns you post are great. To make it more interesting for myself, and hopefully others willing to work with crechet threads (# 10) for beginners, would be of much more interest to me. Sorry if this seems selfish but thread crochet it what I grew up with and enjoy the most. Thank you.
Hippie Chick
Mar 17, 2017
Curious is anyone has attempted this again since it was recently updated? Such a gorgeous sweater and thank you so much for including the instructions on this same page so we dont get directed to an outside website. The instructions look very well presented and easy to follow. This sweater looks like it would take a little while to make and is definitely not a quickie project. I think it would look very pretty is some vintage-style buttons were added for embellishment.
abbottmarguerite65 2 8144402
Mar 15, 2017
I am very new to crochet can do flowers and squares at the moment I like this pattern but the ads are so annoying and also I tried to print it but it will not allow it as the ads are all over the place and cut out some of the instructions so frustrating ! I will look elsewhere and find one I can print off
hoffmannh 4682267
Mar 17, 2017
I copied the directions and pasted them into Word. I'm attracted to this pattern because I want to make a dickie I can put on after my hair is done.
Linda
Feb 06, 2017
Vintage patterns are a favorite of mine, this is one I genuinely will make with friends, who gather to learn new projects with me.
rajeeramaswamy 752 1915
Jan 19, 2017
Hello Everyone I am an intermediate Crochet and Knitter. I have done a few of the items posted on Hooked on Crochet. I was excited when I saw the pattern for the 1941 Cardigan. I am kind of disappointed because the pattern is not very clear and I agree with many of the people who have commented. The shell stitches pucker, all in all I have wasted 8 hours after crocheting up to the arm whole and undoing. May be the owner of this pattern should revisit the instructions. This is may be an EASY pattern if corrected. DO NOT WASTE YOUR TIME EVEN ATTEMPTING THIS CARDIGAN PATTERN.
ivanovich316 35160 58
Dec 28, 2016
I would rather see the schematics for the patron than try to read and comprehend abbreviations. Is the scheme available?
eppeyton 7972530
Dec 26, 2016
I'm confused with row 2. This is done in between the shells of the first row? A shell in chain 2 space and then the next makes the first row buckle. Is there any stitches between each shell.
meenu0812
Dec 17, 2016
this ia a very great n easy pattern... But i'm unable to get thru sleeves..Is ch-space (mentioned in row 2) same as ch-2 space( mentioned in row 3)? If not , can anyone please explain the difference
Zeemer
Nov 07, 2016
This cardigan is very simple but elegant. I like the color combination and the stitches used. It has an old school appeal, it is the kind of sweater our mother and grandmother used to wear. Should I decide to make this 1941 Shell Stitch Crochet Cardigan Pattern, I want to make the sleeves a bit longer and maybe do it in one solid color. Thanks for the free pattern which is very easy to understand and complete with the necessary instructions and diagrams.
ElaineM
Nov 01, 2016
When doing row 2, do you turn the work? When I did it seemed that the stitches did not look as good on what I thought was the right side. I love the pattern. I wish you had a video of it. I think many of us would really benefit from it.
janerostami 898681 3
Apr 07, 2016
I cannot work out how to extend/increase for the back - please can anyone help?
MeTooSuz 0811723
Feb 26, 2016
I no longer get the "save pattern" option. Any suggestions. I do have a lot of "saved" patterns, but there are so many I have a hard time choosing. -) I am disabled so I do spend a lot of time crocheting tho.
tonicason 9742530
Aug 22, 2015
It would of been great if I could of printed out the pattern. Very disappointed that I couldn't. I wanted to make this will traveling, to give me something to do. Why don't you allow your patterns to be printed out????
mengelpa 7971089
Jun 12, 2016
Go to www.redheart.com and search for Manhattan Cardigan. There are several projects that come up, just scroll down till you find this sweater. You will have the option to print it. Read Heart's number for it is LW2644. Hope this helps.
marykazmer 4623653
Jul 22, 2015
It's a really cute pattern. But your ads are not only annoying and distracting but outright disgusting. Who wants to look at bare belly fat and rear ends?
gramcrackers2004 7 541657
Jul 11, 2015
I an not understanding the pattern. Is the ch-2 space before or after the actual ch-2, to use for the following row. gramcrackers2004@gmail.com
CactusSal 5624781
Nov 28, 2015
I am also having the same problem. Did you get a reply? It would be nice if all replies were printed here on this site. Thanks
clbpct
Jul 10, 2015
I love the new pattern. It's bright and airy, perfect if you need just a light cover-up. The older one's buttons look to confining for me and at my age I would probably be too hot. However, the old pattern is a classic look and beautiful on it's own. Both are very nice.
Daughter of Light
Nov 03, 2016
I think it's amazing how something so beautifully simple can be soooo timeless. I'm happy to see the larger sizes included too. I'm thinking about doing this one up for a cover up for a little black dress because it's timelessness comes across as elegant to me. I've never done a crocheted garment before so I hope the easy designation is appropriate!
JukTheWise
Jul 08, 2015
This is the "Manhattan Cardigan" by Red Heart. Why can't you use the actual pattern name? You could always use a subtitle under the pattern name for your descriptive title. This habit of changing pattern names for MOST patterns drives me crazy.
carolerice43 76280 33
Feb 14, 2016
I am in the UK. Can you please give me an equivalent yarn for the yarn in this project (ply, substitute lustre etc) and how many grammes in a skein (total weight required). Thank you.
mengelpa 7971089
Jun 12, 2016
Don't know what the equivalent yarn would be in the UK but Red Heart Luster Sheen yarn comes in 4 ounce (113 g), 335 yard (306 m) skeins. Maybe this will help you find an equivalent yarn.
RegeMama
Apr 06, 2017
Hi Carole Hoping this will help - sharing what I learned about this yarn Availability Red Heart ceased production of LusterSheen the yarn used in this pattern - However you may find it for sale at eBay or Amazon note that color selections will likely be limited Fiber acrylic Weight -Fine comparable to Baby and Sport weight yarns Yield Each skein gr oz and m yd - this pattern calls for skeins each of colors for a total of skeins or gr oz total Despite many comments suggesting this pattern needs to be revisited and possibly corrected I plan to give it a go and make corrections as I see needed for a good looking cardigan cover-up In my opinion it makes sense that vintage yarns look and work best for vintage patterns If you can find a comparable -Fine weight yarn that has at least a little tension stretch in…Read More the fiber as I expect this LusterSheen had I believe you can successfully substitute a similar fiber -Fine yarn weight is comparable to Baby Sport weight yarns and you will most likely be able to find an acceptable substitution Whichever yarn you decide to use pay close attention to the Gauge for this pattern shells rows in pattern CHECK YOUR GAUGE Use any size hook to obtain the gauge I believe the shells means that shells should equal inches Possibly another erratum in this pattern Good luck
smpirlo 6884218
Jul 08, 2015
I also prefer the 1941 pattern - for the buttons and especially for the shaping at the waist and in the sleeves. It looks like there were some decreases along the sides and maybe even in the sleeves of the older pattern. Could Red Heart please release the old pattern?
Member 4511686
Jul 01, 2015
I would love to have the 1941 pattern.
JMitchell
Jul 07, 2015
I, too, love the 1941 pattern. I am much less keen about the modern version (that open front, for one reason)... I do think, however, that the major difference between the two is that the older pattern used buttons. I could probably figure out how to put them on so they would work.
Report Inappropriate Comment
Are you sure you would like to report this comment? It will be flagged for our moderators to take action.
Thank you for taking the time to improve the content on our site.