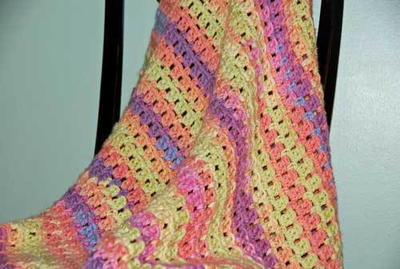
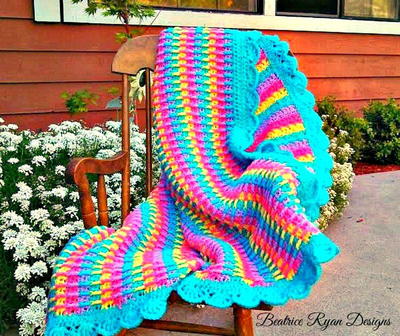
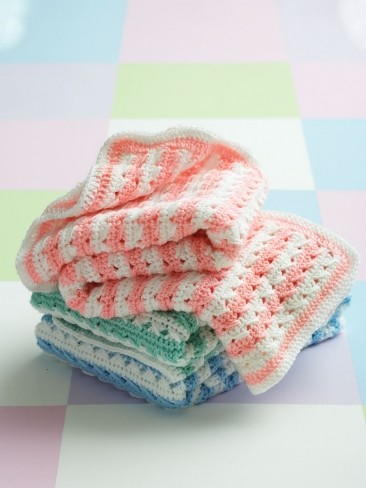
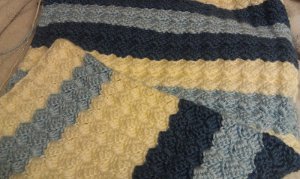
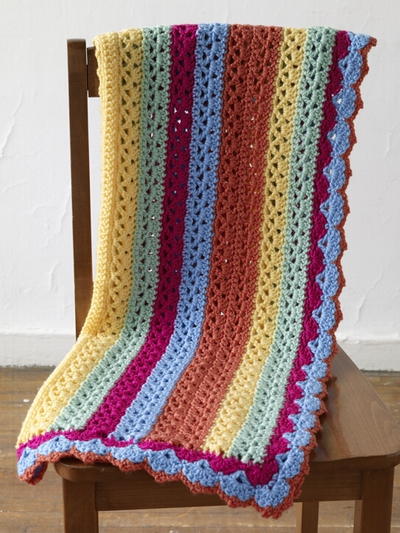
Bright Stripes Baby Afghan

The beautiful colors of this Bright Stripes Baby Afghan make it the perfect free crochet pattern to make for both baby boys and baby girls. This homemade crochet afghan is easy to crochet using Lion Brand's Vanna's Choice Baby yarn in a variety of colors. Make this blanket for your own baby, or give it as a gift if you have a baby shower coming up. The pretty crocheted border gives this homemade blanket the perfect finishing touch. It will look great in any nursery.

Crochet HookI/9 or 5.5 mm hook
Yarn Weight(4) Medium Weight/Worsted Weight and Aran (16-20 stitches to 4 inches)
SIZE
About 29 1/2 x 37 in. (75 x 94 cm)
MATERIALS
-
LION BRAND® VANNA'S CHOICE® BABY (Art. #840)
#157 Duckie 1 ball (A)
#168 Mint 1 ball (B)
#139 Berrylicious 1 ball (C)
#106 Little Boy Blue 1 ball (D)
#132 Goldfish 1 ball (E)
or colors of your choice - LION BRAND® crochet hook size I-9 (5.5 mm)
- LION BRAND® large-eyed blunt needle
GAUGE
12 dc = 4 in. (10 cm).
BE SURE TO CHECK YOUR GAUGE.
STITCH EXPLANATIONS
V-st (dc, ch 2, dc) in indicated st (used in body of Afghan).
small V-st (dc, ch 1, dc) in indicated st (used in border of Afghan).
shell 5 dc in indicated st or sp.
NOTES
1. The first half of the Afghan is worked beg along one side of the foundation ch. The second half is worked beg along the opposite side of the foundation ch.
2. The first row of the first half is worked in the back "bumps" of the foundation ch only. This creates a row with two loops along the top of the row and two loops along the lower edge. The next row of the first half is worked into the two loops of the first row, while the first row of the second half is worked into the two loops along the lower edge.
3. To change color, work last st of old color to last yarn over, yarn over with new color and draw through all loops on hook to complete st.
AFGHAN
First Half
With A, ch 97.
Row 1: Working in back "bumps" of ch only, dc in 4th ch from hook (beg ch counts as first dc) and in each ch across – 95 dc.
Row 2: Ch 1, turn, sc in each st across.
Row 3: Ch 3 (counts as first dc here and throughout), turn, sk first 2 sts, V-st in next st, *sk next 2 sts, V-st in next st; rep from * across to last 2 sts, sk next st, dc in last st.
Row 4: Ch 3, turn, 3 dc in ch-2 sp of each V-st across to last st, dc in last st; change to B in last st. Fasten off A.
Rows 5–7: With B, rep Rows 2-4; change to C in last st. Fasten off B.
Rows 8-10: With C, rep Rows 2-4; change to D in last st. Fasten off C.
Rows 11-13: With D, rep Rows 2-4; change to E in last st. Fasten off D.
Rows 14-19: With E, rep Rows 2-4 twice; change to A in last st. Fasten off E.
Rows 20-22: With A, rep Rows 2-4; change to B in last st. Fasten off A.
Rows 23-25: With B, rep Rows 2-4. Fasten off B.
Second Half
Row 1: Working along opposite side of foundation ch (along lower edge of first half), join A with sl st in first ch, ch 3 (counts as dc), dc in each ch across—95 dc.
Rows 2-25: Rep Rows 2-25 of First Half.
FINISHING
Border
Turn piece, join C with sl st in 3rd dc past corner.
Rnd 1 (WS): Ch 1, sc in each st to last st of row, (sc, ch 2, sc) in last st (corner); work 80 sc evenly spaced along side edge; (sc, ch 2, sc) in first st of lower edge (corner); sc in each st across to last st of lower edge, (sc, ch 2, sc) in last st (corner); work 80 sc evenly spaced along side edge; (sc, ch 2, sc) in first st of top edge, sc in next st; join with sl st in first st.
Rnd 2: Ch 1, sc in same st as join, *sk next 2 sts, shell in next st, sk next 2 sts, sc in next st; rep from * to 2 sts before corner ch-2 sp, 7 dc in corner ch-2 sp, sk next st, sc in next st, rep from * to * to 2 sts before next corner ch-2 sp, 7 dc in corner ch-2 sp, sk next 2 sts, sc in next st, rep from * to * to 2 sts before next corner ch-2 sp, 7 dc in corner ch-2 sp, sk next st, sc in next st, rep from * to * to 2 sts before next corner ch-2 sp, 7 dc in corner ch-2 sp, sk next 2 sts; join with sl st in first st. Fasten off C.
Rnd 3: With RS facing, join D with sc in center dc of first shell following any corner; **ch 1, (dc, ch 1, dc) in next sc (small V-st made), *ch 1, sc in center dc of next shell, ch 1, small V-st in next sc; rep from * to next 7-dc corner, ch 1, sk next 2 dc, sc in next dc, (sc, ch 2, sc) in next dc, sc in next dc; rep from ** 3 more times, ch 1, small V-st in last sc, ch 1; join with sl st in first sc.
Rnd 4: Ch 1, turn, sc in same st as join, *(shell in ch-1 sp of next small V-st, sc in next sc) across to next corner, sk next sc, work 7 dc in next corner ch-2 sp, sk next sc, sc in next sc; rep from * 3 more times, shell in ch-1 sp of next small V-st, (sc in next sc, shell in ch-1 sp of next small V-st) to end; join with sl st in first sc. Fasten off D.
Rnd 5: With RS facing, join E with sc in an sc about 12 sts from any corner; **ch 2, *(sc, ch 2, sc) in center dc of next shell, ch 2, sc in next sc, ch 2; rep from * to next 7-dc corner, ch 2, sk next 2 dc, (sc, ch 2, sc) in next dc, (sc, ch 3, sc) in next dc, (sc, ch 2, sc) in next dc, sk next 2 dc, ch 2, sc in next sc; rep from ** 3 more times, ch 2, (sc, ch 2, sc) in center dc of next shell, ***ch 2, sc in next sc, ch 2, (sc, ch 2, sc) in center dc of next shell, ch 2; rep from *** to end; join with sl st in first sc. Fasten off E.
Weave in ends.
ABBREVIATIONS
beg = begin(ning)
ch = chain
ch-sp = space previously made
dc = double crochet
rep = repeat
rnd = round
RS = right side
sc = single crochet
sk = skip
sl st = slip stitch
st(s) = stitch(es)
WS = wrong side
Find this pattern and more in our free eBook The Most Popular Patterns for Afghans: 16 Knit and Crochet Afghan Patterns from Lion Brand.
Read NextBeginner Crochet Baby Afghan
Your Recently Viewed Projects
Thanks for your comment. Don't forget to share!
Inukshuk84
Apr 07, 2016
This baby blanket is a wonderful project to use up your scrap balls of yarn on. Colours you might think would never go together will look amazing combined in this sort of blanket. You could adapt this blanket to suit just about anyone and I'm sure it would be treasured when received as a gift.
Crochet Knitting
Nov 21, 2015
I made this blanket(twice). As it has a border I just used the starting chain once. I have photos on my blog http//hobbycrochetknitting.blogspot.com.es/2015/11 == /lace-stipe-blanket.html
joannesnyder 11629 85
Apr 21, 2014
I just finished this little blanket and wanted to say how totally beautiful it turned out. I also had a considerable amount of trouble starting on the second half, and am not sure why the pattern is written that way. But, the vibrant colors are just lovely and I can hardly wait to give it to the new parents.
PDawn63 5466181
Feb 24, 2014
I think the reason for making it in halves is so that both completed edges are decorative instead of one edge (the starting edge) being the plain chained one.
bobbylonardo 50143 99
Feb 24, 2014
Since it gets a border all around, I don't see why it needs to be worked in halves. The starting chain will be covered by the border. I would just start at one end and not bother with the crocheting in the "back bumps" (which I hate to do). Pretty pattern.
lynrid2256 0315509
Feb 23, 2014
Hi, I also would like to know why its done in two halves, I will make it but not in to halves cant see the reason for that love the pattern in it.
parrina 5458193
Feb 23, 2014
You can copy and paste the pattern to a new Word page. Just hold down left click on mouse and hold and move down the pattern. Everything should have a blue highlight. When at the end right click and menu will pop down, pick the one that is copy and then go to your new word page and right click and paste the instructions to the new word page. Save, and print, and you have a copy to take with you.
juanitanoble 73984 56
Apr 08, 2013
I would like to make this in a larger (longer) size. Is there an easy way to convert it? (In the past, when I've tried to make things larger, the pattern gets all messed up.)
mrswallygator 0443 187
Apr 08, 2013
I just printed this by using the print button on the upper right hand corner box that opens up .
Jenn0615
Apr 08, 2013
The print button is there just put your mouse over the P all the way on the right where is shows facebook etc..
WillowRaven
Apr 08, 2013
I agree, I would like to be able to print this out as I often take my craft patterns with me when I'm going to appointments and such, and my computer is not available. Even a 'save as pdf file' would be an idea.
DJFRainbow
Apr 08, 2013
This would be a lot easier to make if I could print it. What happened to the print button?
craftimom 4910920
Apr 08, 2013
Put your cursor on the blue "P" just below stars at the start of the pattern. Another box will drop down with lots of choices. The print button is there.
DJFRainbow
Apr 08, 2013
Whoops. Well as usual I was unable to read the pictures. And I thought the P's were for pinterest! That's what I get for thinking. Thanks for clearing this up for all of us.
Report Inappropriate Comment
Are you sure you would like to report this comment? It will be flagged for our moderators to take action.
Thank you for taking the time to improve the content on our site.