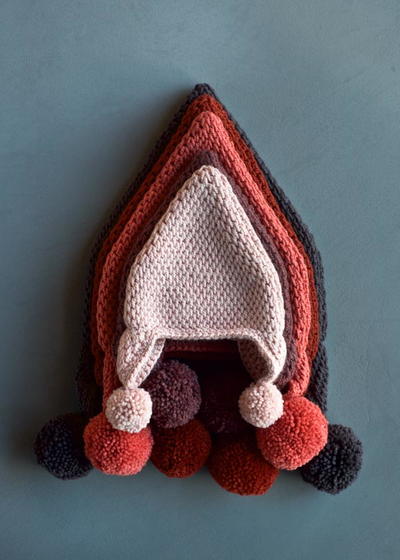
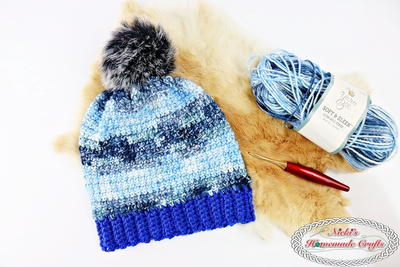
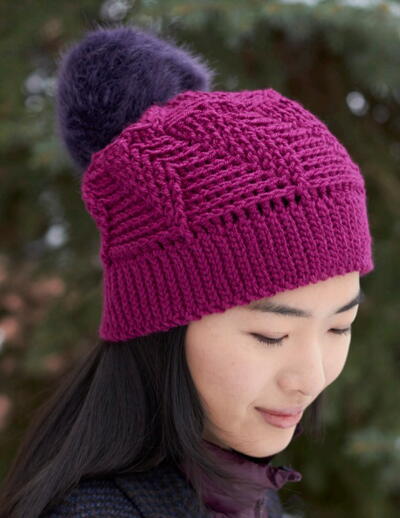
Radiant Orchid Pom Hat

Pom poms are one of the hottest trends in crochet. This playful little accent is a wonderful way to add some spunk to any of your crochet patterns, such as this crocheted hat. The Radiant Orchid Pom Hat is both trendy and functional. It's an intermediate crochet pattern that is created by following an unexpected crochet stitch pattern. The faux fur pom pom is sewn on at the end, so you can always leave it off if you prefer a more basic beanie.

Crochet HookH/8 or 5 mm hook
Yarn Weight(4) Medium Weight/Worsted Weight and Aran (16-20 stitches to 4 inches)
MATERIALS
-
Canadiana (100 g/3.5 oz;187 m/205 yds)
Main Color (MC) Deep Orchid (10332), 1 skein - Size U.S. H/8 (5 mm) crochet hook or size needed to obtain gauge.
-
Faux Fur Pompom (0 g/ oz;0 m/0 yds)
Pompom Aubergine (01323), 1 pompom
SIZE
One size to fit average woman.
GAUGE
14 sc and 17 rows = 4” [10 cm].
INSTRUCTIONS
Ribbing: Ch 13.
1st row: (RS). Working in back loops only, 1 sl st in 2nd ch from hook. 1 sl st in each ch across. Turn. 12 sts.
2nd row: Working in back loops only, 1 sl st in each of next 12 sl st. Turn.
Rep 2nd row until work from beg measures 18" [45.5 cm], ending on a WS row.
Do not fasten off.
Join back seam: Working in back loops only, sl st last row and rem loops of foundation ch tog. Do not fasten off. Turn work and proceed as follows:
Note: Ch 3 at beg of rnd does not count as st.
Beg working in rnds: 1st rnd: Ch 3. Work 70 dc evenly around. Join with sl st to first dc. 70 dc.
2nd rnd: Ch 3. (1 dcfp around next dc. 1 dcbp around each of next 9 dc) 7 times. Join with sl st to first dcfp.
3rd rnd: Ch 3. (1 dcfp around each of next 2 sts. 1 dcbp around each of next 8 sts) 7 times. Join with sl st to first dcfp.
4rd rnd: Ch 3. (1 dcfp around each of next 3 sts. 1 dcbp around each of next 7 sts) 7 times. Join with sl st to first dcfp.
5th rnd: Ch 3. (1 dcfp around each of next 4 sts. 1 dcbp around each of next 6 sts) 7 times. Join with sl st to first dcfp.
6th rnd: Ch 3. (1 dcfp around each of next 5 sts. 1 dcbp around each of next 5 sts) 7 times. Join with sl st to first dcfp.
7th rnd: Ch 3. 1 dcbp around first st. (1 dcfp around each of next 5 sts. 1 dcbp around each of next 5 sts) 6 times. 1 dcfp around each of next 5 sts. 1 dcbp around each of next 4 sts. Join with sl st to first dcbp.
8th rnd: Ch 3. 1 dcbp around each of next 2 sts. (1 dcfp around each of next 5 sts. 1 dcbp around each of next 5 sts) 6 times. 1 dcfp around each of next 5 sts. 1 dcbp around each of next 3 sts. Join with sl st to first dcbp.
9th rnd: Ch 3. 1 dcbp around each of next 3 sts. (1 dcfp around each of next 5 sts. 1 dcbp around each of next 5 sts) 6 times. 1 dcfp around each of next 5 sts. 1 dcbp around each of next 2 sts. Join with sl st to first dcbp.
10th rnd: Ch 3. 1 dcbp around each of next 4 sts. (1 dcfp around each of next 5 sts. 1 dcbp around each of next 5 sts) 6 times. 1 dcfp around each of next 5 sts. 1 dcbp around next st. Join with sl st to first dcbp.
11th rnd: As 6th rnd.
12th rnd: Ch 3. (1 dcfp around next dc. Skip next st. 1 dcbp around each of next 8 dc) 7 times. Join with sl st to first dcfp. 63 sts.
13th rnd: Ch 3. (1 dcfp around each of next 2 sts. Skip next st. 1 dcbp around each of next 6 sts) 7 times. Join with sl st to first dcfp. 56 sts.
14th rnd: Ch 3. (1 dcfp around each of next 3 sts. Skip next st. 1 dcbp around each of next 4 sts) 7 times. Join with sl st to first dcfp. 49 sts.
15th rnd: Ch 3. (1 dcfp around each of next 4 sts. Skip next st. 1 dcbp around each of next 2 sts) 7 times. Join with sl st to first dcfp. 42 sts.
16th rnd: Ch 3. (1 dcfp around each of next 4 sts. Skip next st. 1 dcbp around next st) 7 times. Join with sl st to first dcfp. 35 sts.
17th rnd: Ch 3. 1 dcbp around first st. (1 dcfp around each of next 3 sts. Skip next st. 1 dcbp around next st) 6 times. 1 dcfp around each of next 3 sts. Skip next st. Join with sl st to first dcbp. 28 sts.
18th rnd: Ch 3. Skip first st. (1 dcfp around each of next 2 sts. Skip next st. 1 dcbp around next st) 6 times. 1 dcfp around each of next 2 sts. 1 dcbp around next st. Join with sl st to first dcbp. 21 sts.
Fasten off leaving a long end. Draw end tightly through rem sts and fasten securely.
Sew Pompom to top of Hat.
Read NextTimeless Boho Beanie
Your Recently Viewed Projects
Thanks for your comment. Don't forget to share!
princess6860504
Nov 28, 2017
I am surprised to see that this hat requires a medium (4) weight worsted weight yarn. The picture does not look like that. It looks like the yarn she used is much more exotic and fancy. Can I make this using Lion Brand Landscapes? WOW, I would love it with that yarn. I might not get the same effect. The pretty raised up stitches on the top of the hat might be lost in the changes colors of the Landscapes yarn.
mulberrygalprinces s
Nov 27, 2017
This is so cute. It has my grand daughters name all over it. Not only is it her favorite colors but it has a Pom Pom, which she loves. And after reading thru the directions, I can see that it just may turn out to be my favorite too. It's very easy.
JaneEK
Sep 03, 2017
First of all, Im going to assume that dcfp and dcbp mean Front Post Double Crochet and Back Post Double Crochet respectively. Im not sure why the author didnt choose to use the standardized terms. Secondly, there is no photo at the top of the article. The only photo that shows up is the tiny thumbnail in the Recently Viewed Projects area. Is there any way to fix this? I cant see any details of the hat.
Cheryl Y
Dec 18, 2016
I love the look of this Radiant Orchid Pom Hat! After reading the directions that are right here on this page, I am sure it will work out great! I'll be making a few of these before Christmas for last minute gifts. I'll also be making my own Pom pom, I can't see paying for one if you can make your own. They are so easy to do.. Not sure the colors yet, but the out come should be as nice as the one pictured. Thank you for sharing this beautiful free crochet pattern.
eidiliat 2959436
Jan 28, 2014
I made this hat with Caron's Simply Soft in off-white and it came out beautifully. I made my own pom pom with light sage green mohair. My very discerning daughter asked me for it!
kaleemoosie 651067 9
Jan 21, 2014
I just finished one of these today in Peruvian Highland Bare Wool without a pom pom and I love it. People think it is knitted. It was easy to do but required some focus to keep the numbers straight. I love the way it turned out. I am starting another one tomorrow for a friend and will probably make three of four more. It is thick and soft and really quite striking. Thank you to Yarnspirations for this pattern.
Report Inappropriate Comment
Are you sure you would like to report this comment? It will be flagged for our moderators to take action.
Thank you for taking the time to improve the content on our site.